Update 09.03.2011: removed SAN attribute flag as it is not necessary.
Many of windows administrators requires to setup SSL on their web servers and mostly they wish to use certificates with the Subject Alternative Name extension that allows to map a single certificate to a multiple web sites. For example, you want to use a single certificate for https://www.domaon.com and https://owa.domain.com. In that case you need to have multiple subjects in the certificate. However X.509 certificates don't support multiple subject fields. To resolve this issue, Subject Alternate Name extension is used. You can add multiple (even wildcard) subjects to a certificate.
Some time ago (in the case of Windows 2000 and Windows Server 2003), administrators had to use Enrollment Web Pages or use certreq.exe utility in conjunction with a custom INF file (not user-friendly way) because there is no way to generate a custom request from Certificates MMC snap-in. The life was beautiful until Windows Vista and Windows Server 2008 were released. Administrators tried to use a web enrollment to enroll computer certificates for a new OSs. And heck, this hadn't worked! Yes, old XEnroll ActiveX control is not supported by Windows Vista and higher. Administrators had to install update: KB922706 that adds CertEnroll (native for Windows Vista and higher) ActiveX control. And another heck, there is no option to enroll computer certificates at all! Many administrators overlooked extremely powerful updated Certificates MMC snap-in. Now it is very-very easy to enroll a certificate with a custom SAN extension.
Prepare certificate template
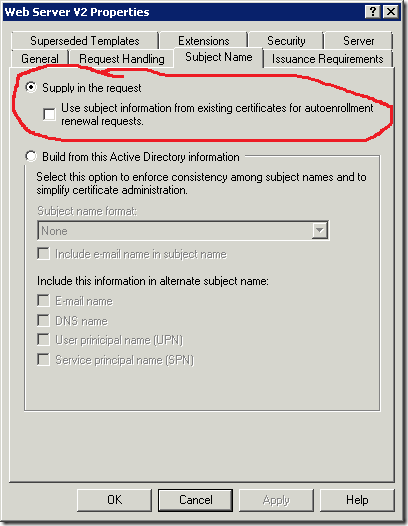
Most certificate templates are configured to build a subject from Active Directory. However this is not common for SSL certificates, because they usually use custom subject name instead of computer's FQDN. Therefore it is necessary to configure certificate template, that allows subject name supplying within certificate request. If you use default WebServer template, no additional steps are required. If you use custom certificate template you must ensure if the subject name is constructed from certificate request as shown:

In addition you must assign Read and Enroll permissions in the Security tab for your web server *computer* account or a custom global or universal group that contains required computer accounts.
Prepare Certification Authority
Make sure if certificate template is supported by issuing CA. Run CertSrv.msc MMC snap-in, expand your CA name and select Certificate Templates node. If required template is listed in the window, no additional steps are required. Otherwise right-click on the node, click New –> Certificate Template to Issue. In the list select required template and click Add.
Certificate enrollment
- Log on to the web server using domain account with local administrator permissions.
- On the Windows desktop
,click Start, and then click Run. - In the Run dialog box type mmc, and then click OK. If User Account Control is enabled, enter required account credentials or just click Yes on consent window.
- In the Console1 window, click File, and then click Add/Remove Snap-in.
- In the Add/Remove Snap-in dialog box, click Add.
- In the Add Standalone Snap-in dialog box, click Certificates and switch radiobutton to Computer account and click Next.
- In the Select computer dialog box use Local computer option (default value), click Finish and click Ok.
- Right-click on Personal node, click All Tasks and click Request new certificate.
- In the Before you begin page you can learn about certificate enrollment wizard. Click Next.
- If Select Enrollment Policy dialog box appear, select appropriate enrollment policy and click Next. You should see something like this:

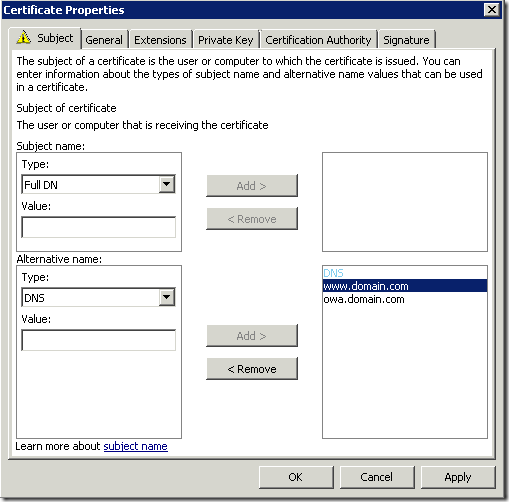
- Select certificate template, and click the warning message and you will see the following dialog box:

- you may leave Subject field as empty if you decide to use subject alternative name extension. Expand drop-down Type list and select proper SAN format. For SSL certificates DNS type is common. In the value edit box type a name in the corresponding format and click Add. Repeat the procedure so mush times as it is necessary and click Ok when all SAN fields are complete.
- You will be returned to Certificate Enrollment wizard. You may notice that warning message is disappeared.
- Click Enroll to enroll a certificate.
Note: I advice to leave Subject field as empty in the case when you use multiple SAN fields. In that case Subject filed will be empty and one of the SANs will be used by clients. In addition, SAN extension will be marked as critical, because this will the only extension that will allow to identify server name.
Tip: what means "extension is marked as critical"? Perhaps you remember one cool Slade song:
"You know what my freedom means to me
What it means, what it means to me
Just exactly what my freedom means to me"This means that if an application see any critical extension, the application MUST process this extension. If critical extension is empty or unclear for that application (cannot recognize extension contained value), application MUST reject the certificate.
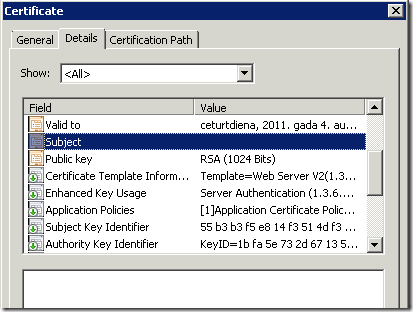
Here are some issued certificate screenshots:
- Certificate view:

- Empty Subject field

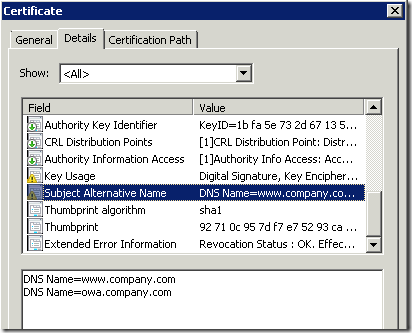
- SAN extension:

See that SAN extension is marked as critical (yellow sign on the extension icon), as said this is because we have empty Subject field. There are no addition configuration steps required, because SAN criticality flag is automatically determined by CA policy module.
HTH
Vadims, generally good article but I think you misunderstand the purpose of EDITF_ATTRIBUTESUBJECTALTNAME2. This flag allows a user to submit a request to the CA with specifying additional attributes containing a SAN. This is actually a very sensitive operation and not recommended to be turned on. You really only want to do this if your templates require manager approval. You should not need to turn this flag on if the certificate request itself contains the SAN extension.
Ok, I'll check TechNet again. Probably this is the case.
> Можно ли использовать SAN при Autoenrollment?
можно. Если шаблон настроен на построение имени из АД, то выберите нужный тип SAN в настройках шаблона. Если имя строится вручную из запроса, тогда настройте вкладку Subject в шаблоне на Supply In Request и включите галку, что имя копируется из запроса обновления сертификата. По причинам безопасности такие запросы должны вручную подтверждаться оператором CA на вкладке Issuance Requirements. Там же переставьте переключатель в valid existing certificate. В этом случае первичный запрос должен выполняться вручную (автоэнроллмент не сможет выполнить первичный запрос), а обновление сертификата уже может выполняться автоматически через автоэнроллмент. Вот такая идея.
Post your comment:


Comments: