In previous post I gave a short intro to Software Restriction Policies (SRP) and today we will talk about basic principles and management UI.
As already said, SRP is a whitelisting technology, therefore it works under the following principle: you are not allowed to run (launch) anything that is not explicitly allowed. Although, SRP can work in blacklist mode, it is not so efficient as in a whitelist mode.
How to launch SRP console?
SRP is a part of group policy and is configured by the Group Policy Editor. In order to launch SRP on a standalone machine, run the following:
- Start –> Run… –> type”secpol.msc”
to edit SRP in a domain environment, do the following:
- Start Group Policy Management Console (GPMC)
- Create new or edit existing Group Policy Object (GPO)
- Expand:
Computer Configuration\Policies\windows Settings\Security Settings and select Software Restriction Policies:
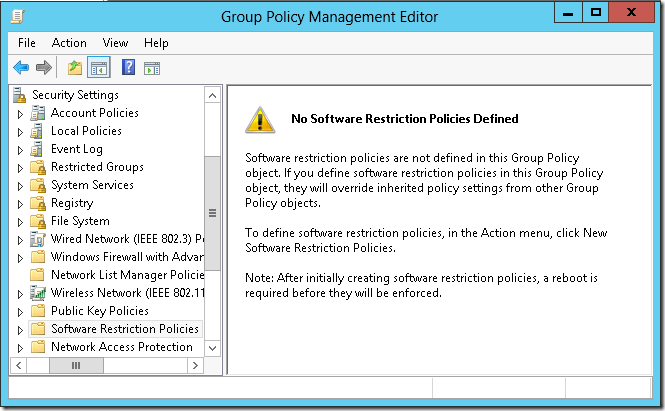
in domain environments you can define SRP under User Configuration node. But this is a subject for a separate talk.
Creating new SRP
To define SRP, in the Action menu, click New Software Restriction Policies. Don’t forget to restart computer to make SRP effective. Once you create new SRP, you will see two nodes and three entries:
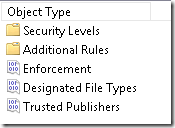
Here is a quick intro to each node and section:
Security Levels
this node displays possible default security level and select one:

Here you can choose SRP mode: whitelist or blacklist. By default it acts as blacklist. Just double-click on desired level and make it default. At this point we don’t need to switch security level.
Additional rules

This is the main node where you will add exceptions (or rules) for your whitelist (allowed file list). We will talk about them in next posts.
Enforcement
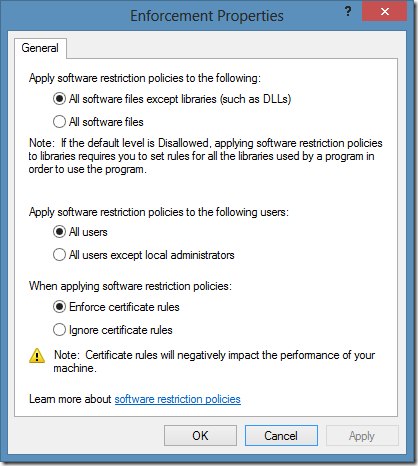
Enforcement entry specifies how strict is SRP. by default SRP doesn’t apply to DLL files. For the start you should use default setting and apply DLL checking when you are familiar with SRP and installed applications. When DLL checking is enforced, it protects you from DLL Hijacking.
Many administrators think that only end users should be protected by SRP. However, this is wrong assumption. In 99% of all malware infections are administrators, because they can install applications and write to system folders. Therefore it is *highly* recommended to apply SRP to all users without exceptions, especially to administrators.
SRP allows you to create certificate rules (something similar to Publisher rules in Applocker) and it is very useful feature. Although, there is a note about performance impact when you enable certificate rules, this is not the case for modern hardware. I would recommend to enable them.
Designated File Types
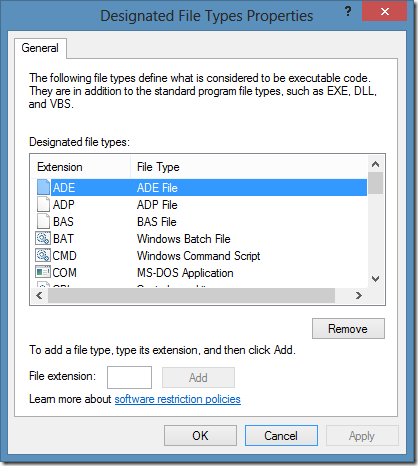
This entry defines a list of file extensions that are checked by SRP. If a user attempts to run a file with extension that is listed here, SRP checks whether there is appropriate rule. If there is a rule that allows file execution (either by path, hash or certificate rule) with allowed status, file is executed, otherwise it is blocked by default. At this point I would recommend to remove LNK extension (shortcut files) from the list (in next post I’ll explain why). You can edit the list as necessary.
Trusted Publishers
And the last entry is trusted publisher container configuration:
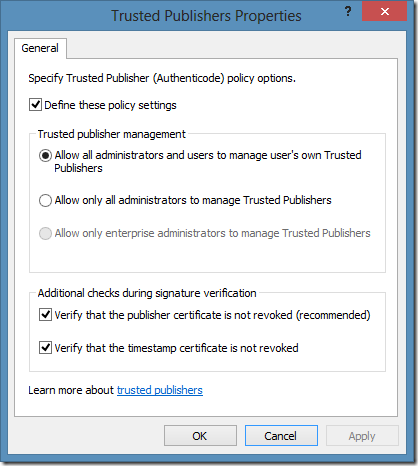
You should configure these settings as shown in the figure. Trusted Publisher settings affects certificate rules. If you wish to allow all software issued by a specified issuer (signer) you can create certificate rule by specifying particular certificate. This certificate is automatically installed in Trusted Publishers container and is propagated to all users.
In this post we explored how to create SRP and management UI. In the next post (or posts) we will talk about exception (rule) creation.
Post your comment:


Comments: