Retired Microsoft Blog disclaimer

This directory is a mirror of retired "A Microsoft Premier Field Engineer's blog on Cloud and Security Technologies" TechNet blog and is provided as is. All posting authorship and copyrights belong to respective authors.

Posts on this page:

Original URL: https://blogs.technet.microsoft.com/xdot509/2013/06/10/pki-tip-certificate-store-shortcuts/
Post name: PKI Tip: Certificate Store Shortcuts
Original author: chdelay
Posting date: 2013-06-10T19:44:19+00:00


For those that spend time managing certificates I wanted to highlight some shortcuts for certificate management. 

For a while now we have been able to directly access the Certificate MMC targeted for the Current User by launching certmgr.msc.

Which opens up the Certificate MMC targeted for the Current User as seen below.

The Bad News

However, until Windows 8 / Windows Server 2012 there has not been an easy way to open up the Certificates MMC targeted for the local computer.  In the past you had to perform the following steps:

(Windows 7) Click Start Button, type mmc.exe, press Enter key, in the MMC go to File in the menu bar, Click Add/Remove Snap-in…, select Certificates, click Add, select Computer account, click the Next button, select Local computer, click the Finish button, and then finally click the OK button.

Yeah, a lot of work just to open up the Certificates MMC targeted for the local computer. 

The Good News

In Windows 8 / Windows Server 2012 we just need to do the following:

Type certlm.msc and hit the Enter key.

And Voila, Certificates MMC targeted for the Local Computer!

The Great News

With some work you can now enable this in down-level clients such as Windows 7.

If you navigate to C:\Windows\System32\ on your Windows 8 machine you will find certlm.msc.

Copy certlm.msc and paste it into C:\Windows\System32 on a Windows 7 machine for example.

Now, when you want to access the Local Computer certificate store through the MMC on your Windows 7 machine, you just have to launch certlm.msc!

-Chris

Original URL: https://blogs.technet.microsoft.com/xdot509/2013/06/06/operating-a-pki-ca-certificate-renewals-and-ocsp/
Post name: Operating a PKI: CA Certificate Renewals and OCSP
Original author: chdelay
Posting date: 2013-06-06T12:02:57+00:00


There are some effects that CA Certificate Renewal has on OCSP. OCSP provides revocation checking information for clients. For, each CA an OCSP Responder has a Revocation Configuration. Each Revocation Configuration has an OCSP Signing Certificate associated with it. The private key of the OCSP Signing Certificate is used to sign OCSP Responses so that clients can verify the authenticity of those responses.

As explained in the following article: http://technet.microsoft.com/en-us/library/cc754774.aspx

Online Certificate Status Protocol (OCSP) Response Signing certificates need to be signed by the same certification authority (CA) key that was used to sign the end-entity certificates that they provide status for.

After a CA key is renewed, the CA will be using the new key to sign newly issued certificates. In the period between the time a CA certificate is renewed and the expiration date of the original CA certificate, the CA cannot issue or renew OCSP Response Signing certificates, which may prevent an Online Responder from signing OCSP responses.

The Solution

The solution to this issue is to configure the CA to issue certificates based on information about the issuer in the request. In other words the OCSP Responder normally sends information about the issuer in the request so that the CA can sign the new OCSP Response Signing certificate with the same key pair it was previously signed by. So, we just need to configure the CA to honor these requests. In fact if you have an OCSP Responder setup in your environment, you may have noticed this event in the Application Log:

In order to enable this feature you need to run the following command on the CA and then restart the CA Service: “certutil -setreg ca\UseDefinedCACertInRequest 1”

So, once you run this command your existing Revocation Configuration will be able to properly renew it’s OCSP Signing Certificate, even after the Issuing CA Certificate is renewed. However, if you do need to renew your CA Certificate with a new key pair you do need to setup a new Revocation Configuration to support that new key. Instructions for configuring a Revocation Configuration are available here: http://blogs.technet.com/b/askds/archive/2009/06/29/implementing-an-ocsp-responder-part-iii-configuring-ocsp-for-use-with-enterprise-cas.aspx.

To summarize you will need to perform the following actions to enable your OCSP to support a Issuing CA whose certificate has been renewed with thenew key pair:

  • Run the following command on your CA: “certutil -setreg ca\UseDefinedCACertInRequest 1”
  • Restart the CA Service
  • Setup a new Revocation Configuration after your CA Certificate is renewed

To illustrate the end result, we can view the original Issuing CA Certificate:

Notice that the Subject Key Identifier matches the Authority Key Identifier in my original OCSP Signing Certificate:

Here is my renewed CA Certificate:

Once I renewed my CA Certificate, configured my CA as mentioned earlier, and configured a new Revocation Configuration you can see that the Subject Key Identifier in the new CA Certificate matches the Authority Key Identifier field in OCSP Signing Certificate for the new Revocation Configuration:

Summary

This is my third blog article relating to CA Certificate Renewal. Hopefully, these articles have given you the information you need to understand CA Certificate Lifecycles, the impact of renewing a CA Certificate, and how to successfully renew your CA Certificates with minimal impact to your environment.

Here are links to the previous two articles:

Operating a Windows PKI: Certification Authority Certificate Lifecycle and Renewals

Operating a Windows PKI: Renewing CA Certificates


-Chris

Original URL: https://blogs.technet.microsoft.com/xdot509/2013/06/06/operating-a-windows-pki-renewing-ca-certificates/
Post name: Operating a Windows PKI: Renewing CA Certificates
Original author: chdelay
Posting date: 2013-06-06T08:33:56+00:00


In the previous blog posting (Operating a Windows PKI: Certification Authority Certificate Lifecycle and Renewals) I covered considerations for the CA Certificates lifecycle and when CA certificates should be renewed.  In this blog posting, I am going to cover some additional considerations and walkthrough the process of renewing CA Certificates.

CRLNameSuffix

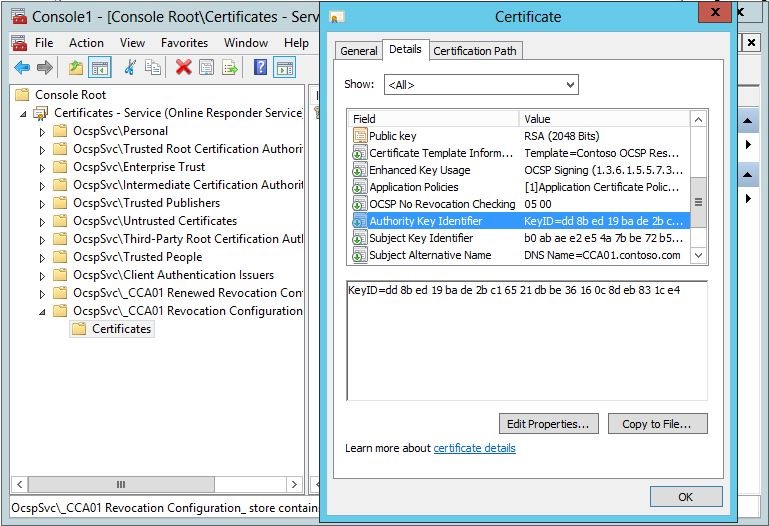
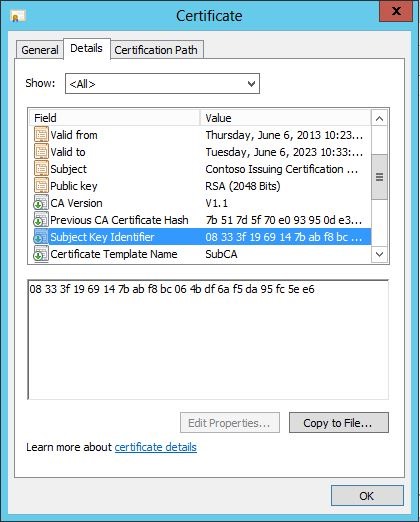
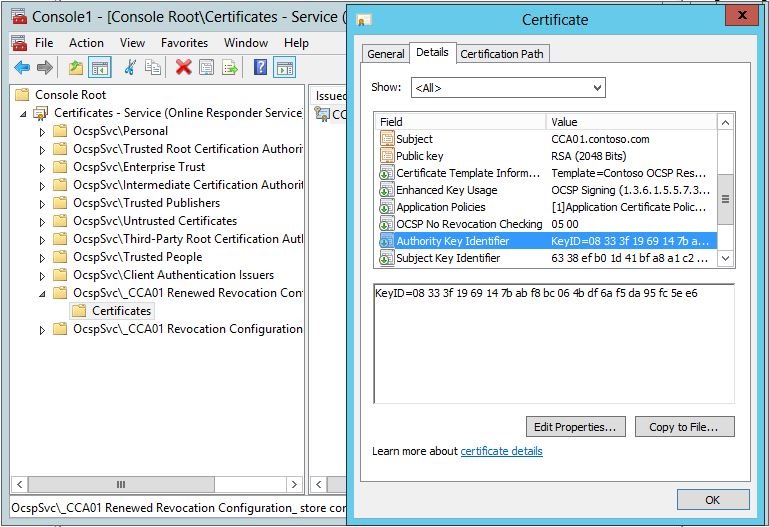
Two important things to remember.  If you renew a CA certificate, you are going to have multiple CA certificates, the previous certificate and the renewed certificate.  If you renew a CA certificate with a New Key Pair, the CA is going to have to sign multiple CRLs.  It will have to sign CRLs with the previous key, assuming that CA certificate is time valid.  Also, the CA will need to sign CRLs with the new key pair.

To ensure that the renewal works properties you must have the CRLPublicationURLs registry key configured properly.  Specifically, when you configure the CA to publish CRLs or to list an HTTP location in the CDP extension you will want to ensure that the CRLNameSuffix property is defined.  For example, below is the post-configuration script for a Root CA:

certutil -setreg CA\CRLPublicationURLs "1:%WINDIR%\system32\CertSrv\CertEnroll\%%3%%8%%9.crl\n2:http://pki.fourthcoffee.com/certenroll/%%3%%8%%9.crl\n10:ldap:///CN=%%7%%8,CN=%%2,CN=CDP,CN=Public Key Services,CN=Services,%%6%%10"

In this line:

1:%WINDIR%\system32\CertSrv\CertEnroll\%%3%%8%%9.crl

And this line:

2:http://pki.fourthcoffee.com/certenroll/%%3%%8%%9.crl

You will notice that there is a %%8 before %%9.crl.  After these scripts are run the additional % signs will be stripped.  The additional % are required for the script since it is a batch file.  So, the resulting variable is %8.  The variable %8 stands for CRLNameSuffix.  This variable will tell the CA to affix an incremental number to CRL files if they are signed by a new key pair.  So, the CRL signed by the CAs first key will be named “FourthCoffee Root Certification Authority.crl”.  The CRL signed by the second key will be named “FourthCoffee Root Certification Authority(1).crl, and so on.

Changing the CA Certificates Validity Period

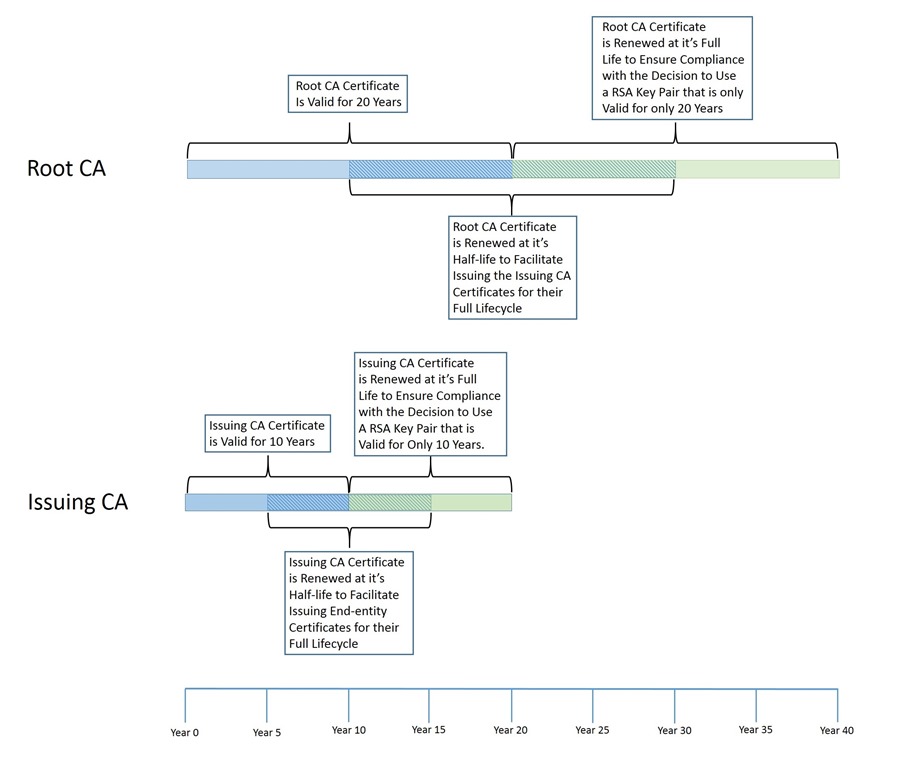
In rare circumstances you may want to change how long CA Certificates are valid for, when renewing the CA certificate.  So, let’s use the example of a two tier PKI hierarchy.  If you want to modify the validity period for the subordinate/issuing CA, you will have to modify the ValidityPeriodUnits and ValidityPeriod settings on the Root CA.  These two registry settings will determine for how long the Root CA issues certificates.  Validity PeriodUnits is set to a number and ValidityPeriod is set to a measurement of time.  For example, if ValidityPeriodUnits is set to “10”, and ValidityPeriod is set to “Years” the Root CA will issue certificates that are valid for 10 years.  Both of these settings are located in the registry at HKLM\System\CurrentControlSet\Services\CertSvc\Configuration\<CAName>\.  Optionally, the registry can be configured with the “certutil –setreg” command.

To change the Validity Period for the Root CA you can configure a CAPolicy.inf.  To create a CAPolicy.inf file that changes the lifietime of the certificate to 30 years, you would type the following into a text file, and save it with the name CAPolicy.inf in the C:\Windows directory,:

[Version]
Signature= "$Windows NT$"

[Certsrv_Server]
RenewalValidityPeriod=Years
RenewalValidityPeriodUnits=30

Then you would renew the CA certificate.

However, I have not been able to alter the resulting CA certificates lifetime using this method.  I have, only tested this with Windows Server 2012.  It is my understanding that his has worked in previous versions of the OS but have not been able to verify.  Additional information on the CAPolicy.inf file is available here: http://blogs.technet.com/b/askds/archive/2009/10/15/windows-server-2008-r2-capolicy-inf-syntax.aspx

Changing the CA Certificates Key Size

The following steps can be taken to change the Key Size for a renewed CA certificate.  First, it should be noted that if you are changing the key size, you are changing the key.  Therefore, to increase the Key Size you will need to renew the CA certificate with a new key pair. 

The first step is to create a CAPolicy.inf file on the CA for which you wish to increase the Key Size.  The format of the file, is as follows:

[Version]
Signature= "$Windows NT$"

[Certsrv_Server]
RenewalKeyLength=4096

You can change the RenewalKeyLength to the size of the key desired.

Next, you will renew the CA certificate with a new key pair.  Instructions for CA Certificate renewal, will be covered later in the article.

Changing the CA Certificates Hashing Algorithm

I have had one situation where a customer wanted to change the Hash Algorithm for  a CA Certificate.  The customer had installed an Issuing CA.  The Issuing CA’s certificate used SHA-256 as the hash algorithm.  The customer wanted to change the hash algorithm to the less secure, but more compatible SHA1.  Assuming, a two-tier hierarchy, you can change the Hash Algorithm in the CA certificate on either the Root or Issuing CA by modifying the following registry key HKLM\System\CurrentControlSet\Services\CertSvc\Configuration\<CAName>\CSP\HashAlgorithm on the Root CA and then renewing either the Issuing or Root CA, depending on which one for which you are changing the Hash Algorithm. 

The customer I was working with had the Hashing Algorithm on the Issuing CA set to SHA-256.  So, we changed the HashAlgorithm registry key on the Root CA from “SHA256” to “SHA1”. 


Renewing a Root CA Certificate

The video below covers the steps required to renew a Root CA Certificate.

Renewing a Root CA Certificate


Renewing an Issuing CA Certificate

The video below covers the steps required to renew a Root CA Certificate

Renewing a Issuing CA Certificate

Conclusion

You should now have the information and steps you need to understand CA Certificates Lifecycle and how to renew CA Certificates.

Original URL: https://blogs.technet.microsoft.com/xdot509/2013/05/27/operating-a-windows-pki-certification-authority-certificate-lifecycle-and-renewals/
Post name: Operating a Windows PKI: Certification Authority Certificate Lifecycle and Renewals
Original author: chdelay
Posting date: 2013-05-27T14:29:57+00:00


Certification Authority Certificate Lifecycle and Renewals

In this blog post I am going to discuss managing the Lifecycle for CA Certificates as well as cover the actual process to renew CA Certificates.

Number of Tiers

If an organization is looking to deploy a new PKI, we usually first discuss the type of overall design in terms of hierarchy. There are typically 3 types of hierarchies that we see deployed. There is the Single Tier PKI Hierarchy which consists of a single CA that is both a Root and Issuing CA. There are several drawbacks with a Single Tier Hierarchy including the fact that it is not a very secure or scalable solution. Then there is a Two Tier PKI Hierarchy. A Two Tier PKI Hierarchy is a more secure solution since the Root CA is kept offline, which prevents it from being compromised via the network. A Two Tier Hierarchy also is much more scalable since you can always add additional Issuing CAs to the hierarchy to meet the organization’s needs. There is also a Three Tier Hierarchy. A Three Tier hierarchy is typically used in very large organizations that either require a more complex solution or need the 3 tiers to meet some security objective.

CA Certificate and End-entity Certificate Validity Periods

Typically a Two Tier hierarchy meets most organizations needs in terms of both security and scalability. So, for the remainder of this blog posting I will be discussing certificate lifetimes in relation to a Two Tier PKI Hierarchy. Once a customer has decided the overall type of design, we then start to discuss the various configuration options for the Certification Authorities. One of those discussions is around the lifetime of the CA Certificates and RSA key pairs. When discussing these lifetime there are several things to take in to consideration. Typically, I discuss the certificate lifetimes based on a “bottom to top” approach. My first question typically is: How long of a lifetime do you plan on issuing end-entity certificates for? A lot of organizations are familiar with getting 1 year or 2 year certificates from a 3rd party CA. So, most customers typically plan on issuing end-entity certs for 2 years. If you are pretty comfortable with issuing certificates for 1 or 2 years that does have some implication for the lifetimes of the CA certificates and RSA key pairs.

The implication for CA certificate lifetimes and RSA key pairs is around enrollment. If you are going to want to issue certificates for either 1 or 2 years, you will most likely want to have your Issuing CA be valid for at least double that period of time. So, this would lead to a discussion on potentially have either a 4 or 5 year lifetime for the Issuing CA Certificate and RSA key pairs. So, why should the lifetime of the CA certificate be twice the lifetime of the issued certificates? Well, the answer it turns out is pretty simple. An Issuing CA cannot issue certificates that are valid for longer than its own lifetime.

So, based on this information we know that the Issuing CA will need to have at least a lifetime of 2 years if we are issuing two year certs. However, if you make the CA only valid for 2 years you will only be able to issue 2 year certs on the first day that the Issuing CA is created. This is because on the following day the CAs certificate lifetime will be 1 day short of two years. So, at this point you would only be able to issue certs that are valid for 1 day short of 2 years. So, in this scenario as the CAs lifetime gets shorter and shorter the validity period of issued certificates gets shorter as well.

So, in order to give the CA a long enough validity period to actually be useful we typically make the Issuing CAs cert valid for at least twice the lifetime of issued certificates. Using the same example of issuing 1 and 2 year certificates we can clearly see that making the CA certificate valid for 4 or 5 years will give us a decent amount of time before the CA certificate needs to be renewed. However, you will still eventually run into the situation as described above, where the CA can no longer issue certificates for the full intended lifecycle. So, how do we handle this? What we do? The answer shortly.

When having the discussion around CA certificate lifetimes one of the other questions I have is: Are there situations that may come up where you may have the need to issue certificates for more than 2 years? And it turns out for a lot of organizations there are situations where issuing 3, 4, or even 5 year end-entity certificates make sense. These situations typically involve devices that require a great deal of administrative effort to both request a certificate and then install the certificate once it is issued. Some examples are non-domain joined Windows machines, network appliances, laptops or mobile devices for remote workers. In many situations, organizations may either not have the staffing to replace certificates on these devices every 1 or 2 years, or may not find it financially feasible to do so. In these types of situations you may increase the lifetime of end-entity certificates to reduce the administrative or financial burden that comes with replacing these certificates more often.

If you are going to issue certificates let’s say that are valid for up to 5 years, again you need to consider implementing a CAs whose certificates lifetime is twice or more than twice the lifetime of issued certificates. This design typically forces organizations to consider having Issuing CAs whose certificate validity period is 10 Years. So, now that an organization has decided that it’s issuing CA certificate is going to be valid for 10 years, what about the Root CA? Well for pretty much the same reason as discussed previously the Root CAs certificate validity period is going to be at least twice that of the Issuing CA. This usually leads to the decision to have a Root CA, whose certificate is valid for a period of 20 years.

CA Certificate Renewals

Let’s continue to use the scenario of have a Root CA valid for 20 Years, an Issuing CA valid for 10 years, and issuing end-entity certificates that have a validity period for up to 5 years. So, once my Issuing CA certificate exceeds 5 years in age, I am going to run into the issue where I am no longer able to issue 5 year certificates. How do we handle this situation? In order to provide adequate lifetime for the CA to issue full term certificates, we renew the Issuing CA certificate at it’s half-life.

Below is a graphic that illustrates the CA Certificate Lifecycle (click graphic to expand):

So, remember this example outlined in the graphic above is of a Two Tier PKI Hierarchy with an Offline Root CA, and an Issuing CA. Below is the timing of the CA Certificate Renewals:

  • At t + 5 years, the Issuing CA certificate is renewed with the same key pair, this renewal is to facilitate issuing end-entity certificates for their full life cycle. When the Issuing CA certificate is renewed there will be a new CA certificate with the same key pair. Since, the same key pair is being used there still is only one CRL file generated by the CA.
  • At t + 10 years the Issuing CA certificate will be renewed with a new key pair. This action enforces the 10 year lifetime of the RSA key pair as agreed to when designing the PKI and PKI security. This will create a new CA certificate with a new key pair. This will also force the CA to generate a new CRL file, since there is a new key pair. A CRL signed by the “old” key pair will continue to be generated as long as the CA certificate associated with the “old” key pair is still time valid.
  • At t + 10 years the Root CA certificate is renewed with the same key pair. This renewal is to facilitate issuing, subordinate CA certificates for their full lifetime. A new Root CA certificate will be created with the same key pair. Since the key pair is the same, the CA will continue to publish 1 CRL.
  • At t + 15 years, the Issuing CA certificate is renewed with the same key pair, this renewal is to facilitate issuing end-entity certificates for their full life cycle. When the Issuing CA certificate is renewed there will be a new CA certificate with the same key pair.
  • At t + 20 years, the Root CA Certificate is renewed with a new key pair, this enforces the lifetime of the RSA key pair. This action enforces the 10 year lifetime of the RSA key pair as agreed to when designing the PKI and PKI security. This will also force the CA to generate a new CRL file, since there is a new key pair. A CRL signed by the “old” key pair will continue to be generated as long as the CA certificate associated with the “old” key pair is still time valid.

Summary

The purpose of his blog posting was to give a better understanding of when CA Certificates are renewed and why. In my next posting, I will cover some additional considerations for CA Certificate Renewal and cover the steps necessary to renew a CA Certificate.

-Chris

Original URL: https://blogs.technet.microsoft.com/xdot509/2013/05/10/operating-a-windows-pki-removing-expired-certificates-from-the-ca-database/
Post name: Operating a Windows PKI: Removing Expired Certificates from the CA Database
Original author: chdelay
Posting date: 2013-05-10T10:36:05+00:00


Today, I am going to discuss removing expired certificates from the CA database.  Every time a CA issues a certificate it also stores a copy of the issued certificate in the CA database.  Overtime the certificates that the CA issues expire.  Once the certificate expires it is no longer valid.  Therefore, once a certificate expires you can safely remove it from the CA database.  The one exception to this is if have Key Archival configured on the CA.  If you are archiving private keys, you may not want to remove expired CA certificates from the CA database.

Important Note: You should backup the CA including the database and log files prior to deleting any certificates from the database.

Removing expired certificates

Today’s current date is 5/10/2012, and you can see in the screenshot below that I have several issued certificates that are expired.

So, to remove the expired certificates from the CA Database I can run the following command:

certutil –deleterow certs 5/10/2012

As you can see in the screenshot below, 16 rows were deleted.

Now, if I look at the Issued Certificates container in the Certification Authority management console I see that my expired certificates are no longer there.

Note:  The certutil command listed above will only delete ~3000 certificates at a time.  So, if you have a lot of expired certificates you will have to rerun the command several times.

Delete Pending and Failed Requests

Also, if you want to delete any failed or pending requests that were submitted prior to the current day you can use the following command:

certutil –deleterow <today’s date in mm/dd/yyyy format> request


Summary

So, I covered the steps for removing expired certificates from the CA database.  I also covered removing pending and failed requests from the CA database. 

I am looking for a list of topics to cover in future blog postings.  So, if you have a topic you would like me to cover, please submit a comment or contact me at @chdelay on Twitter.