


Historical Content Alert
This is a historical content for Windows NT 4.0 product and is presented for informative purposes only. All content in this directory is copyrighted and owned by Microsoft.Installing Certificate Server
 To install Certificate Server
- Run the Microsoft® Windows NT 4.0 Option Pack Setup program and install Internet Information Server (IIS) if it is not already installed.
- Select Custom setup.
- Select Certificate Server in the Components list box. Internet Information Server (IIS) is selected by default; this is a requirement.
- Select any other optional components desired and click Next to continue with Windows NT 4.0 Option Pack Setup.
Note Installation of individual sub-components of Certificate Server for a partial installation (such as a remote Certificate Server Web Client) is not supported in this release.
At the appropriate point in Windows NT 4.0 Option Pack Setup, the Certificate Server Configuration Wizard will walk you through the process of configuring Certificate Server. Just follow the instructions at each step and click Next to advance to the next step. To go back to a previous step, click Back. To exit the Wizard at any time, click Cancel.
Complete these Configuration Wizard steps to configure Certificate Server
- Introduction. Read the introductory text in this screen and click Next when ready to continue.
- Choose Configuration Data Storage Location. Provide the location used by Certificate Server to store Certificate Authority certificates and the Certificate Server configuration file. This location will be referenced by applications or users when they request or use certificates issued by the server. This Shared Folder should be located on a public network share so that any user can access and install the Certificate Authority (CA) certificate. For this release, it must be located on the machine on which Certificate Server is being installed. You must specify a path name such as c:\public. The text you enter for the shared folder name must begin with a drive letter such as c:\. Relative paths are not allowed.
- Choose Database Location. To modify the default location for the certificate store database, enter a location or click Browse and select the desired location. The default location is Winnt\System32\CertLog.
- Choose Log Location. To modify the default location for the Certificate Server transaction log, enter a location or click Browse and select the desired location. The default location is Winnt\System32\CertLog.
- (Optional) Choose to Show Advanced Configuration. The advanced configuration setup dialog allows you to specify further configuration options. This checkbox for this is unchecked by default.
Click Next when ready to continue.
- If you did not check the Show Advanced Configuration checkbox, the Identifying Information dialog is displayed. Proceed to step 12 for instructions.
If you did check the Show Advanced Configuration checkbox, the advanced configuration setup dialog is displayed. Proceed to the next step for instructions.
- Choose CSP and Hashing. If multiple Cryptographic Service Providers are installed on your system, select the desired Cryptographic Service Provider (CSP) from the list. Microsoft Base Cryptographic Provider is the default. Then select the desired hashing algorithm from the list of algorithms supplied by the selected CSP. MD5 is the default if it is supported by the selected CSP. Otherwise, the first hashing algorithm in the selected CSP is the default.
Note In this version, a single provider, Microsoft Base Cryptographic Provider is the only choice and MD5 hashing is selected by default. Future releases will allow selection of other CSPs and their hashing algorithms.
- Choose to Use Existing Keys. If you have existing keys that you would like to use, click the Use Existing Keys checkbox and select the appropriate key container. Certificate Server private keys are stored in a Microsoft Cryptographic API key container using the selected Cryptographic Service Provider.
This facility is intended for use when restoring Certificate Server, or for reusing keys generated by another application. Certificate Server will check the certificate store for a matching certificate, and if found, use the certificate to generate a certificates file.
If Use Existing Keys is checked and a matching certificate is found in the certificate store, the controls for steps 9, 10 and 11 are disabled.
- Clear the Erase all previous configuration information check box, unless there is existing configuration information that should be preserved.
- Choose the Make this Certificate Server the default check box, unless another server will be the default.
- Choose Certificate Authority Hierarchy.
Note Certificate Authority hierarchies are not supported in this release of Certificate Server.
You can select either:
Root CA. Create a root certificate for the Certificate Authority (CA) being created.
Non-Root CA. Create a certificate request file that you can use to obtain a certificate from another CA. Use this option only if you want to install a non-root CA that will participate in an established CA hierarchy.
The Configuration Wizard automatically generates self-signed signature (root) and key exchange certificates for the CA being created. The certificate file name is based on the server machine name, and use the .crt extension. These are stored in the Shared Folder created in the Choose Storage Location step.
Note If you choose Non-Root CA, only the certificate request file will be generated in the Shared Folder because this CA will be a non-root CA. The signature certificate for a non-root CA must be generated and stored later using the process described in Installing a Certificate Authority Hierarchy.
Click Next when ready to continue. The Identifying Information dialog is displayed.
- Enter Identifying Information. Provide the information for each of the requested identifying items.
Item Information Example Name Certificate Authority name Test Site Certificate Authority Organization Your company Microsoft Corporation Organizational Unit Your organizational unit Beta Support Group Locality Your locality Redmond State Your state Washington Country Your country US Comment An identifying comment For internal use only Click Next when ready to continue.
The Configuration Wizard stores all the configuration information you have specified, and performs the following steps:
- Generates a public/private key pair and self-signed root (site) certificate for this Certificate Server, and installs them in the local machine's key repository and certificate store, respectively.
- Writes the Certificate Server's signature and key exchange certificates to the Shared Folder, and adds the Certificate Server to the list in the Certificate Authority Certificate List Web page. This page allows Web browsers to install the Certificate Authority (CA) certificates.
- Generates a certificate request file to submit to another CA if the Non-Root CA option was selected. In this case, a self-signed root certificate is not generated and stored in the Shared Folder as previously described.
- Writes the Certificate Server's configuration file, CertSrv.txt to the Shared Folder.
- Adds the Certificate Authority service to the system services.
- Performs necessary additions to the system registry.
Unless the Non-Root CA option was selected in the Choose Certificate Authority Hierarchy step, the following message is displayed when setup is complete:

If the Non-Root CA option was selected in the Choose Certificate Authority Hierarchy step so that a Certificate Authority hierarchy can be installed, then the following message (referencing the specified Shared Folder) is displayed instead:
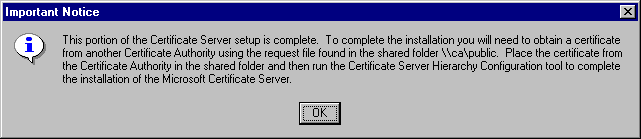
See Installing a Certificate Authority Hierarchy for the steps required to complete installation of Certificate Server into a Certificate Authority hierarchy.
Note The Configuration Wizard configures the Certificate Authority service to start automatically when the operating system loads. To configure the service to start manually, see Configuring the Certificate Authority Service.