


| Original URL: | https://blogs.technet.microsoft.com/xdot509/2015/12/27/transitioning-your-pki-to-sha2/ |
| Post name: | Transitioning Your PKI to SHA2 |
| Original author: | chdelay |
| Posting date: | 2015-12-27T14:53:00+00:00 |
Background
Hashing Algorithms
Hashing Algorithms take variable input and provide a unique fixed length output. Hashing algorithms have a number of desired properties. Those desired properties include that the hash should not be able to be reversed to determine the data that was inputted into the hash. Also, it should not be possible to produce collisions. A collision is when two separate inputs into a hash algorithm produce the same hash.
How a Digital Signature is created
To produce a digital signature data that is going to be signed is passed through a hash algorithm to create a hash.
The resulting hash is encrypted with key. That key is the private key that is part of a private/public key pair. The private key is held securely by the signer and the public key is widely distributed in the form of an X.509 certificate.
The result of the encrypted hash is a digital signature
Verifying a digital signature
To verify a digital signature, the verifier must first retrieve or possess a copy of the signer’s certificate. This certificate includes the public key of the signer.
The verifier must also have a copy of the data or document that was signed. The verifier also must have knowledge of what hash algorithm and what asymmetric cryptographic algorithm were used to create the signature. Information on what algorithms were used for the signature are usually contained in the metadata of the signature. And finally, the verifier must also have a copy of the signature.
The verifier runs the document or data through the same hashing algorithm as the signer. The verifier then decrypts the digital signature with the signer’s public key. The result of the decryption is the hash that was created by the signer. That hash is compared to the hash generated by the verifier. If the hashes match the verifier now knows two things. First, the verifier knows that the data has not been modified since signed by the signer. Second, since the public key decrypted a matching hash, the verifier knows that the document or data was signed with the corresponding private key and thus knows that the identity associated with the signer via the certificate is actually the signer of the data or document.
Impact of Collisions on Certificates
Certificates are digitally signed data, signed by a Certification Authority. If the signature is determined valid using the Certification Authorities public key, then that certificate is understood to have been issued by that Certification Authority assuming information used for chain building also regard that CA as the issuer.
There is a significant problem that is caused if collisions can be created for the hash algorithm that is used to sign a certificate. The issue arises because it provides an opportunity for an adversary to create fraudulent certificates. If an adversary can create a fraudulent certificate whose hash is the same as another certificate, then the adversary can use the signature from another non-fraudulent certificate on the fraudulent certificate. This allows an adversary to create certificates that have the same chain of trust as those signed by that CA. This is the reason that as hashing algorithms become considered broken in the sense that collisions can be created, that they must stop being used in the certificate signing process.
Attacks against SHA1
Example of a current attack against SHA1: https://eprint.iacr.org/2015/967
SHA1 Deprecation
Microsoft SHA1 Deprecation Policy as of 11/26/2015
Public Key Infrastructure’s whose Root CA certificates are installed in the Windows OS through the Microsoft Root Certificate Program will no longer be allowed to issue SSL and Code Signing certificates that are signed using the SHA1 hashing algorithm. This policy will effect certificates that are issued as of January 1, 2016. The official policy can be viewed here: https://technet.microsoft.com/en-us/library/security/2880823.aspx
3rd Party SHA1 Policies
Google: Gradually sunsetting SHA-1 (https://googleonlinesecurity.blogspot.com/2014/09/gradually-sunsetting-sha-1.html)
Mozilla: Phasing Out Certificates with SHA-1 based Signature Algorithms (https://blog.mozilla.org/security/2014/09/23/phasing-out-certificates-with-sha-1-based-signature-algorithms/)
SHA2
Beginning with Windows Server 2008, Windows began supporting Suite-B cryptographic protocols. This support of Suite-B cryptographic protocols includes the support of the SHA2 hashing algorithm. Specifically, SHA256, SHA384, and SHA512 are supported by Windows. Typically, when choosing a SHA2 hashing algorithm SHA256 is selected. I have not run into compatibility issues with SHA384 or SHA512. However, it is more likely that SHA256 would be supported in 3rd party software then SHA384 or SHA512. Also, it is a common practice by 3rdparty Certification Authorities to issue certificates signed using the SHA256 hashing algorithm.
Reconfiguring a PKI to use SHA2 instead of SHA1
The steps below will illustrate how one can reconfigure their PKI so that the CA certificates are signed with the SHA2 hashing algorithm and certificates issued by the PKI are signed using the SHA2 hashing algorithm. This walkthrough is an example of how this can be accomplished on a Two Tier PKI. If you are going to perform these steps in a production environment you should first backup your existing PKI. It is also recommended that you engage Premier Field Engineering, Microsoft Support, or Microsoft Consulting Services if you are performing these steps in a Production Environment. One last note of caution, you should first run through these steps in a pre-production environment to ensure you get the proper results.
Reconfiguring the Root CA
In the following steps I will show the steps used to reconfigure the Root CA to issue certificates signed using the SHA256 hashing algorithm.
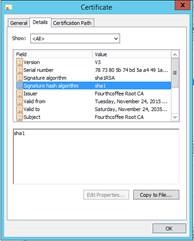
The screenshot below shows the current Root CA certificate in my test lab and the fact that the hashing algorithm is SHA1.
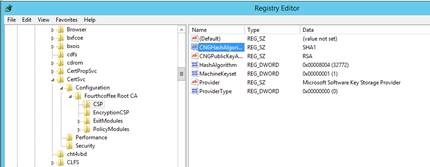
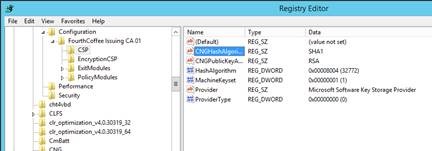
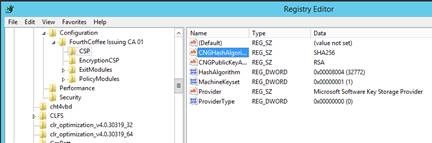
Step 1: Open the registry editor
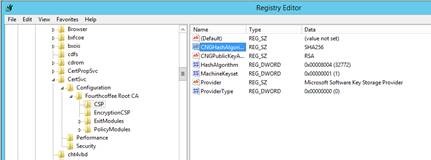
Step 2: Navigate to HKLM\System\CurrentControlSet\Services\CertSvc\Configuration\<CA Name>\CSP
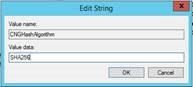
Step 3: Open the registry setting CNGHashAlgorithm
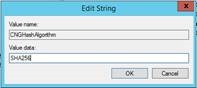
Step 4: Replace Value data with SHA256
Step 5: Click OK
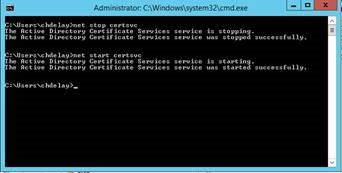
Step 6: Restart the Active Directory Services service. One way to do this is to open an elevated command prompt and run the following command to stop the service: net stop certsvc, and then run the following command to start the service: net start certsvc.
Renewing the Root CA Certificate
In the following steps I will show how the Root CA certificate can be renewed. Since, I reconfigured might Root CA to issue certificates signed using the SHA256 hashing algorithm, the resulting certificate will be signed with this hashing algorithm.
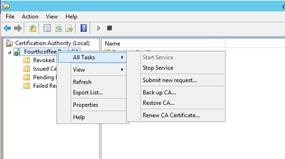
Step 1: Open the Certification Authority MMC (certsrv.msc)
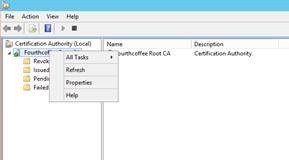
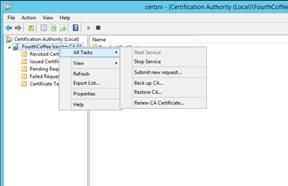
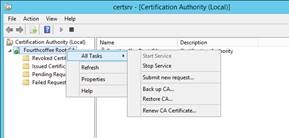
Step 2: Right-click on the CA Name
Step 3: Select All Tasks and then Renew CA Certificate…from the context menu
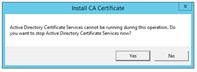
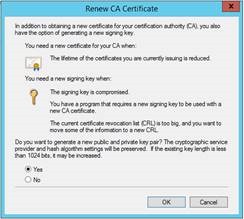
Step 4: When prompted to stop the Active Directory Certificate Services service, click Yes
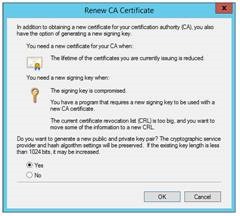
Step 5: When prompted to Renew CA Certificate, click OK. Note: If you do not want to renew the CA certificate with a new key pair, select No and then click OK.
Verifying the certificate
To verify that the certificate has been renewed and signed using the SHA256 hashing algorithm, perform the following steps:
Step 1: Open the Certification Authority MMC (certsrv.msc)
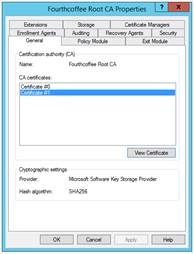
Step 2: Right-click on the CA Name and select Propertiesfrom the context menu.
Step 3: Select the newest certificate in the list, which will be the last one in the list.
Step 4: Click View Certificates
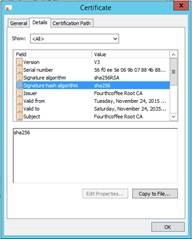
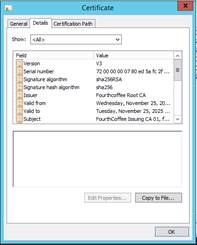
Step 5: When the Certificate opens, click on the Detailstab
Verify Signature hash algorithm is set to SHA256.
Publishing the Root CA Certificate and CRL
Next you will need to publish the new CA Certificate to any AIA repositories. You will also need to publish the new CRL to any CDP locations. <Add section on finding these sections>
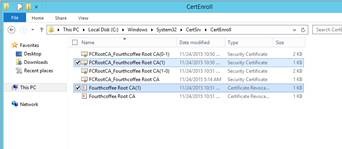
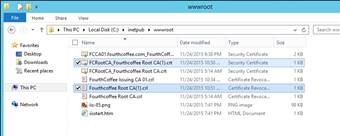
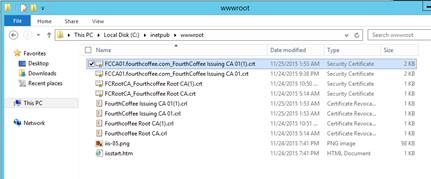
Step 1: On the Root CA navigate to C:\Windows\Systen32\CertSrv\CertEnroll
Step 2: Copy the newest CA Certificate and CRL
Step 3: Make the CA Certificate and CRL available to a machine where you are logged in as Enterprise Admin.
Step 4: Run the folllowing command in an elevated command prompt and where the path in the command prompt is the same path where there is a copy of the CA Certificate:
certutil –f –dspublish <CA Certificate File Name> RootCA
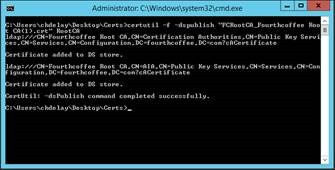
Step 5: Run the folllowing command in an elevated command prompt and where the path in the command prompt is the same path where there is a copy of the CRL:
certutil –f –dspublish <CRL File Name>

Step 6: Copy the Root CA Certificate to the HTTP AIA Repository
Step 7: Copy the Root CRL to the HTTP CDP Repository
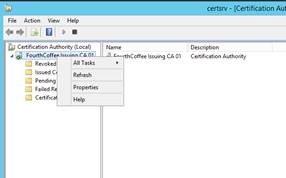
Renewing the Issuing CA Certificate
Step 1: Open the Certification Authority MMC (certsrv.msc) on the Issuing CA
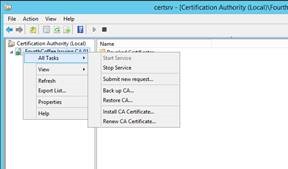
Step 2: Right-click on the CA Name
Step 3: Select All Tasks and then Renew CA Certificate…from the context menu
Step 4: When prompted to stop the Active Directory Certificate Services service, click Yes
Step 5: When prompted to Renew CA Certificate, click OK. Note: If you do not want to renew the CA certificate with a new key pair, select No and then click OK.
Step 6: When prompted to submit the CA Certificate Request click Cancel
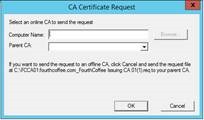
Step 7: Locate the newest request file in the C:\ directory
Step 8: Copy that request file to the Root CA

Step 9: On the Root CA open up the Certification Authority MMC (certsrv.msc)
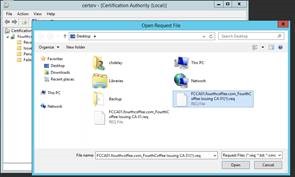
Step 10: Right-click on the CA Name and from the context menu, select All Tasks and then Submit new request…
Step 11: Navigate to the request file and click Open.
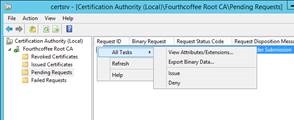
Step 12: Return to the Certification Authority MMC and click on Pending Requests
Step 13: Right-click on the appropriate request and from the context menu click All Tasks and then Issue
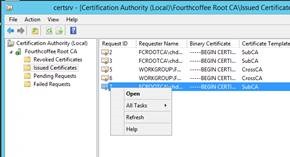
Step 14: Navigate to Issued Certificates
Step 15: Right-click on the certificate you just generated and click Open
Step 16: Click on the Details Tab (Note that the Signature hash algorithm is set to SHA256)
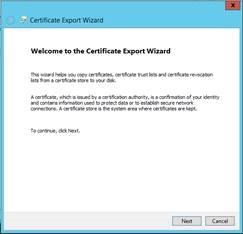
Step 17: Click the Copy to File…button
Step 18: When the Certificate Export Wizard opens click Next
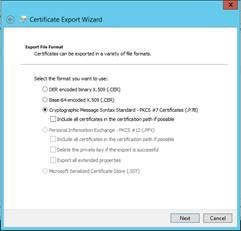
Step 19: On the Export File Format page of the wizard, select Cryptographic Message Syntax Standard – PKCS #7 Certificates (.P7B)
Step 20: Click Next
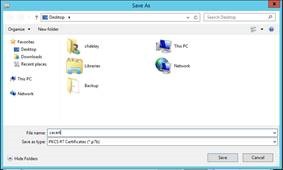
Step 21: On the File to Export page, click Browse…
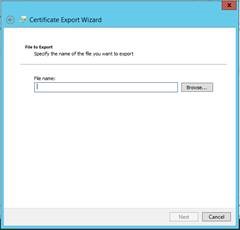
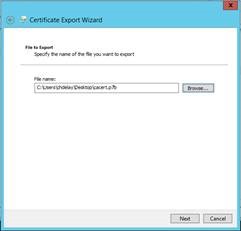
Step 22: Navigate to the location where you want to save the resulting CA Certificate File, and then click Save
Step 23: Click Next
Step 24: Click Finish

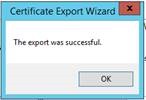
Step 25: When prompted that The export was successful., click OK
Step 26: Copy the certificate from the Root CA to the Issuing CA
Step 27: From the context menu right-click on the CA Name and select All Tasks and then Install CA Certificate…
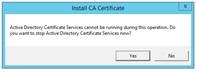
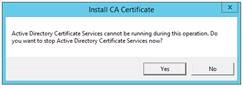
Step 28: When prompted to stop the Active Directory Certificate Services service, click Yes
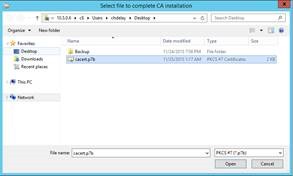
Step 29: Browse to the CA Certificate Envelope file and click Open
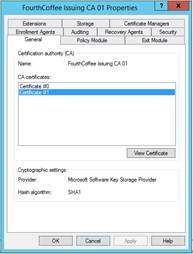
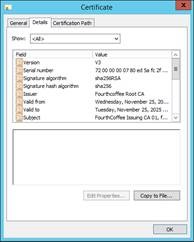
Verify the Issuing CA Certificate
To verify that the Issuing CA certificate was renewed with SHA256 used in signing of the certificate, follow the following steps.
Step 1: Open the Certification Authority MMC
Step 2: Right-click on the CA Name and from the context menu click Properties
Step 3: Select the last certificate in the list
Step 4: Click View Certificate
Step 5: Verify that the Signature hash algorithm is set to SHA256
Publish CA Certificate
An Enterprise Issuing CA is normally configured to automatically publish it’s CRL to both the HTTP and LDAP CDP repositories. Enterprise Issuing CAs typically also are configured to publish their CA cert to Active Directory. But in my experience the Enterprise Issuing CA will not publish it’s CA certificate to an HTTP AIA repository. The following steps illustrate how to copy the CA Ceritficate to the HTTP AIA repository.
Step 1: Navigate to C:\Windows\System32\CertSrv\CertEnroll on the Issuing CA.
Step 2: Copy the newest CRT file.
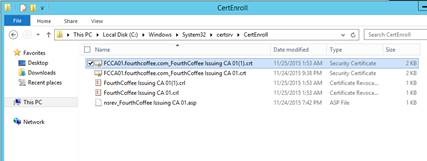
Step 3: Locate the server(s) that host the HTTP AIA repository, paste the CRT file to the appropriate directory.
Validating PKI Status
The following steps will allow you to validate that all of the AIA and CDP repositories are now accessible and up to date with the appropriate files.
Step 1: Open pkiview.msc
Step 2: In the left hand pane click on the Root CA
Step 3: Verify that there are no errors in the right-hand pane
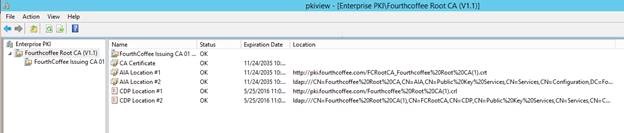
Step 4: Click on the Issuing CA
Step 5: Verify that there are no errors in the right-hand pane

Configure the Issuing CA
Next you will need to configure the Issuing CA to issue end-entity certificates that are signed using the SHA256 hash algorithm.
Step 1: Open the registry editor
Step 2: Navigate to HKLM\System\CurrentControlSet\Services\CertSvc\Configuration\<CA Name>\CSP
Step 3: Open the registry setting CNGHashAlgorithm
Step 4: Replace Value data with SHA256
Step 5: Click OK
Step 6: Restart the Active Directory Services service. One way to do this is to open an elevated command prompt and run the following command to stop the service: net stop certsvc, and then run the following command to start the service: net start certsvc.

-Chris
Comments: