


| Original URL: | https://blogs.technet.microsoft.com/xdot509/2014/11/29/microsoft-devices-security-virtual-smart-cards-part-2-deployment/ |
| Post name: | Microsoft Devices Security, Virtual Smart Cards Part 2: Deployment |
| Original author: | chdelay |
| Posting date: | 2014-11-29T14:53:31+00:00 |
Deploying Virtual Smart Cards
I am going to cover how to deploy Virtual Smart Cards. In this section I am going to perform a simplified deployment using Active Directory Certificate Services and tpmvscmgr.exe. In a complex environment you may wish to use additional tools such as scripts and Forefront Identity Manager to assist in your deployment. Later on I will be discussing how to implement FIM CM and use that to manage Virtual Smart Cards. Although, you can deploy Virtual Smart Cards without FIM CM, I wouldn’t recommend it because much of the management including unblocking a smart card cannot be done easily without a tool such as FIM CM.
The deployment steps I am covering are also covered the document Understanding and Evaluating Virtual Smart Cards, which is necessary read for anyone deploying Virtual Smart Cards. The document can be downloaded here: http://www.microsoft.com/en-us/download/details.aspx?id=29076
Smart Card Group Policies
Before I cover the actual deployment I feel that it is important to understand Smart Card related Group Policies. First of all the Smart Card related group policies can be located at the following location in the Group Policy Editor: \Computer Configuration\Administrative Templates\Windows Components\Smart Card.
Below are the GPO settings available via Group Policy:
Allow certificates with no extended key usage certificate attribute
- Allow Integrated Unblock screen to be displayed at the time of logon
- Allow signature keys valid for Logon
- Allow time valid certificates
- Turn on certificate propagation from smart card
- Configure root certificate clean up
- Turn on root certificate propagation from smart card
- Prevent plaintext PINs from being returned by Credential Manager
- Allow ECC certificates to be used for logon and authentication
- Filter duplicate logon certificates
- Force the reading of all certificates from the smart card
- Display string when smart card is blocked
- Reverse the subject name store in a certificate when displaying
- Turn on Smart Card Plug and Play service
- Notify user of successful smart card driver installation
- Allow user name hint
These Group Policy settings are described in detail, here: http://technet.microsoft.com/en-us/library/ff404287(v=ws.10).aspx
Virtual Smart Card Prerequisites
· Active Directory
· Domain Controllers must have a valid certificate for use with Smart Card Logon. The following article covers the requirements for the certificate: http://support.microsoft.com/kb/281245
· An Enterprise Certification Authority running on Windows Server 2012 or Windows Server 2012 R2. Steps for setting up a PKI on Windows Server 2012 is available here: http://blogs.technet.com/b/xdot509/archive/2013/03/22/installing-a-two-tier-pki-hierarchy-in-windows-server-2012-wrap-up.aspx
· Windows 8.0 or Windows 8.1 domain joined computer that has a TPM that is version 1.2 or greater.
· Certification Authorities issuing Smart Card logon certificates must be in the NTAuth store.
Installing Certificates on Domain Controllers
In order for Smart Card logon to work, any domain controller that may receive a Smart Card logon needs to have a certificate installed. The specific details of what need to be included in that certificate are listed here: http://support.microsoft.com/kb/281245. However, there are Certificate Templates that are built into Active Directory Certificate Services that can be used for this purpose. Below are the 3 default templates that can be used:
Domain Controller: Domain Controllers will automatically enroll for a certificate based on the Domain Controller template if it is available on a CA. The Domain Controller template is a Version 1 template. If a certificate is requested using this template it will include the DNS name of the Domain Controller in the Subject and Subject Alternative Name. Additionally, the DS Objet Guid for the domain controller will be included in the Subject Alternative Name extension. The resulting certificate will also include Client Authentication and Server Authentication in the Enhanced Key Usage extension.
Domain Controller Authentication: The Domain Controller Authentication is a Version 2 template and can be used with autoenrollment to deploy a certificate based on this template to all Domain Controllers. If a certificate is requested using this template it will include the DNS name of the Domain Controller in Subject Alternative Name. The resulting certificate will also include Client Authentication, Server Authentication, and Smart Card Logon in the Enhanced Key Usage extension.
Kerberos Authentication: The Kerberos Authentication is a Version 2 template and can be used with autoenrollment to deploy a certificate based on this template to all Domain Controllers. . If a certificate is requested using this template it will include the DNS name of the Domain Controller, the shortname of the domain, and the DNS name of the Domain in Subject Alternative Name. The resulting certificate will also include Client Authentication, Server Authentication, Smart Card Logon, and KDC Authentication in the Enhanced Key Usage extension.
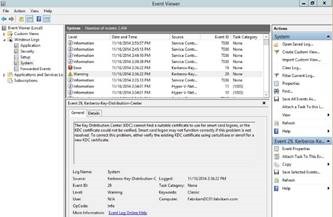
If you do not have a certificate on your domain controllers, you will get an Event 29 warning event for Kerberos-Key-Distribution-Center, followed by an Error event 19 logged.
Deploying Certificates to Domain Controllers via Autoenrollment
Below are steps that show an example of how certificates can be deployed to domain controllers to support Smart Card logon. It is just an example. There are a number of considerations that must be made when determining how certificates are deployed to domain controllers. Although, autoenrollment is the easiest way to deploy certificates to domain controllers there are instances where it might not be appropriate. Some considerations include whether other certificates such as 3rd party certificates are installed on domain controllers and whether autoenrollment would interfere with the use of those certificates.
Creating Autoenrollment GPO
A group policy must be created to enable the autoenrollment client. Here, I am going to create and enable a GPO on the Domain Controllers container.
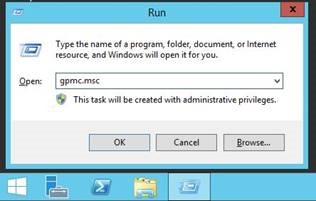
First, open the Group Policy Management Console (gpmc.msc)
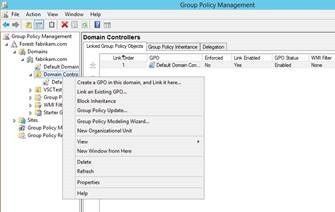
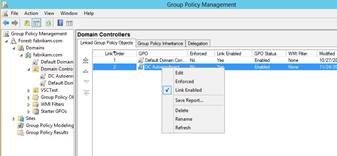
In the Group Policy Management Console, expand the Domains node, and then the node with the name of the domain. Locate the Domain Controllers container. Right click on the Domain Controllers container and from the context menu select Create a GPO in this domain, and Link it here…
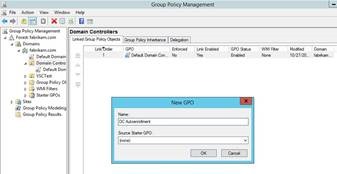
Next, enter the name you have chosen for the GPO, and click OK.
In the Group Policy Management Console, locate the newly created GPO. Right click on the GPO, and select Edit from the context menu.
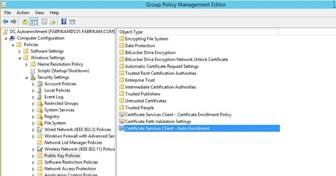
Expand Computer Configuration, then Policies, and then Security Settings. Then select Public Key Policies. In the Object Type pane, double click on Certificate Services Client – Auto Enrollment.
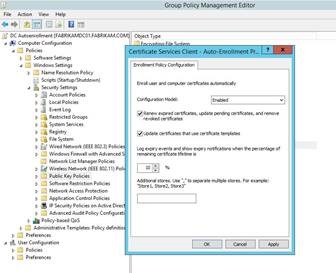
This will open the Enrollment Policy Configuration. To enable autoenrollment perform the following steps:
1. Change Configuration Model to Enabled
2. Check Renew expired certificates, update pending certificates, and remove revoked certificates
3. Check Update certificates that user certificate templates
Adding Certificate Template to Certification Authority
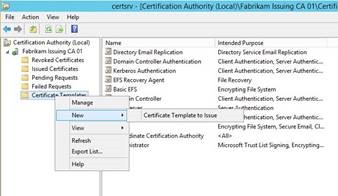
The next step is to add the Certificate Template to any CAs that will be required to issue certificates based on the template. In the example below, I will be adding the Kerberos Authentication template to a CA.
In the Certification Authority Management Console (certsrv.msc), right click on Certificate Templates. Then select New, then Certificate Template to Issue from the context menu
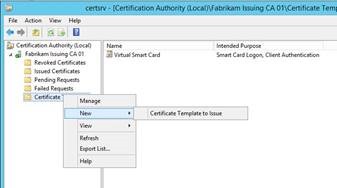
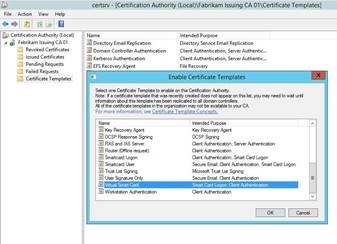
On the Enable Certificate Templates menu, select Kerberos Authentication and click OK.
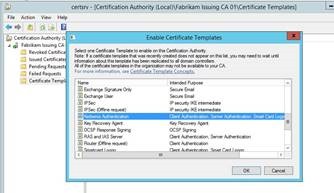
The Kerberos Authentication Certificate Template is now available on the CA.
Verifying Certification Authority is in the NTAuth store
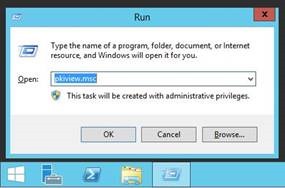
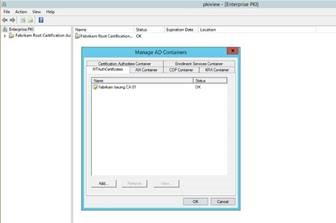
First open pkiview.msc
Once Enterprise PKI (pkiview.msc) opens, right click on Enterprise PKI and select Manage AD Containers… from the context menu.
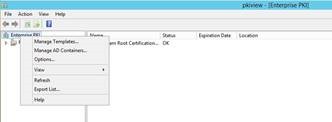
When the Manage AD Containers window opens, select the NTAuthCertificates Tab. Ensure that the CA(s) issuing Virtual Smart Card certificates are listed here. If your CA is not listed, click the Add… button to add its certificate.
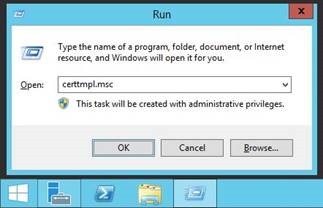
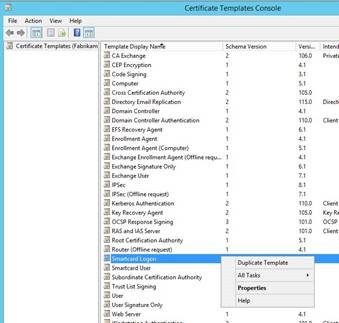
Creating the Certificate Template
First, open the Certificate Template MMC by launching certtmpl.msc.
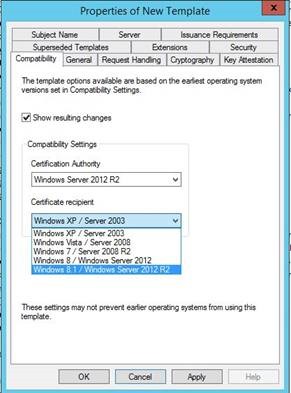
Once the Certificate Template MMC is open, select the Smartcard Logon template, and select Duplicate Template from the context menu.
You will then be presented with the Compatibility Tab. Select Windows Server 2012 R2 as the Certification Authority.
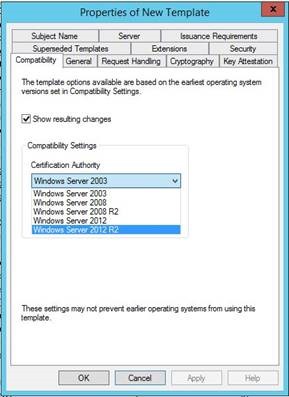
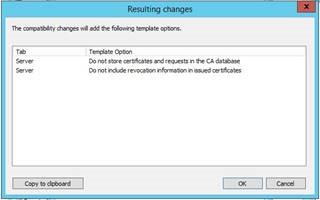
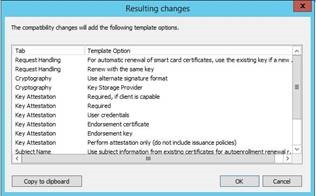
You will then be notified of features that will now be enabled in the Certificate Template. Select OK.
Under Certificate recipient, select Windows 8.1 / Windows Server 2012 R2
You will then be notified of features that will now be enabled in the Certificate Template. Select OK.
Next, we move on to the General Tab. Under Template display name, enter a name for the Certificate Template. And under Validity period choose how long you would like the Virtual Smart Card certificates to be valid. 1 year is common for both Smart Card and Virtual Smart Card certificates. This is because the certificates are used to logon and gain access to resources, so we want to keep the validity period as low as practically possible.

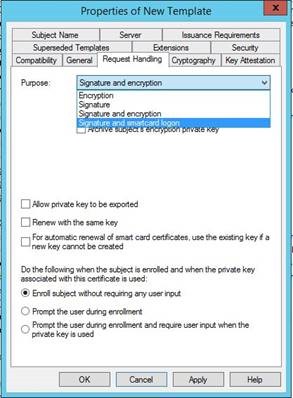
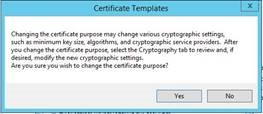
On the Request Handling Tab, select Signature and smartcard logon as the purpose. Once you make this change, verify that Prompt the user during enrollment is selected. For Virtual Smart Card certificate renewals, the user needs to be prompted, because they will have to supply their VSC PIN when renewing their certificate.
You will receive the following prompt: Changing the certificate purpose may change various cryptographic settings such as minimum key size, algorithms, and cryptographic service providers. After you change the certificate purpose, select the Cryptography tab to review and, if desired, modify the new cryptographic settings.
Click, Yes.
On the Cryptography Tab, select the Requests must use on of the following providers radio button. Then select Microsoft Base Smart Card Crypto Provider. Ensure that this is the only CSP selected. Note: When using the CSP the Maximum key length allowed is 2048-bit. Although the UI may allow you to enter a larger key size, the resulting certificate will have an RSA key pair no larger than 2048-bit.
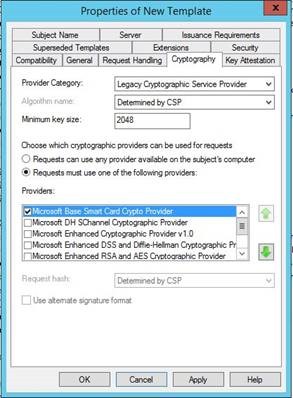
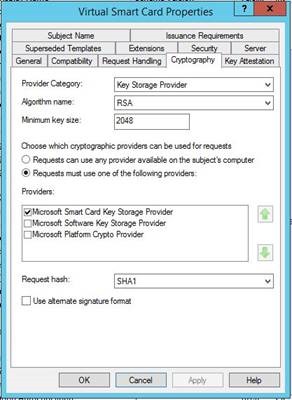
Alternatively, you can use a Key Storage Provider (KSP) instead of a Cryptographic Service Provider (CSP). You would want to make this change if you need to use one of the ECC algorithms (more on this later). To choose the KSP, under Provider Category select Key Storage Provider. Then select the Requests must use one of the following providers radio button. Then check Microsoft Smart Card Key Storage Provider.
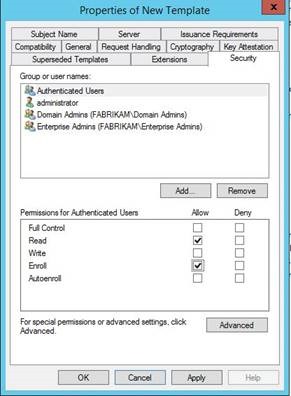
Next, onto the Security Tab. You will want to determine which users you want to have the ability to enroll for the Virtual Smart Card certificate. Once you make that determination, you will want to put that set of users in a security group and add them to the permissions on the certificate template. In my example, I used the Authenticated Users group, which is there by default. You will then want to give Read and Enroll permission to the group you wish to allow for enrollment. This completes the configuration of the Certificate Template. Click OK, to save your changes.
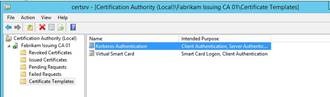
Now you will have to make that certificate template available on each Certification Authority that you want to make available for issuing. On each Certification Authority, open the Certification Authority Management Console (certsv.msc). Navigate to Certificate Templates. Right click on Certificate Templates then from the context menu select New, then Certificate Template to Issue.
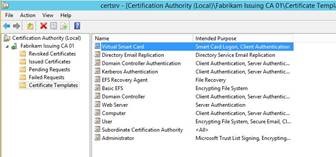
In the Enable Certificate Templates menu, select the Virtual Smart Card template you created. In my example, the template is named Virtual Smart Card. Then click OK.
You should now see your Certificate Template available on the Certification Authority.
Creating the Virtual Smart Card
I am going to cover the steps for manually creating the Virtual Smart Card. To create the VSC we will use tpmvscmgr.exe.
On the machine on which you want to create the Virtual Smart Card, run the Command Prompt in the context of Administrator.
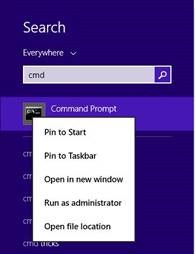
Depending on your settings you may be prompted by User Account Control, if so click Yes.

Below is an example you can use to create the Virtual Smart Card. You may want to alter the command based on your desired settings. The create option of course tells the command to create a VSC.
The /name switch gives a name to the VSC.
The /Pin option allows you to configure the PIN. If you specify Default the PIN will be set to 12345678, alternatively you can use the PROMPT option if you wish to be prompted for a PIN.
The /adminkey option will generate an administrative key that can be used to unblock the VSC. You can specify DEFAULT to specify the default key, RANDOM to create a random key, or PROMPT to be prompted for a key.
Please see the following article for additional information on tpmvscmgr.exe: http://technet.microsoft.com/en-us/Library/dn593707.aspx
In the example below, the following command is used: tpmvsmgr.exe create /name myVSC /pin default /adminkey random /generate

Once your VSC is created, it will be given a Smart Card Reader Device Instance ID, as seen below. The trailing number in the Instance ID will increment with each additional Virtual Smart Card that is created on the system. This completes the steps required for manually creating a Virtual Smart Card.

Enrolling for Virtual Smart Card Certificate
Once you have created your Virtual Smart Card, you will then need to enroll for a certificate. Previously, I gave an example of creating a certificate template for use with Smart Card Logon. In this example, I will be enrolling for a certificate based on that template. On the machine with the Virtual Smart Card, open the User Certificates Management Console (certmgr.msc)
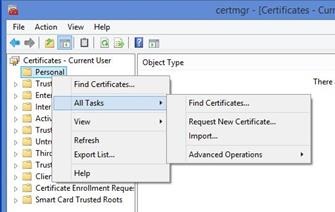
In certmgr.msc, you can enroll for a certificate by right clicking on Personal then from the context menu selecting All Tasks then Request New Certificate… This will open the Certificate Enrollment wizard.
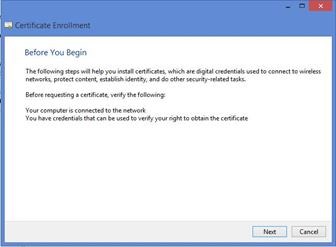
Once the Certificate Enrollment wizard opens, click Next.
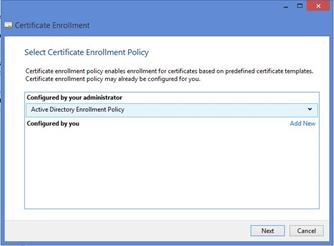
On the Select Certificate Enrollment Policy page of the wizard, click Next. Note: If you have configured an alternate policy for use in conjunction with Certificate Enrollment Web Services then you may have to select the Enrollment Policy that is associated with CEWS.
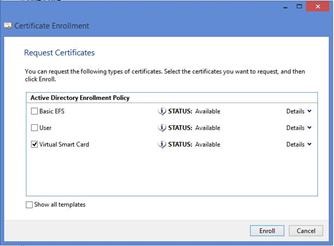
Next, on the Request Certificates page of the wizard select the check box next to the certificate template for which you are attempting to enroll. Then click the Enroll button to enroll for the certificate. In my example, I have chosen the Virtual Smart Card template that I created earlier.
You will then be prompted for the PIN associated with the Virtual Smart Card. Enter the PIN and then click OK.
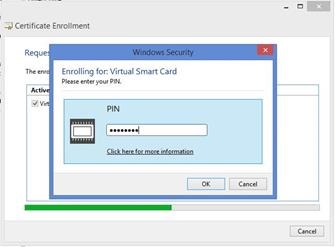
When enrollment succeeds, you will be presented with the Certificate Installation Results page. Click the Finish button.

Logging on with Virtual Smart Card
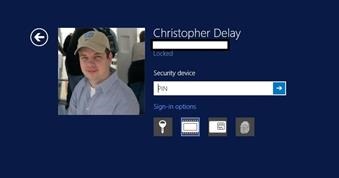
Now with a Virtual Smart Card created and a Smart Card Logon certificate on the Virtual Smart Card, you now should be able to logon with a Virtual Smart Card. Lock or Logoff the workstation, depending on your situation. Then select Security Device form the menu of Sign-in options. Then enter your pin and hit the Enter key.
Changing Smart Card PIN
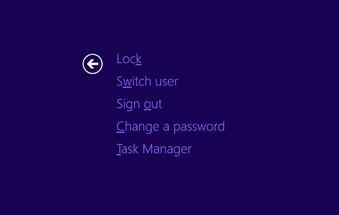
A user may at times wish to change his/her Virtual Smart Card PIN. This is especially true if all Virtual Smart Cards are pre-provision for the user. To change the PIN, the user can hold down CTRL + ALT + DEL, while logged on with the Virtual Smart Card. The user then would select Change a password.
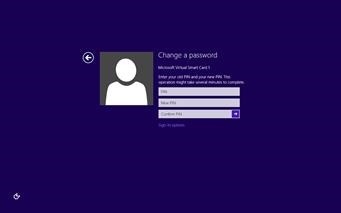
In order to change the PIN, the user will then have to enter their existing PIN, the new PIN, and then confirm the new PIN.
Summary
In this article I covered the steps for preparing for deployment of Virtual Smart Cards, and how to manually deploy Virtual Smart Cards. In an upcoming posting, I will cover how to deploy Virtual Smart Cards with FIM CM.
Comments: