


| Original URL: | https://blogs.technet.microsoft.com/xdot509/2015/12/27/administrator-workstations/ |
| Post name: | Administrator Workstations |
| Original author: | chdelay |
| Posting date: | 2015-12-27T15:21:06+00:00 |
I had previously published this information to my blog and accidently removed it from here. Re-adding the posting. I hope to find time to update this for Windows 10 in the future. Windows 10 has a feature named Credential Guard which greatly increases the security of credentials and help limits their exposure. This blog posting covers one possible way that Administrator Workstations could be configured to reduce the attack surface for Administrator Accounts. If you would like assistance with this Microsoft Consulting Services has a service named Privileged Administrator Workstation, where they can assist you with implementing Administrator Workstations. Their service is much more detailed and comprehensive then what I have provided here. The instructions here are just taking Microsoft’s PtH recommendations and showing how they could be implemented.
Definitions
Productivity Workstation: Workstation used by a user to check email, access the internet, view and edit documents. This workstation is less trusted since it has a larger attack surface and is extremely susceptible to compromise.
Administrator Workstation: A workstation used solely for systems administration. This workstation is very trusted since it is locked down, reducing the overall attack surface and making less susceptible to compromise.
Background
To help secure environments against Credential Theft attacks and to prevent escalation the following conceptual model should be used to help understand how the environment should be secured.
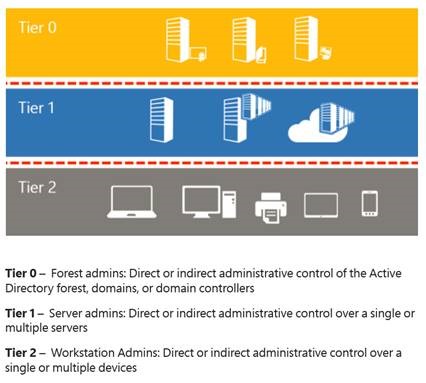
In order to protect credentials, especially those of privileged accounts the following rules should be followed:
· A user should never logon to a system that is in a lower tier. (For example a Domain Administrator should not login to a server or a non-administrator workstation with their credentials.)
· A tier 0 principal should not be accessed by an account or service that is in a lower tier. (For example the same WSUS server that patches all infrastructure servers should not be the same one that patches Domain Controllers.)
Administrator Workstations
Users who will be logging in with accounts that will be members of privileged groups should have a dedicated workstation for administration.
When these types of users perform both administration and productivity work from the same workstation it increases the likelihood of their credentials being compromised. This is due to the increased exposure due to opening documents, reading email, or browsing the web all of which are pathways for malware or an adversary to gain a foothold on a workstation.
Exposure of credentials
Even if an administrator is logged on to workstation with a non-admin account, their admin credentials can be exposed if the use the “Run As” functionality and use their admin credentials.
If an administrator uses RDP to manage servers or domain controllers with a privileged account, their password can be exposed if there is malware on the system running a keystroke logger.
Cost of exposure
If a highly privileged account such as domain administrator or enterprise administrator is compromised it is an extremely costly compromise. In some cases this may result in the organization having to build an entirely new forest, since the existing forest can no longer be trusted. In the best case scenario the organization will have to spend several months having all systems reviewed by a forensic team to try to rid systems of malware or an adversary that has established a foothold. Although the cost of a second laptop for an administrator can be costly, that cost pales in comparison to having to rebuild an entire forest. Having a dedicated workstation for administrators is a fundamental mitigation that should be in place and if it is not in place reduces the effectiveness of other mitigation that are put in place to protect administrator credentials.
Options for Administrator Workstation
Option 1: Dedicated Hardware
Advantages:
A dedicated laptop used exclusively for performing administration is the most secure option. This is due to the fact that the administrators credentials are completely isolated. As with all administrator workstations.
Since a user has a dedicated productivity machine they are allowed to have greater control and will be able to use USB storage, add drivers, and have greater control over the environment.
Disadvantages:
Requires the user having two machines.
Option 2: Physical Machine for Administrator Workstation with VM for Productivity Workstation.
Advantages: The advantage of this configuration is it isolates the productivity workstation from the administrator workstation using a hypervisor. This allows a single physical machine to be used for both an administrator workstation and productivity workstation.
Additional Information: One question that may be posed is “Can the Physical Machine be the Productivity Workstation and the VM be the Administrator Workstation?”. The answer to this question is: No. The Productivity Workstation is a Tier 2 Workstation and the Administrator Workstation is a Tier 0 Workstation. If the physical machine is a Productivity Workstation and the VM is a Administrator Workstation, you then have a Tier 2 workstation managing a Tier 0 workstation. And from the previous rules we know that a lower tier should not be able to manage a higher tier. This is because if the physical machine was compromised it would have control over the VM, be able to overlay fake images over the VM, modify the VM configuration, add files to the VM image, and capture keystrokes through the physical machine.
Disadvantages:
Since the laptop is the Administrator Workstation it is very locked down. That means that the user has little control over the machine, including using USB storage and adding device drivers. This means the user must compromise on the usefulness of the laptop in exchange for carrying one machine.
Hardening Requirements for Administrator Workstation
In order to ensure the integrity of the Administrator Workstation there is configuration that needs to be enforced. The following is a list of those configuration items.
· The administrator using the Administrator Workstation cannot have administrator level access to the OS on the Administrator Workstation. This must be enforced to prevent the administrator from bypassing security configuration on the workstation.
· Latest Operating System- Each iteration of the Windows Operating System adds additional features to mitigate known attacks, additional there are security features added to each OS that increase the ability to further secure the OS through proper configuration. To ensure the security of the Administrator workstation the latest Operating System should be installed. The latest Operating System is Windows 8.1.
· Secure Boot- Protects the Operating System by preventing the loading of unsigned code during the boot up process
· AppLocker- Application Whitelisting should be implemented so that only approved applications can be run on the Administrator Workstation.
· BitLocker- Whole volume encryption should be implemented to secure the device in case of loss or theft.
· USB Restrictions- The Administrator Workstation should be prevented from using USB storage to prevent infection or compromise via malware on a USB device.
· Internet Restrictions- The Administrator Workstation should be make incapable of accessing the internet. This restriction can be implement by configuring the browser to point to a “black hole” proxy. Alternatively, the organizations proxy server can be configured to block outbound connections on connections imitated by an administrator account.
· Network Isolation- Windows Firewall should be enabled and configured to block incoming connections.
· Antimalware- Antimalware also known as Antivirus should be installed on the Administrator Workstation and kept current with signatures.
· Exploitation Mitigation- EMET should be installed to mitigate common methods that malware and adversaries use to run code on the system.
· Attack Surface Analysis- During the build of the Administrator Workstation a tool such as Attack Surface Analyzer should be run to determine the attack surface are of the deployment.
· Imaging- A Golden Image should be produced of the Administrator Workstation and should be kept up to date. In the event of a potential exposure the machine can quickly be wiped and rebuilt.
Restricting Administrator Access
Below are instructions to demonstrate how restricted groups can be used to control members of the Local Administrators Group.
Step 1: Open GPMC.msc
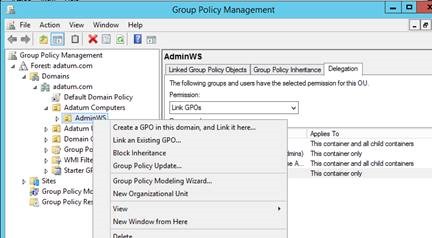
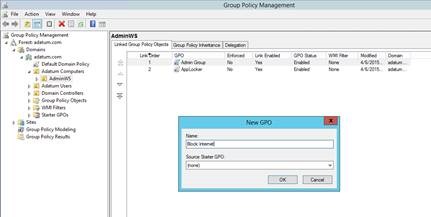
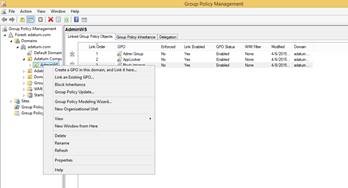
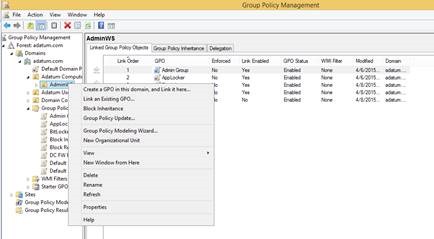
Step 2: Right click on the OU that contains Administrator Workstations and select Create a GPO in this domain and Link it here…
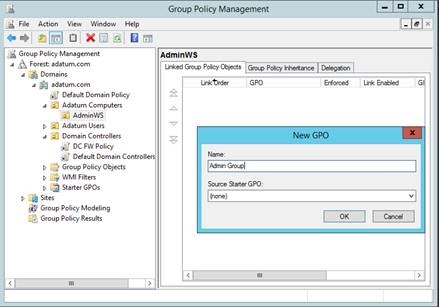
Step 3: Give the GPO a name and click OK
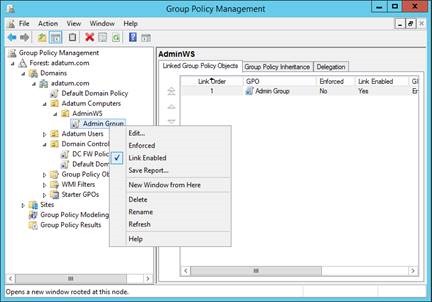
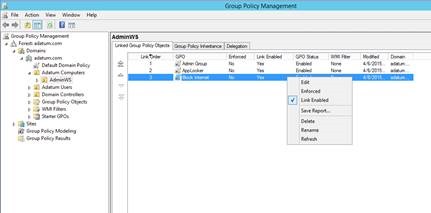
Step 4: Right click on the new GPO and select Edit… from the context menu
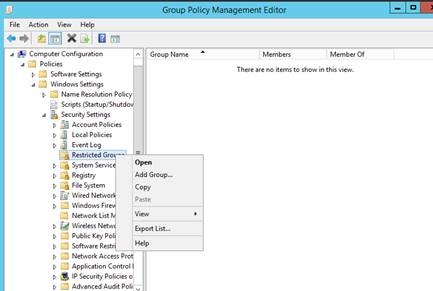
Step 5: Navigate to \Computer Configuration\Policies\Windows Settings\Restricted Groups
Step 6: Right click on Restricted Groups and select Add Group… from the context menu
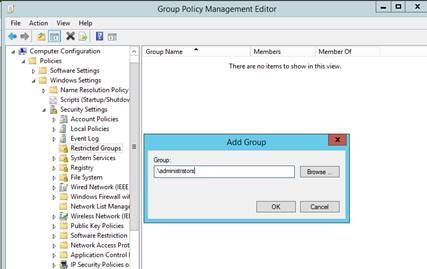
Step 7: In the Add Group dialog box enter .\Administrators and click OK
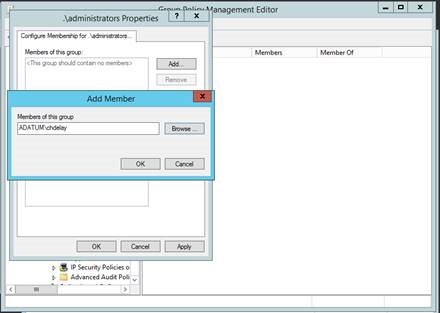
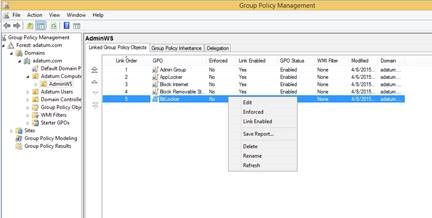
Step 8: A new Window will open. Under the Members of this group section and users or groups that should be Local Administrators. Be sure to exclude the users of the Administrator Workstation. Click OK when finished.
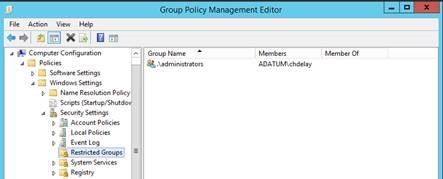
The resulting GPO should look something like the example below.
Current Operating System
Windows 8.1 should be installed as the operating system on the Administrator Workstation.
Windows 8.1 includes all of the security features of Windows 7 along with the additional security functionality available in Windows 8.1. Below are some of the key security features that help add additional security to privileged users.
Secure Boot
Secure Boot prevents unsigned code from being run during the boot process. This prevents attackers from loading attack tools or malware during boot.
Trusted Boot
Early-Launch Anti-Malware (ELAM) is run early in the boot process and is used to prevent malware from launching prior to the Operating System.
Virtual Smart Cards
The Trusted Platform Module is used to securely store a certificate that is used for Smart Card Logon. The user must enter a PIN to use the Virtual Smart Card. So a user must have possession of the device as well as knowledge of the PIN to perform a Smart Card Logon with a Virtual Smart Card.
Protected Groups
· Protected Groups add the following protections: The member of the Protected Users group cannot authenticate by using NTLM, Digest Authentication, or CredSSP. On a device running Windows 8.1, passwords are not cached, so the device that uses any one of these Security Support Providers (SSPs) will fail to authenticate to a domain when the account is a member of the Protected User group.
· The Kerberos protocol will not use the weaker DES or RC4 encryption types in the pre-authentication process. This means that the domain must be configured to support at least the AES cipher suite.
· The user’s account cannot be delegated with Kerberos constrained or unconstrained delegation. This means that former connections to other systems may fail if the user is a member of the Protected Users group.
· The default Kerberos Ticket Granting Tickets (TGTs) lifetime setting of four hours is configurable by using Authentication Policies and Silos, which can be accessed through the Active Directory Administrative Center (ADAC). This means that when four hours has passed, the user must authenticate again.
Restricted Admin Mode for RDP
This allows an administrator to RDP to another system without exposing their credentials to that system
Secure Boot
Secure boot requires firmware that is at UEFI version 2.3.1 or greater. Secure Boot must be enabled in the BIOS. Contact your PC vendor to get instruction on how to enable Secure Boot on your particular model. Below is an example of a BIOS Setup screen where Secure Boot is enabled.

(Photo from http://blogs.msdn.com/b/b8/archive/2011/09/22/protecting-the-pre-os-environment-with-uefi.aspx)
AppLocker
AppLocker is an Application Control feature in Windows 7 and Windows 8. AppLocker is used to control which applications a user can run. This control over what applications can run, reduces the chance of a user accidentally running malware or other software that can leave a system exposed. In terms of the Administrator Workstation it is used for “Application Whitelisting”. The first step in Application Whitelisting is to determine what applications the user should be allowed to run. So, first you will want to inventory what applications an Administrator users. Productivity software and alternate web browsers should not be allowed to run on the Administrator Workstation.
Once you have the applications that should be whitelisted you can use the following steps to create a GPO to enforce the AppLocker settings.
First we you will need a reference machine to create your settings on. On the reference machine you should have Windows 8.1 installed, along with any applications that you have chosen to whitelist. You will also need the RSAT installed unless you plan on importing the policy into group policy on another machine. The RSAT tools can be downloaded from here: http://www.microsoft.com/en-us/download/details.aspx?id=39296.
Step 1: Launch the Local Group Policy Editor (gpedit.msc) on the reference machine.
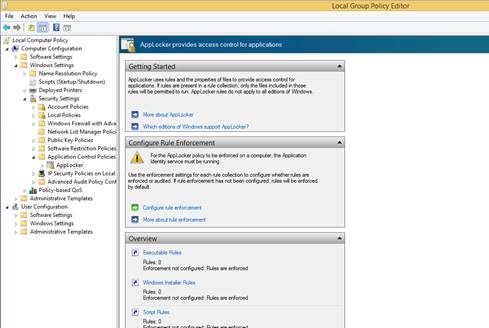
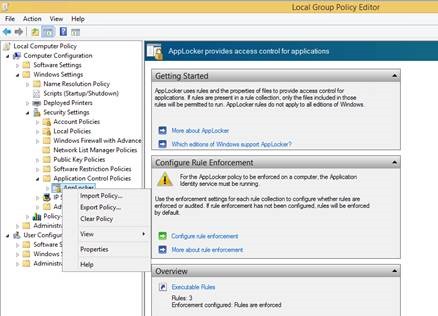
Step 2: Navigate to \Computer Configuration\Windows Settings\Security Settings\Application Control Policies\AppLocker
Step 3: Click on Configure rule enforcement
Step 4: Under Executable rules, select Configured and choose Enforce Rules, then click OK. This step enables rule enforcement for executable files such .exe.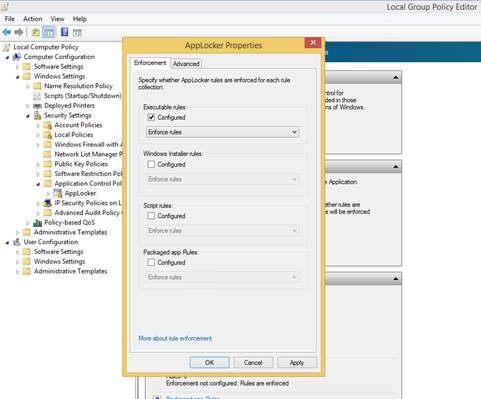
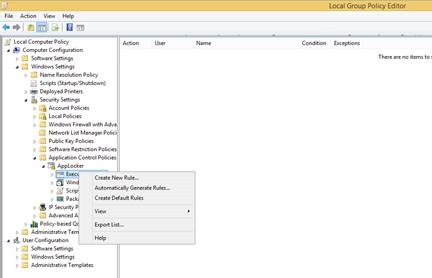
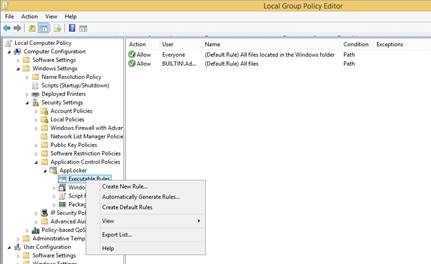
Step 5: Right click on Executable Rules and select Create Default Rules from the context menu.
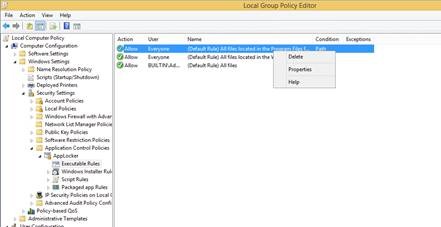
Step 6: The Default rules creates 3 rules:
· Allow Everyone to run All files located in the Program Files folder
· Allow Everyone to run All files located in the Windows folder
· Allow Builtin Administrator to run All files
The rule that allows Everyone to run All files located in the Program Files folder should be deleted, so that you have greater control over what programs the user can run. Do not delete the other two rules. Deleting these rules can cause the user to be incapable of logging in.
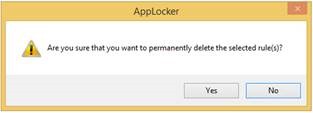
Step 7: When prompted about deleting the rule, click Yes
Step 8: Right click on Executable Rules, and select Create New Rule… from the context menu
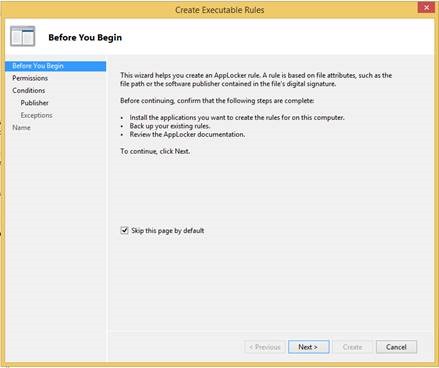
Step 9: Check Skip this page by default, and click Next
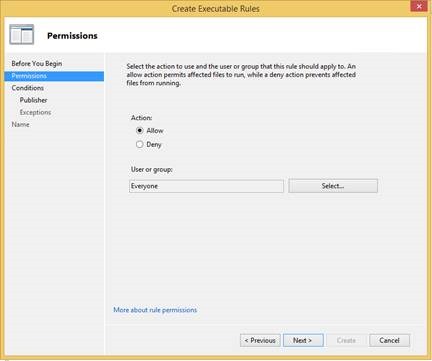
Step 10: Select Allow. Select a group or user that will be using the Administrator Workstation and click Next.
Step 11: Select Publisher and click Next.
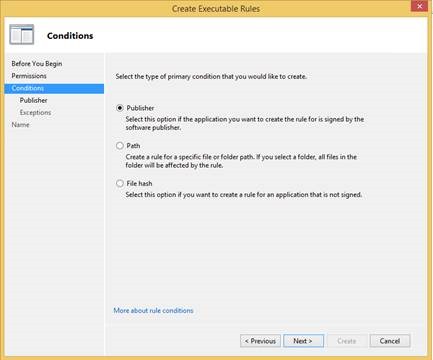
Step 12: Check, Use Custom Values and next to the File Version select Exactly from the Drop Down menu.
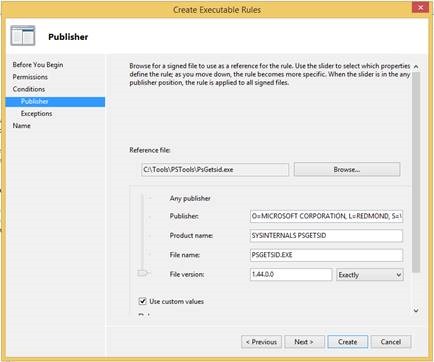
Step 13: Click Next
Step 14: Click Create
Follow Steps 10-14 for each application that needs to be whitelisted.

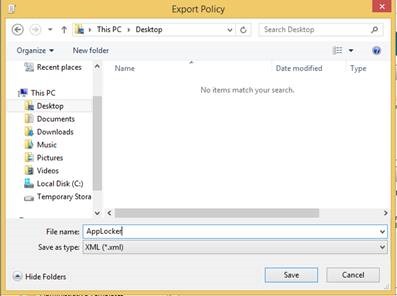
Step 15: In the Group Policy Editor, right click on AppLocker, and select Export Policy… from the context menu.
Step 16: Give the Policy File a name and click Save
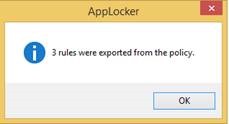
Step 17: When prompted that the rules were exported, click OK.
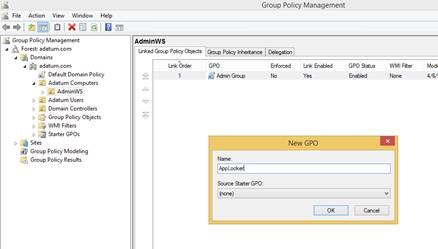
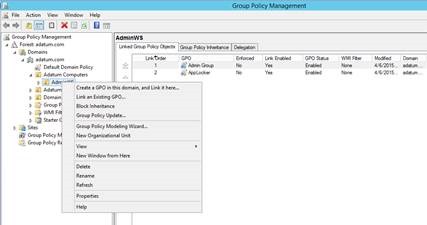
Step 18: Open Group Policy Management (GPMC.msc). On the OU that contains the Administrator Workstations, right click and select Create a GPO in this domain, and Link it here…

Step 19: When prompted, give a name for the GPO and click OK
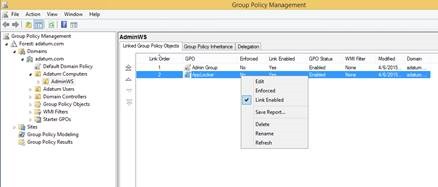
Step 20: Right click on the newly create GPO and select Edit
The Application Identity Service must be running for Applocker to function so we will enable it through Group Policy.
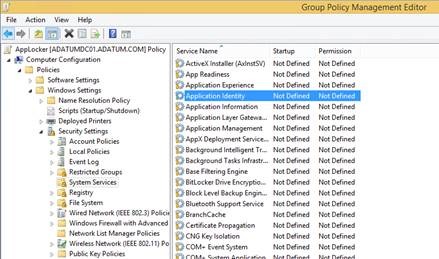
Step 21: Navigate to \Computer Configuration\Policies\Windows Settings\Security Settings\System Services.
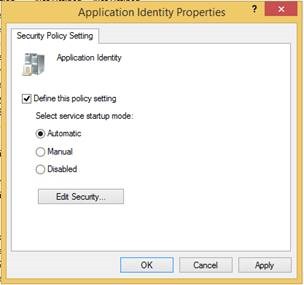
Step 22: Double click on Application Identity
Step 23: Select Define this policy setting and then select Automatic , and then click OK
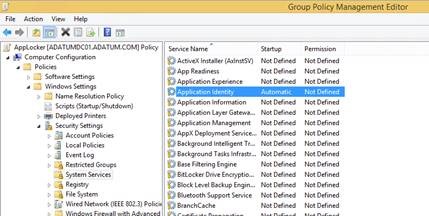
The Services should now show up as Automatic
Now we are going to import the previously created policy.
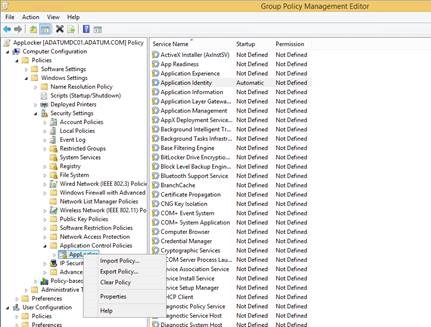
Step 24: Navigate to \Computer Configuration\Windows Settings\Security Settings\Application Control Policies\AppLocker
Step 25: Right click on AppLocker
Step 26: Select Import Policy… from the context menu
Step 27: Navigate to the Policy File you created in step sixteen, and click Open
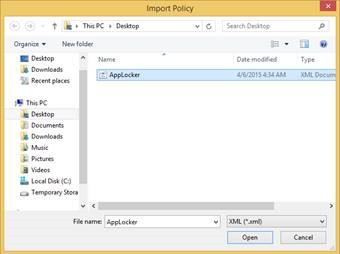
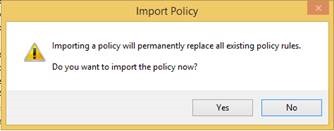
Step 28: When prompted if you want to import the policy, click Yes
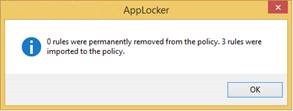
Step 29: When prompted that the rules were imported, click OK
Internet Restrictions
Internet Access on the Administrator Workstation should be blocked. The steps below demonstrate how internet access can be blocked with a GPO. These instructions assume there are no other web browsers other then Internet Explorer installed on the system.
Step 1: Right click on the OU that contains Administrator Workstations, and select Create a GPO in this domain, and Link it here…
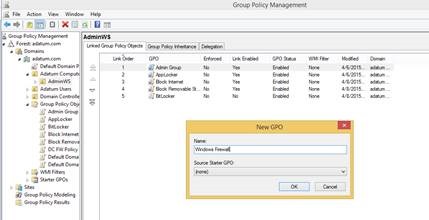
Step 2: Type a name for the new GPO and click OK
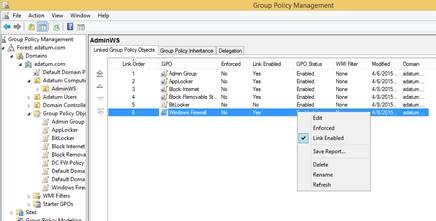
Step 3: Right click on the newly created GPO and select Edit from the context menu
Step 4: Navigate to \Computer Configuration\Administrative Templates\Windows Components\Internet Explorer\
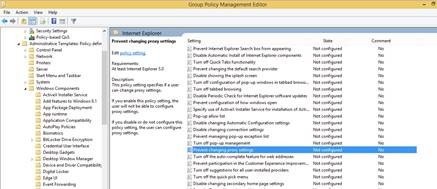
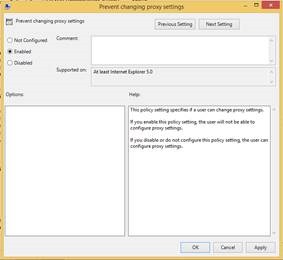
Step 5: Open Prevent changing proxy settings and click OK
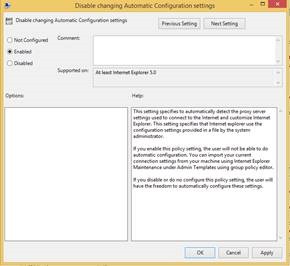
Step 6: Open the setting Disable changing Automatic Configuration settings, select Enabled, and then click OK
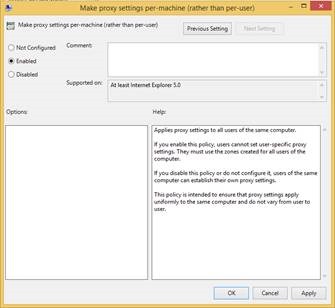
Step 7: Open the setting Make proxy settings per-machine (rather than per-user) select Enabled and click OK.
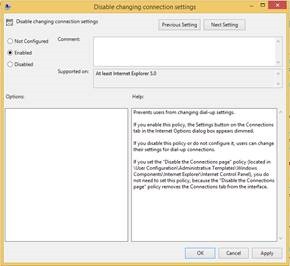
Step 8: Open Disable changing connection settings, select Enabled, and click OK
Step 9: Navigate to \Computer Configuration\Administrative Templates\Windows Components\Internet Explorer\Internet Control Panel
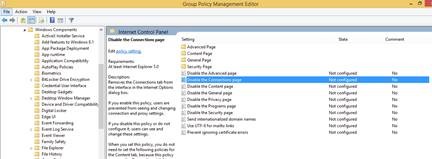
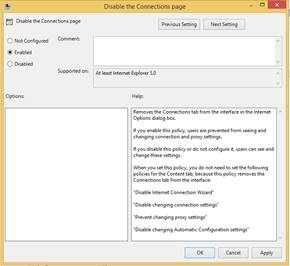
Step 10: Open the setting Disable the Connections page, select Enabled, and click OK
Step 11: Create a new Group Policy that is linked to the OU that contains Administrator accounts.
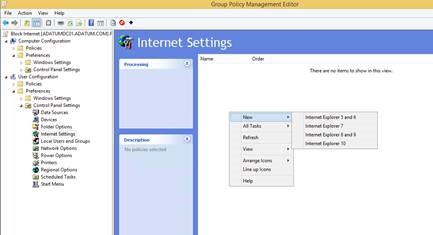
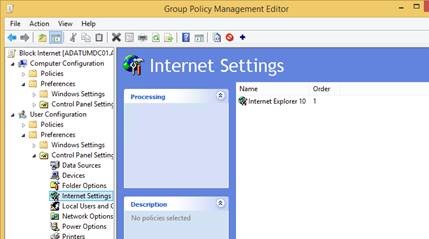
Step 12: Navigate to \User Configuration\Preferences\Internet Settings
Step 13: Right click on Internet Settings, select New and then Internet Explorer 10 from the context menu
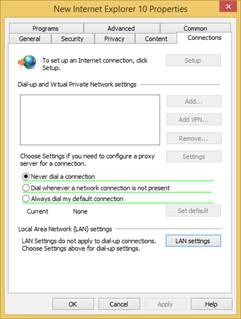
Step 14: Navigate to the Connections Tab, and click LAN Settings
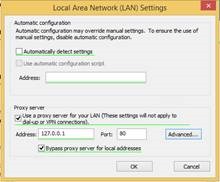
Step 15: Select Use a proxy server for your LAN (These settings will not apply to dial-up or VPN connections), under Address enter 127.0.0.1, for Port enter 80, and ensure that Bypass proxy server for local addresses is selected. Make sure everything has a green underline, if not toggle the F5 and F8 keys until it turns green. Click OK.
Step 16: Close the Group Policy Editor.
USB Restrictions
Malware is often spread via Removable Storage. Therefore it is important that Removable Storage cannot be used with the Administrator Workstation. Below are steps to lock down Removable Storage on the Administrator Workstation.
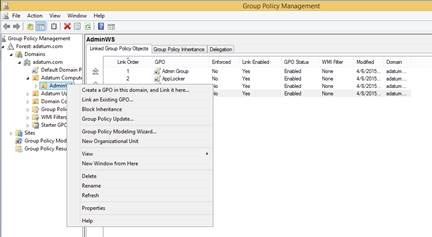
Step 1: Open the Group Policy Management Console.
Step 2: Right click on the OU that contains the Administrator Workstation, and click on Create a GPO in this domain, and Link it here…
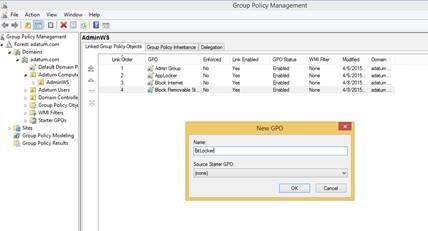
Step 3: Enter a name for the newly created GPO, and click OK
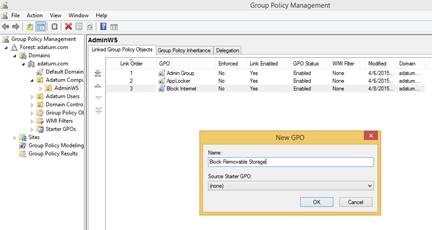
Step 4: Right click on the newly created GPO, and select Edit
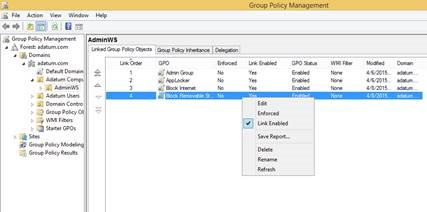
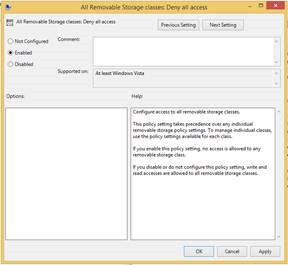
Step 5: Navigate \Computer Configuration\Administrative Templates\System\Removable Storage Access and open the setting All Removable Storage classes: Deny all access
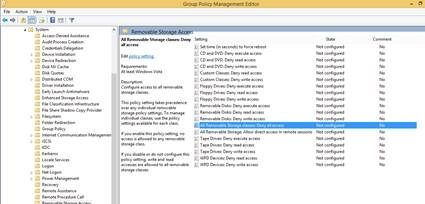
Step 6: Select Enabled, and click OK
BitLocker
BitLocker Drive Encryption should be enabled on the Administrator Workstation to secure the machine in case it is lost or stolen. The following steps illustrate how to configure BitLocker securely. The following instructions do not able the ability to recover BitLocker with a Recovery Key. If the administrator is unable to boot, the machine should be considered compromised, and rebuild from known good media.
Step 1: Right click on the OU that contains the Administrator Workstation, and click on Create a GPO in this domain, and Link it here…
Step 2: Enter a name for the newly created GPO, and click OK
Step 3: Right click on the newly created GPO, and select Edit
Step 4: Navigate to \Computer Configuration\Windows Components\Bit locker Drive Encryption\Operating System Drives
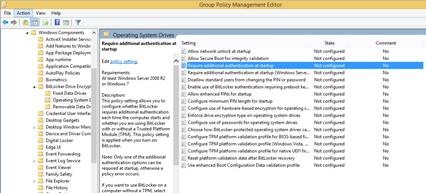
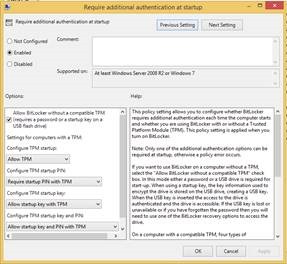
Step 5: Open the setting Require additional authentication at startup, select Enabled, and click OK
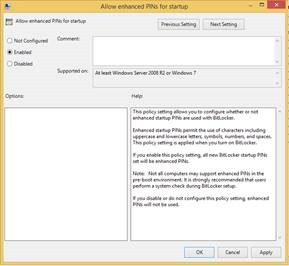
Step 6: Open the setting Allow enhanced PINs for startup, select Enabled, and click OK
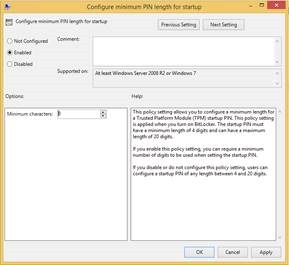
Step 7: Open Configure minimum PIN length for startup, select Enabled, and click OK
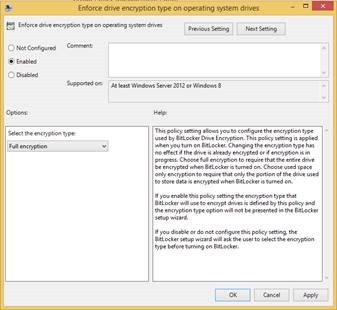
Step 8: Open the setting Enforce drive encryption type on operating system drives, select Enabled, and click OK
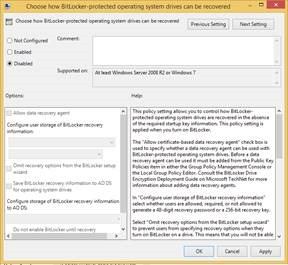
Step 9: Select the setting Choose how BitLocker-protected operating system drives can be recovered, select Disabled, and click OK
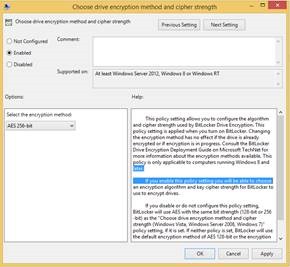
Step 10: Navigate to \Computer Configuration\Administrative Templates\Windows Components\BitLocker Drive Encryption
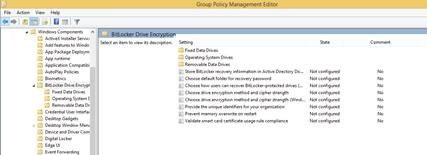
Step 11: Open the setting Choose drive encryption method and cipher strength, select Enabled, and click OK
Network Isolation
The Windows Firewall should be enabled to protect the Administrator Workstation from Network Attacks. The following instructions cover how to create a Group Policy to configure the Windows Firewall for Administrator Workstations.
Step 1: Right click on the OU that contains the Administrator Workstation, select Create a GPO in this domain, and Link it here…
Step 2: Enter a name for the New Group Policy, and click OK
Step 3: Right click on the newly created GPO and select Edit
Step 4: Navigate to \Computer Configuration\Policies\Windows Settings\Security Settings\Windows Firewall with Advanced Security\
Step 5: Right click on Windows Firewall with Advanced Security, and select Properties
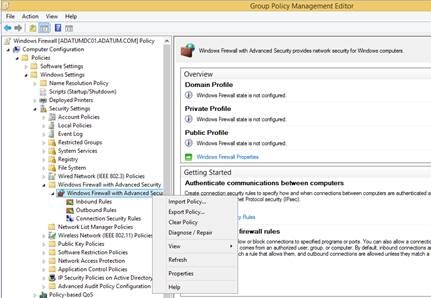
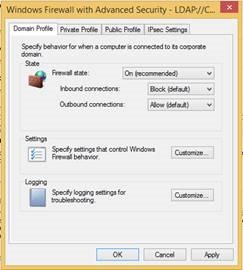
Step 6: Configure the settings as defined below:
Firewall state: On (recommended)
Inbound connections: Block (default)
Outbound connections: Allow (default)
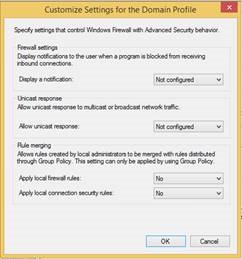
Step 7: Then under Settings, click Customize…
Step 8: Change Apply local firewall rules to No
Step 9: Change Apply local connection security rules to No
Step 10: Click OK
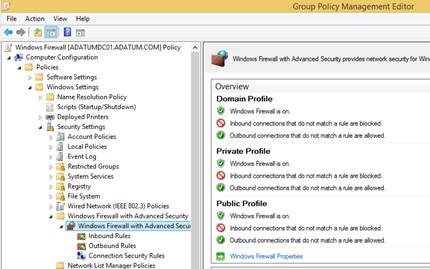
Step 11: Repeat Steps 6 – 10 for each Profile. When finished, click OK.
The resulting setting should look similar to those in the screenshot below:
Comments: