


| Original URL: | https://blogs.technet.microsoft.com/pki/2012/02/27/connecting-ipads-to-an-enterprise-wireless-802-1x-network-using-certificates-and-network-device-enrollment-services-ndes/ |
| Post name: | Connecting iPads to an Enterprise Wireless 802.1x Network Using Certificates and Network Device Enrollment Services (NDES) |
| Original author: | Amerk [MSFT] |
| Posting date: | 2012-02-27T09:01:00+00:00 |
Important notice: Microsoft does not support any apple products, if you need to troubleshoot any problem related to apple products, please refer to http://www.apple.com/support
 Warning Warning |
|---|
SCEP was designed to be used in a closed network where all end-points are trusted. The warnings from CERT in the article"Simple Certificate Enrollment Protocol (SCEP) does not strongly authenticate certificate requests  " should be considered when implementing the NDES service. If an applicationutilizes SCEP, itshould provide its own strong authentication. " should be considered when implementing the NDES service. If an applicationutilizes SCEP, itshould provide its own strong authentication. |
I am often asked by customers how to deploy certificates to iPads using NDES, where I refer them to Rob Greene’s blog for the steps required configuring NDES and enrolling these devices for certificates. Lately, I was presented with a challenge where a customer wanted to enroll these devices for certificates and authenticate them to an 802.1x infrastructure using Network Policy Server (NPS)
Let’s review how a non-domain joined machine authenticates to an 802.1x network before delving into the required steps for iPads to connect to the same network. Historically, the following steps were followed:
1. Create a placeholder computer account in Active Directory Domain Services (ADDS)
2. Configure a Service Principal Name (SPN) for the new computer object.
3. Enroll a computer certificate passing the FQDN of the placeholder computer object as a Subject Name, using Web Enrollment Pages or Certificates MMC snap-in directly from the computer (Skip step 4 if you are using the Certificates MMC snap-in)
4. Export the certificate created for the non-domain joined machine and install it.
5. Associate the newly created certificate to the placeholder ADDS domain computer account manually created through Name Mappings
a. Select Advanced View in Active Directory Users and Computers
b.Right-click the placeholder computer object and then select Name Mappings.
Note: Windows 7 and Windows Server 2008 R2 allows to you skip steps 3 and 4 by using Certificate Enrollment Web Services (CES) and Certificate Enrollment Web Policy (CEP) to enroll non-domain joined computers for certificates
The method described earlier applies to computers where the computer certificate enrolled is based on a computer template. The computer will present the certificate (Subject Name) to the Network Policy Server (NPS), which in turn will check if the computer account is enabled in ADDS.
Devices such as iPads behave differently, where they treat all certificates installed as a user certificate, hence when passing the subject name to the NPS server, NPS will look for a user object in ADDS rather than a computer object, causing the authentication request to fail
Log Name: Security
Source: Microsoft-Windows-Security-Auditing
Date: 2/15/2012 8:55:49 PM
Event ID: 6273
Task Category: Network Policy Server
Level: Information
Keywords: Audit Failure
User: N/A
Computer: DC1.contoso.com
Description:
Network Policy Server denied access to a user.
Contact the Network Policy Server administrator for more information.
User:
Security ID: NULL SID
Account Name: ipad.contoso.com
Account Domain: CONTOSO
Fully Qualified Account Name: CONTOSO\ipad.contoso.com
Client Machine:
Security ID: NULL SID
Account Name: -
Fully Qualified Account Name: -
OS-Version: -
Called Station Identifier: 021c1049ef6a
Calling Station Identifier: b8ff6154d066
NAS:
NAS IPv4 Address: 192.168.25.254
NAS IPv6 Address: -
NAS Identifier: 021c1049ef6a
NAS Port-Type: Wireless - IEEE 802.11
NAS Port: 34
RADIUS Client:
Client Friendly Name: wrt350n
Client IP Address: 192.168.25.254
Authentication Details:
Connection Request Policy Name: Secure Wireless Connections
Network Policy Name: -
Authentication Provider: Windows
Authentication Server: DC1.contoso.com
Authentication Type: EAP
EAP Type: -
Account Session Identifier: -
Logging Results: Accounting information was written to the local log file.
Reason Code: 8
Reason: The specified user account does not exist.
The certificates installed on IPads use the Network Device Enrollment Services (NDES) which utilizes the Simple Certificate Enrollment Protocol (SCEP) to enroll for device certificates – This is the default and can’t be changed - These device certificates are computer certificates and not user certificates.
certutil -v -adtemplate ipsecintermediateoffline
IPSECIntermediateOffline: IPSec (Offline request) -- Auto-Enroll: Access is denied.
msPKI-Enrollment-Flag = 0
msPKI-Certificate-Name-Flag = 1
CT_FLAG_ENROLLEE_SUPPLIES_SUBJECT -- 1
msPKI-Private-Key-Flag = 0
flags = 10241 (66113)
CT_FLAG_ENROLLEE_SUPPLIES_SUBJECT -- 1
CT_FLAG_MACHINE_TYPE -- 40 (64)
CT_FLAG_ADD_TEMPLATE_NAME -- 200 (512)
CT_FLAG_IS_DEFAULT -- 10000 (65536)
cn = IPSECIntermediateOffline
distinguishedName = IPSECIntermediateOffline
displayName = IPSec (Offline request)
templateDescription = Computer
pKIExtendedKeyUsage = 1.3.6.1.5.5.8.2.2 IP security IKE intermediate
pKIDefaultCSPs = Microsoft RSA SChannel Cryptographic Provider
pKICriticalExtensions = 2.5.29.15 Key Usage
revision = 7
msPKI-Template-Schema-Version = 1
msPKI-Template-Minor-Revision = 1
msPKI-RA-Signature = 0
msPKI-Minimal-Key-Size = 400 (1024)
msPKI-Cert-Template-OID = 1.3.6.1.4.1.311.21.8.800281.5632585.475790.4272720.15075391.217.1.20
msPKI-Supersede-Templates =
msPKI-RA-Policies =
msPKI-RA-Application-Policies =
msPKI-Certificate-Policy =
msPKI-Certificate-Application-Policy =
dwKeySpec = AT_KEYEXCHANGE
pKIExpirationPeriod = 2 Years
pKIOverlapPeriod = 6 Weeks
Template Extensions: 3
1.3.6.1.4.1.311.20.2: Flags = 0, Length = 32
Certificate Template Name (Certificate Type)
IPSECIntermediateOffline
2.5.29.37: Flags = 0, Length = c
Enhanced Key Usage
IP security IKE intermediate (1.3.6.1.5.5.8.2.2)
2.5.29.15: Flags = 1(Critical), Length = 4
Key Usage
Digital Signature, Key Encipherment (a0)
As a result, the Network Policy Server (NPS) will deny access to the iPad device, because it is mapping the wrong certificate type, and will log the following security event.
Log Name: Security
Source: Microsoft-Windows-Security-Auditing
Date: 2/19/2012 12:38:38 PM
Event ID: 6273
Task Category: Network Policy Server
Level: Information
Keywords: Audit Failure
User: N/A
Computer: DC1.contoso.com
Description:
Network Policy Server denied access to a user.
Contact the Network Policy Server administrator for more information.
User:
Security ID: CONTOSO\ipad
Account Name: ipad
Account Domain: CONTOSO
Fully Qualified Account Name: CONTOSO\ipad
Client Machine:
Security ID: NULL SID
Account Name: -
Fully Qualified Account Name: -
OS-Version: -
Called Station Identifier: 021c1049ef6a
Calling Station Identifier: b8ff6154d066
NAS:
NAS IPv4 Address: 192.168.25.254
NAS IPv6 Address: -
NAS Identifier: 021c1049ef6a
NAS Port-Type: Wireless - IEEE 802.11
NAS Port: 34
RADIUS Client:
Client Friendly Name: wrt350n
Client IP Address: 192.168.25.254
Authentication Details:
Connection Request Policy Name: Secure Wireless Connections
Network Policy Name: Secure Wireless Connections
Authentication Provider: Windows
Authentication Server: DC1.contoso.com
Authentication Type: EAP
EAP Type: Microsoft: Smart Card or other certificate
Account Session Identifier: -
Logging Results: Accounting information was written to the local log file.
Reason Code: 293
Reason: The certificate is not valid for the requested usage.
The only way to make this work is to map the computer enrolled certificate to a user account, which is described in the remainder of this blog.
Extreme Caution: The steps mentioned in this blog were tested in an isolated network, and not verified to work fully in an Enterprise Network. This solution is provided as is without any Microsoft support.
But, wait! What if we issue a certificate with subject type computer (e.g. IPSec Offline Request) and associate to the user account?
Important:
The steps to enroll certificates for IPads and iPhone were described in iPad/iPhone Certificate Issuance . The solution provided in this blog assumes you read it first.
The X.500 notation in the Iphone Configuration Utility for CN (common name) or O (Organization ) has to be upper case letters – example CN=IPAD1 – failure to type the correct syntax will generate the following error on the Network Device Enrollment Service (NDES) during certificate enrollment:
Log Name: Application
Source: Microsoft-Windows-NetworkDeviceEnrollmentService
Date: 2/16/2012 4:40:58 AM
Event ID: 31
Task Category: None
Level: Error
Keywords: Classic
User: N/A
Computer: NDES.contoso.com
Description:
The Network Device Enrollment Service cannot submit the certificate request (The request subject name is invalid or too long.). 0x80004005
Basic lab topology
High Level Operational Steps
- The device connects to a deployment wireless network (isolated) while connected via USB to the Mobile Device Management Software (MDM). In this example, the IPad is connected to the Iphone Configuration Utility.
- The device Administrator connects to the Network Device Enrollment Service (NDES) to obtain a temporary password which is entered in the Mobile Device Management (MDM) as the device’s profile.
- The Mobile Device Management (MDM) software pushes the profile configuration to the device.
- The device creates the private/public pair key and sends a request to the Network Device Enrollment Service (NDES)to request a certificate
- The Network Device Enrollment Service (NDES) sends an RA request to the Certification Authority (CA)
- The Certification Authority (CA) sends the certificate to the Network Device Enrollment Service (NDES)
- The Network Device Enrollment Service (NDES) sends the certificate to Device which in turn installs it
- The Device connects to the corporate network using 802.1X
Configuration steps
1. Create a user account for each device you want to enroll in ADDS with the following specifications:
a.Set a long complex password (at least 15 characters).
b.Set the password to not expire by selecting Password never expires.
c.In the user properties Account tab, select Smart Card is required for interactive logon. Select Smart card is required for interactive logon.
d.Select Account is sensitive and cannot be delegated in the user properties “Account “ tab.
e.Click on “Logon On To” button and in “The Following Computers” and then enter a placeholder computer name (IPad’s IMEI for example). The placeholder computer account doesn’t need to exist in ADDS.
Note: Disabling the user account will not work, because the Network Policy Service (NPS) will detect that the account is disabled it will deny access to the iPad. The Network Policy Server (NPS) will log the following event if the user account is disabled
Log Name: Security
Source: Microsoft-Windows-Security-Auditing
Date: 2/16/2012 4:52:50 PM
Event ID: 6273
Task Category: Network Policy Server
Level: Information
Keywords: Audit Failure
User: N/A
Computer: DC1.contoso.com
Description:
Network Policy Server denied access to a user.
Contact the Network Policy Server administrator for more information.
User:
Security ID: CONTOSO\ipad
Account Name: ipad
Account Domain: CONTOSO
Fully Qualified Account Name: CONTOSO\ipad
Client Machine:
Security ID: NULL SID
Account Name: -
Fully Qualified Account Name: -
OS-Version: -
Called Station Identifier: 021c1049ef6a
Calling Station Identifier: b8ff6154d066
NAS:
NAS IPv4 Address: 192.168.25.254
NAS IPv6 Address: -
NAS Identifier: 021c1049ef6a
NAS Port-Type: Wireless - IEEE 802.11
NAS Port: 34
RADIUS Client:
Client Friendly Name: wrt350n
Client IP Address: 192.168.25.254
Authentication Details:
Connection Request Policy Name: Secure Wireless Connections
Network Policy Name: -
Authentication Provider: Windows
Authentication Server: DC1.contoso.com
Authentication Type: EAP
EAP Type: -
Account Session Identifier: -
Logging Results: Accounting information was written to the local log file.
Reason Code: 34
Reason: The user or computer account that is specified in the RADIUS Access-Request message is disabled.
2. Duplicate the User template with the following configuration (name it as “UserV2” for example):
a. Request Handling tab:
i. Purpose – Signature and encryption
ii. No other checkbox selected
iii. CSP – Microsoft RSA Schannel Cryptographic Provider
b. Subject Name Tab:
i. Select “Supply in the request”
c.Issuance Requirements Tab
i.Nothing selected or configured
d. Extensions tab:
i. Application Policies:
-
-
-
- IP Security IKE Intermediate
- Server Authentication
- Client Authentication
-
-
ii. Basic Constraints:
-
-
-
- Leave as default
-
-
iii. Certificate Template Information:
-
-
-
- This configuration comes from the AD Template object; you need to modify the subject type from user to computer, which allows NDES to enroll for user certificates (described in Step 4).
-
-
iv. Issuance Policy:
-
-
-
- Leave as default
-
-
v. Key Usage:
-
-
-
- Signature requirements:
- Digital Signature
- Allow key exchange only with key encryption
- Critical extension
- Signature requirements:
-
-
e.Security Tab
i. Configure in the same way as described in the iPad/iPhone Certificate Issuance.
3. Check the certificate template attributes you created in step 2 using certutil –v –adtemplate userv2 and note the template description attribute. This attribute will be changed later on
Userv2: User v2 -- Auto-Enroll: .
msPKI-Enrollment-Flag = 0
msPKI-Certificate-Name-Flag = 1
CT_FLAG_ENROLLEE_SUPPLIES_SUBJECT -- 1
msPKI-Private-Key-Flag = 0
flags = 2023a (131642)
CT_FLAG_ADD_EMAIL -- 2
CT_FLAG_PUBLISH_TO_DS -- 8
CT_FLAG_EXPORTABLE_KEY -- 10 (16)
CT_FLAG_AUTO_ENROLLMENT -- 20 (32)
CT_FLAG_ADD_TEMPLATE_NAME -- 200 (512)
CT_FLAG_IS_MODIFIED -- 20000 (131072)
cn = Userv2
distinguishedName = Userv2
displayName = User v2
templateDescription = User
pKIExtendedKeyUsage =
0: 1.3.6.1.5.5.8.2.2 IP security IKE intermediate
1: 1.3.6.1.5.5.7.3.1 Server Authentication
2: 1.3.6.1.5.5.7.3.2 Client Authentication
pKIDefaultCSPs = Microsoft RSA SChannel Cryptographic Provider
pKICriticalExtensions =
0: 2.5.29.7 Subject Alternative Name
1: 2.5.29.15 Key Usage
revision = 64 (100)
msPKI-Template-Schema-Version = 2
msPKI-Template-Minor-Revision = 8
msPKI-RA-Signature = 0
msPKI-Minimal-Key-Size = 800 (2048)
msPKI-Cert-Template-OID = 1.3.6.1.4.1.311.21.8.800281.5632585.475790.4272720.15075391.217.15856343.7753402 User v2
msPKI-Supersede-Templates =
msPKI-RA-Policies =
msPKI-RA-Application-Policies =
msPKI-Certificate-Policy =
msPKI-Certificate-Application-Policy =
0: 1.3.6.1.5.5.8.2.2 IP security IKE intermediate
1: 1.3.6.1.5.5.7.3.1 Server Authentication
2: 1.3.6.1.5.5.7.3.2 Client Authentication
dwKeySpec = AT_KEYEXCHANGE
pKIExpirationPeriod = 1 Years
pKIOverlapPeriod = 6 Weeks
Template Extensions: 4
1.3.6.1.4.1.311.21.7: Flags = 0, Length = 2f
Certificate Template Information
Template=User v2(1.3.6.1.4.1.311.21.8.800281.5632585.475790.4272720.15075391.217.15856343.7753402)
Major Version Number=100
Minor Version Number=8
2.5.29.37: Flags = 0, Length = 20
Enhanced Key Usage
IP security IKE intermediate (1.3.6.1.5.5.8.2.2)
Server Authentication (1.3.6.1.5.5.7.3.1)
Client Authentication (1.3.6.1.5.5.7.3.2)
2.5.29.15: Flags = 1(Critical), Length = 4
Key Usage
Digital Signature, Key Encipherment (a0)
1.3.6.1.4.1.311.21.10: Flags = 0, Length = 26
Application Policies
[1]Application Certificate Policy:
Policy Identifier=IP security IKE intermediate
[2]Application Certificate Policy:
Policy Identifier=Server Authentication
[3]Application Certificate Policy:
Policy Identifier=Client Authentication
4. Network Device Enrollment Service (NDES) does not support user templates; as a result, the user template created in Step 2 has to be changed to a computer template. To do so:
a. Open Active Directory Sites and Services
b. Select Menu , View and then select Show Services Node.
c. Expand Services, Public Key Services and then click Certificate Templates.
d. Open the duplicated certificate template created in step 2 (UserV2 in this example)
e. Edit the flags attribute and change its value from 131642 to 131706.
Extreme Warning: This method is supplied as is, and should be thoroughly tested in your environment. Deploy this solution at your own risk
If you run certutil –v –adtemplate userv2command again, you can see that the templatedescription attribute was changed from user to computer.
5.Publish the certificate created in step 2 to the Certification Authority (CA).
Note: If you don’t perform these changes to the certificate template and configure NDES to deploy this template, then you will receive the following error when requesting the challenge password from the Network Device Enrollment Service (NDES):
Network Device Enrollment Service
Network Device Enrollment Service allows you to obtain certificates for routers or other network devices using the Simple Certificate Enrollment Protocol (SCEP).
You do not have sufficient permission to enroll with SCEP. Please contact your system administrator.
For more information see Using Network Device Enrollment Service.
6. Configure the Network Device Enrollment Service (NDES) to issue certificates based on the certificate template created in step do by editing the following registry key:
[HKEY_LOCAL_MACHINE\SOFTWARE\Microsoft\Cryptography\MSCEP]
"SignatureTemplate"="Userv2"
"EncryptionTemplate"="Userv2"
"GeneralPurposeTemplate"="Userv2"
7. Restart Internet Information Services (IIS) on the Network Device Enrollment Service (NDES).
8. Install the Root CA’s certificate on the computer where you will run the iPhone Configuration Utility.
9. Open the iPhone Configuration Utility and create a configuration profile.
10. Make sure NDES and SCEP settings are configured in the iPhone Configuration Utility using the steps in iPad/Iphone Certificate Issuance blog.
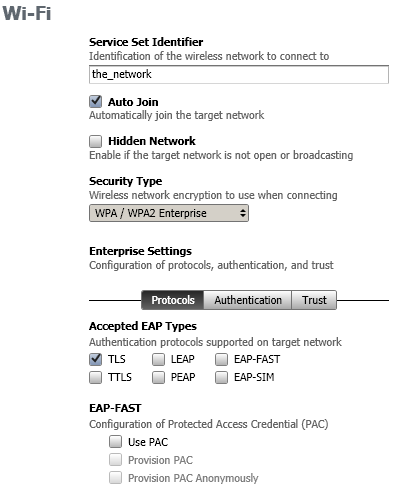
11. Select Wi-fi and enter the SSID of the 802.1x wireless network.
12. Select Auto-Join.
13. On Security type, select WPA/WPA2 Enterprise.
14. Select Protocols and then choose TLS
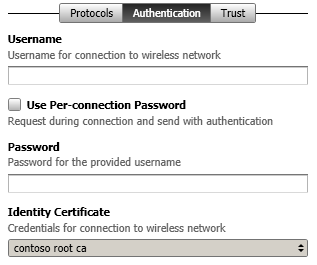
15. Next, select Authentication and choose the SCEP identity certificate that was previously configured as outlined in iPad/Iphone Certificate Issuance blog.
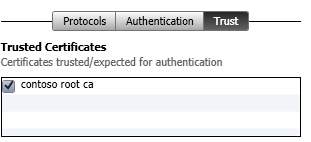
16. Select “Trust” and choose your RootCA certificate as a trusted certificate.

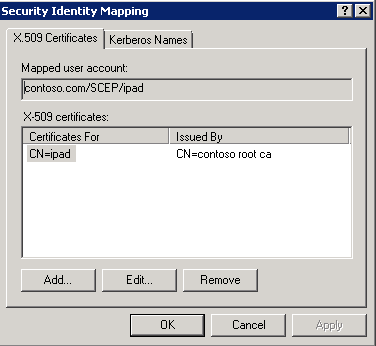
17. After the CA issues the new certificate, you must export it from the CA and associate this certificate with the user account that was created in step 1:
a.Open Active Directory Users and Computers
b.Select menu, View-and then select Advanced Features
c.Find the user account that represents the IPad
d.Right-click the user account and choose Name Mappings
e.Click Add, then select the certificate to import
18. Deploy the profile to your IPad
NPS Basic Settings
The Network Policy Server (NPS) settings that were configured during this solution were:
1. Make your Network policy Server (NPS) member of “RAS and IAS Servers” group
2. Publish the “RAS and IAS Server” certificate template to your CA
3. Enroll your Network policy Server (NPS) server for the “RAS and IAS Server” certificate
4. In Policies, select Connection request policies:
a. Create a Policy named “Secure Wireless Connections” with a condition:
-
- NAS Port Type = “Wireless – Other or Wireless – IEE 802.11”
b. Disable the default policy called “Use Windows authentication for all users”
5. In Policies, select Network Policies:
a. Create a policy named “Secure Wireless Connections” with following settings:
-
- Overview Tab
- Select “Grant Access. Grant access if the connection request matches this policy.”
- Select “Ignore user account dial-in properties”
- Conditions Tab
- NAS Port Type = “Wireless – Other or Wireless – IEE 802.11”
- Windows Groups = “Contoso\Domain users” (this could be any group, just make sure to make the user account member of it)
- Constraints Tab
- Authentication Methods
- Microsoft: Smart Card or other certificate (choose the enrolled RAS and IAS Server certificate)
- Authentication Methods
- Overview Tab
Thanks to Paulo Marques da Costa for writing this informative Blog