Retired Microsoft Blog disclaimer

This directory is a mirror of retired "Windows PKI Team" TechNet blog and is provided as is. All posting authorship and copyrights belong to respective authors.

Posts on this page:

Original URL: https://blogs.technet.microsoft.com/pki/2015/07/24/crosspost-implementing-sha-2-in-active-directory-certificate-services/
Post name: [CrossPost] Implementing SHA-2 in Active Directory Certificate Services
Original author: WesH [MSFT]
Posting date: 2015-07-24T06:54:00+00:00


A fellow engineer at Microsoft, Roger Grimes, has published a great article on Implementing SHA-2 in ADCS. You can read it at the link below:

http://social.technet.microsoft.com/wiki/contents/articles/31296.implementing-sha-2-in-active-directory-certificate-services.aspx

Original URL: https://blogs.technet.microsoft.com/pki/2015/04/26/setting-up-ndes-using-a-group-managed-service-account-gmsa/
Post name: Setting up NDES using a Group Managed Service Account (gMSA)
Original author: Dagmar_Heidecker
Posting date: 2015-04-26T23:24:00+00:00


Setting up NDES using a Group Managed Service Account (gMSA)

Hallo everybody, this is Andy and Dagmar from Austrian Premier Field Engineering (PFE) describing how to implement NDES using a gMSA (instead of a normal domain user account).

When creating a lab on how to implement NDES (Network Device Enrollment Service) on Windows Server 2012 R2, we decided to go for gMSA to be more secure and to get rid of monolithic service accounts that could be misused. Unfortunately it turned out that it was not as straight forward as we expected and we decided to write down the steps and publish them.

Why all the effort? NDES works like a charm when installed with default settings… The answer is short and simple: Security. NDES acts as a registration authority for a CA thereby leveraging the Simple Certificate Enrollment Protocol (SCEP). Because of the way this protocol was designed, the CA has to fully trust the NDES regarding the verification of incoming certificate requests. The result of this design is that the NDES owns an extremely powerful type of certificate (Exchange Enrollment Agent (Offline request) by default) which allows NDES to request certificates with almost any subject from the CA. Therefore, putting as much effort as possible into securing NDES absolutely makes sense.

Be aware that the whole process of securing NDES should comprise a bunch of measures (e.g. enrolling the NDES certificates to a HSM) and that using a gMSA to run it, is only one of the recommended hardening steps. Please refer to this whitepaper focusing on NDES security: http://www.microsoft.com/en-us/download/details.aspx?id=46406&WT.mc_id=Blog_Intune_General_PCIT

Group Managed Service Accounts

(Standalone) Managed Service Accounts were introduced in Windows Server 2008 R2 and are managed domain accounts that provide automatic password management and simplified SPN management, including delegation of management to other administrators but limited to only one server. Group Managed Service accounts were introduced with Windows Server 2012 and provide the same functionality within the domain but also extend their availability to multiple servers.

From the security as well as from the manageability perspective, gMSA are the preferred way to configure services wherever it is supported to use them. For more details regarding gMSA, please refer to https://technet.microsoft.com/en-us/library/hh831782.aspx

NDES Accounts

When setting up NDES you have to decide in which security context the NDES application pool should run. From the NDES wiki (see http://social.technet.microsoft.com/wiki/contents/articles/9063.network-device-enrollment-service-ndes-in-active-directory-certificate-services-ad-cs.aspx#Permissions_Required_for_the_Network_Device_Enrollment_Servicefor more details) we learn that the NDES app pool account needs to fulfill the following requirements:

  • Must be a member of the local IIS_IUSRS group.
  • Must have request permission on the configured CA.
  • Must be a domain user account and have Read and Enroll permissions on the configured templates.
  • Must have SPN set in Active Directory.

All these requirements can be fulfilled by a gMSA, we simply need to configure the SCEP app pool to run in the security context of the gMSA, perform some additional steps and that’s it. But oooops, it wasn’t so simple then…

Configuration Steps

Many of the steps below are described in more detail in the NDES wiki. We are repeating them here in a summarized way in order to provide a complete guide of all steps required. Wherever gMSA specific steps are required, we describe them in detail.

Let’s assume the following parameters for our lab environment:

  • NDES service account: NDESgMSA
  • NDES server: ADCSWeb02.fabrikam.com
  • Certification authority: CA02
  • Web Server certificate (with proper subject and/or SANs set) enrolled to the NDES server

Prerequisites

  • Forest prepared for gMSA usage (KDS Root Key created - https://technet.microsoft.com/en-us/library/jj128430.aspx)
  • NDES Administrator account (out of scope of this post, see NDES wiki for details)
  • NDES Device Administrator account (out of scope of this post, see NDES wiki for details)

Create and configure gMSA

1. Type the following command to create a new gMSA:

New-ADServiceAccount -name NDESgMSA -DNSHostName NDESgMSA.fabrikam.com -PrincipalsAllowedToRetrieveManagedPassword ADCSWEB02$

2. Then configure the gMSA on the NDES host machine:
a. To load the AD PowerShell RSAT feature, type: Add-WindowsFeature RSAT-AD-PowerShell
b. To install the gMSA on ADCSWEB02 type: Install-ADServiceAccount NDESgMSA
c. To verify if the gMSA has been configured properly, type: Test-ADServiceAccount NDESgMSA

Note: The answer has to be true, otherwise it does not make any sense to continue.

3. Next, add the NDESgMSA account to the IIS_IUSRSgroup on the NDES host machine.

Configure CA Security Settings and Templates

Note: we are assuming for easiness that you are going to use the default templates. We recommend using custom (version 2) templates in production as stated at http://social.technet.microsoft.com/wiki/contents/articles/9063.network-device-enrollment-service-ndes-in-active-directory-certificate-services-ad-cs.aspx#Setting_Up_New_Templates_for_the_Service_Certificates.

1. Grant Read and Enroll permissions on Exchange Enrollment Agent (Offline Request) template to NDESAdmin.
2. Grant Read and Enroll permissions on CEP Encryption template to NDESAdmin.
3. Grant Read and Enroll permissions on IPSec (Offline Request) template to NDESgMSA and DeviceAdmin.
4. Publish all three templates on the Certification Authority.

Install NDES

Unfortunately, the setup wizard does not provide support for running the NDES application pool in the security context of a gMSA. That’s why we are processing the installation using more or less the default settings.

  1. On the NDES host machine, add the Network Device Enrollment Service as a role service for the Certification Authority role.
  2. Once the installation has completed, click Configure Active Directory Certificate Services to continue with the configuration of NDEs.
  3. On the Credentials screen, ensure that the NDES Admin account (which was created as part of the prerequisites) is selected.
  4. On the Role Service page, select Network Device Enrollment Service and click Next.
  5. On the Specify the service account page, select Use the built-in application pool identity. Click Next.
  6. On the Specify CA for Network Device Enrollment Service page, click Select. On Select Certification Authority, select the CA you are going to use with this NDES installation and click OK > Next.
  7. On the Type the requested information to enroll for an RA certificate page, click Next.
  8. On the Configure CSPs for the RA page, click Next.
  9. Finally, click Configure.

Alternatively, using the famous PowerShell:

Add-WindowsFeature Adcs-Device-Enrollment -includeManagementTools
Install-AdcsNetworkDeviceEnrollmentService -ApplicationPoolIdentity -CAConfig "CA02.fabrikam.com\FabrikamIssuingCA" -RAName "Fabrikam NDES RA" -RACountry "DE" -RACompany "Fabrikam" -SigningProviderName "Microsoft Strong Cryptographic Provider" -SigningKeyLength 2048 -EncryptionProviderName "Microsoft Strong Cryptographic Provider" -EncryptionKeyLength 2048

Post-Installation IIS Configuration

  1. Open Internet Information Service (IIS) Manager.
  2. Configure a binding for https using the host name and Server Name Indication (SNI)
    Note: On Windows Server 2012, IIS supports Server Name Indication (SNI), which is a TLS extension to include a virtual domain as a part of SSL negotiation. What this effectively means is that the virtual domain name, or a hostname, can now be used to identify the network end point. This allows IIS to share IP addresses among SSL websites. However, it should be noted that if this feature is enabled, clients (in this case the mobile device itself or the MDM (Mobile Device Management Tool) not ready for SNI will not be able to contact NDES. Find more details about SNI at http://www.iis.net/learn/get-started/whats-new-in-iis-8/iis-80-server-name-indication-sni-ssl-scalability
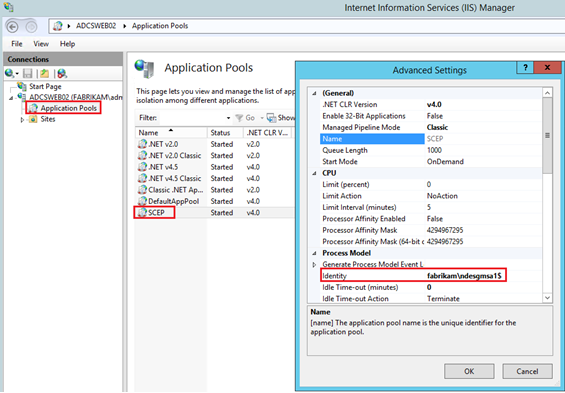
  3. Change SCEP application pool identity to the gMSA

    Note that the NDES application pool is named “SCEP application pool” in IIS.

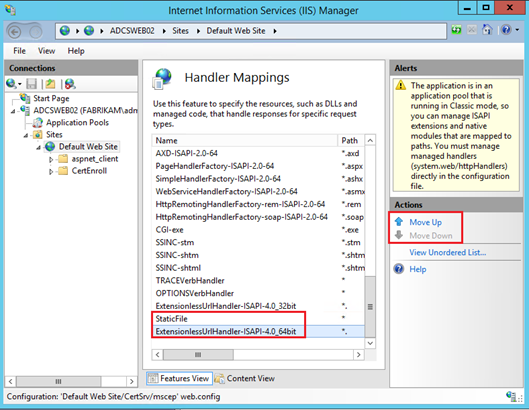
  4. Change ISAPI Handler order:
    Note: The following steps are described in https://support.microsoft.com/en-us/kb/2800975
    If you do not configure IIS in the way described by the knowledge base article mentioned above, your NDES installation will work upon first testing. But later you will find out that the device administrator role is unable to request a challenge password at the mscep_admin site (unless being added to the Enterprise Administrators group).

    a. Still in IIS MMC, select the Default Web Site.
    b. Click View Applications on the Actions pane on the right side.
    c. Double-click Handler Mappings on the middle pane.
    d. On the Actions pane, click View Ordered List…
    e. On the Details pane in the middle, select ExtensionlessUrlhandler-ISAPI-4.0_64bit and click Move Down. Click Yes to move it below the StatifFile item.

    f. Repeat steps a to f for the /Certsrv/mscep_admin application.
    g. Restart IIS by typing iisreset on an elevated command prompt.

  5. Configure permissions on private keys
    Note: again, we assumed for easiness that you are going to use the default templates. If you followed our recommendations and prepared custom templates instead, you can skip this step.
    During the initial configuration of NDES, two certificates were requested in the security context of the NDES Admin (account used to install NDES role service) and permissions on the corresponding keys were configured for the built-in app pool identity. However, we need to configure permissions to the keys for the gMSA:

    a. Open local computer certificate store (certlm.msc) on the NDES machine
    b. Right-click the CEP Encryption certificate, select All Tasks > Manage Private Keys
    c. Add the NDESgMSA account and add the Read permission.
    d. Repeat the steps a – c for the Exchange Enrollment Agent (Offline) certificate.
    e. Restart IIS by typing iisreset on an elevated command prompt.

    Additional Comments

    Starting with Windows Server 2012 R2, NDES supports policy module integration which can provide additional security for the SCEP. This enhancement lets an organization or mobile device management solution address the issue described in CERT Vulnerability Note VU#971035 “Simple Certificate Enrollment Protocol (SCEP) does not strongly authenticate certificate requests.” See http://www.kb.cert.org/vuls/id/971035for more details on this vulnerability.

    Find more details about the NDES Policy Module support at https://technet.microsoft.com/en-us/library/dn473016.aspx

Original URL: https://blogs.technet.microsoft.com/pki/2014/09/08/setting-up-tpm-protected-certificates-using-a-microsoft-certificate-authority-part-3-key-attestation/
Post name: Setting up TPM protected certificates using a Microsoft Certificate Authority – Part 3: Key Attestation
Original author: WesH [MSFT]
Posting date: 2014-09-08T05:10:38+00:00


Hey Everyone, I am back with the last part of this 3 of this series on TPM protected certificates. The last topic for this series is on Key Attestation. Recently I have had a few people ask me about the Key Attestation tab in Windows Server 2012 R2. Another person informed me they tried to set it up, and it didn’t work. That’s not cool. I hadn’t used the feature before so I decided to take a dive into it and maybe I could help y’all out. Here is what I found. First, what is this for? Key Attestation is an assurance mechanism. It validates the private key in a certificate key pair are protected via a TPM. If you don’t know what the big deal is about protecting keys via TPM please see part 1 and part 2 of this series. Depending on how the key is being protected, the CA can also insert Issuance Policy OID’s into a certificate based on what attestation method was used.

The 3 methods used for Key Attestation are:

User Credentials: (Low Assurance) Issuance Policy/Certificate Policy OID: 1.3.6.1.4.1.311.21.32 – The user provides an EKPub to the enterprise CA. The enterprise CA performs no further validation.

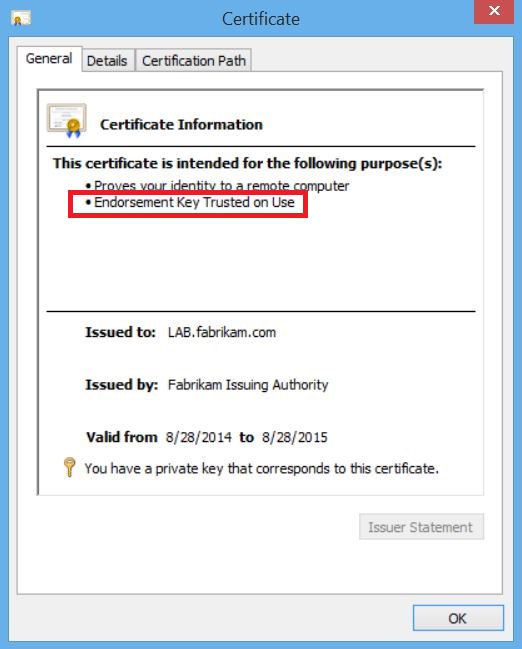
Endorsement Certificate: (Medium Assurance) Issuance Policy/Certificate Policy OID 1.3.6.1.4.1.311.21.31The TPM has a manufacturer supplied certificate embedded. The Enterprise CA validates the EKCert chain. All CA’s in the chain must be trusted. This method also means that ALL TPM’s from the manufacturer’s chain are trusted.

Endorsement Key: (High Assurance) Issuance Policy/Certificate Policy OID: 1.3.6.1.4.1.311.21.30 – The Enterprise CA validates each EKPub provided against an administrator defined list of allowed EKPub. The list is contained in a directory that includes files named for each EKPub SHA-256 hash.


Assumptions

This article assumes the individual has a basic understanding of Microsoft PKI and its components.


Microsoft Lab Configuration

Requirements:

  1. A domain controller running Windows Server 2003 or later
  2. An enterprise certificate authority running Windows Server 2012 R2
  3. A desktop or laptop with a enabled and configured TPM, running Windows 8.1
  4. You have completed the labs from part 1 of this series. (We will be leveraging certificate templates you created from part 1)

Configuring and Testing User Credential Attestation:

This option only requests the client send an EKPub to the Enterprise CA. There is no further validation other than the user’s domain credentials (low assurance).

Step 1: Certificate Template Configuration

In this section we will modify the template we configured in Part 1 of this 3 part series to perform key attestation and insert issuance policies.

  1. Open the Certificate Template Console (certtmpl.msc)

  2. Modify the Workstation Authentication Template you created in Part 1 of this series

  3. Verify the following:

    • Compatibility Tab

      • Certificate Authority: Windows Server 2012 R2

      • Certificate Recipient: Windows 8.1/Windows Server 2012 R2

    • Cryptography Tab

      • Provider Category: Key Storage Provider

      • Requests must be from one of the following providers: Check only Microsoft Platform Crypto Provider

  4. New Settings:

    • Request Handling

      • Renew with the same key: cleared/unchecked

    • Key Attestation Tab

      • Key Attestation: Required

    • Attestation Type

      • User Credentials

    • Issuance Policies for key attested certificates

      • Include issuance polices for enforced attestation types

Result: Certificates requested from the template should resemble the following


Configuring and Testing Endorsement Certificate Attestation:


This option makes use of the certificate some manufacturers burn into their TPM’s. Notice I said some, not all manufacturers are doing this. The next fun thing about this one is, depending on the manufacturer you have to go chase them down to get copies of the public keys for all the CA’s in their chain and import those certificates into special containers on your CA. The good thing about this is, after you do it all of the TPM enabled devices that chain to those certificates are trusted for attestation.

Let’s get started on setting this up.

Step 1: Who made my TPM and do I have an EKCert?

From the Windows 8.1 device that has a TPM.

  1. Open PowerShell as an Admin.
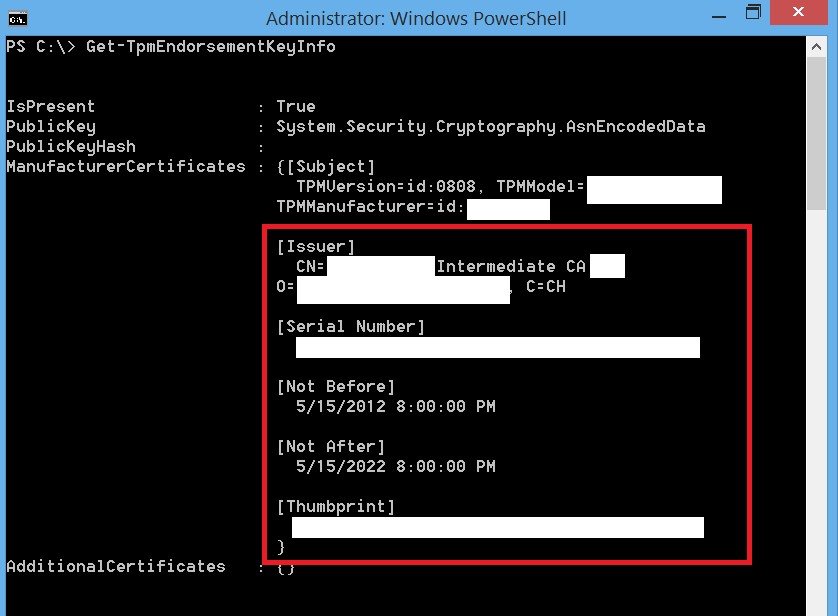
  2. Run the following cmdlet: Get-TPMEndorsementKeyInfoyou should get an output similar to that seen below. Sorry I had to block out a bunch of stuff but you should get the point. From here we can see the certificate information for the EKCert (if you have one)

  3. Now the fun part. Visit the manufacturer’s site and pray they publish these certificates there and you can find them. If not, you will have contact them and ask nicely. Mine was the latter.

Step 2: Importing the Manufacturer Certificates to be used with Attestation


Now that the manufacturer has given us the public keys we can go ahead and import them into special containers in the local machine store so they can be used for attestation purposes.

Some of this is from the TechNet Article: TPM Key Attestation. So a big thanks to the folks that wrote this.


The following commands will create the EKCert containers for the manufacturer’s certificates.


# Create EKCert containers and import TPM manufacturer certificates


cd cert:
cd .\\LocalMachine


new-item EKROOT


new-item EKCA


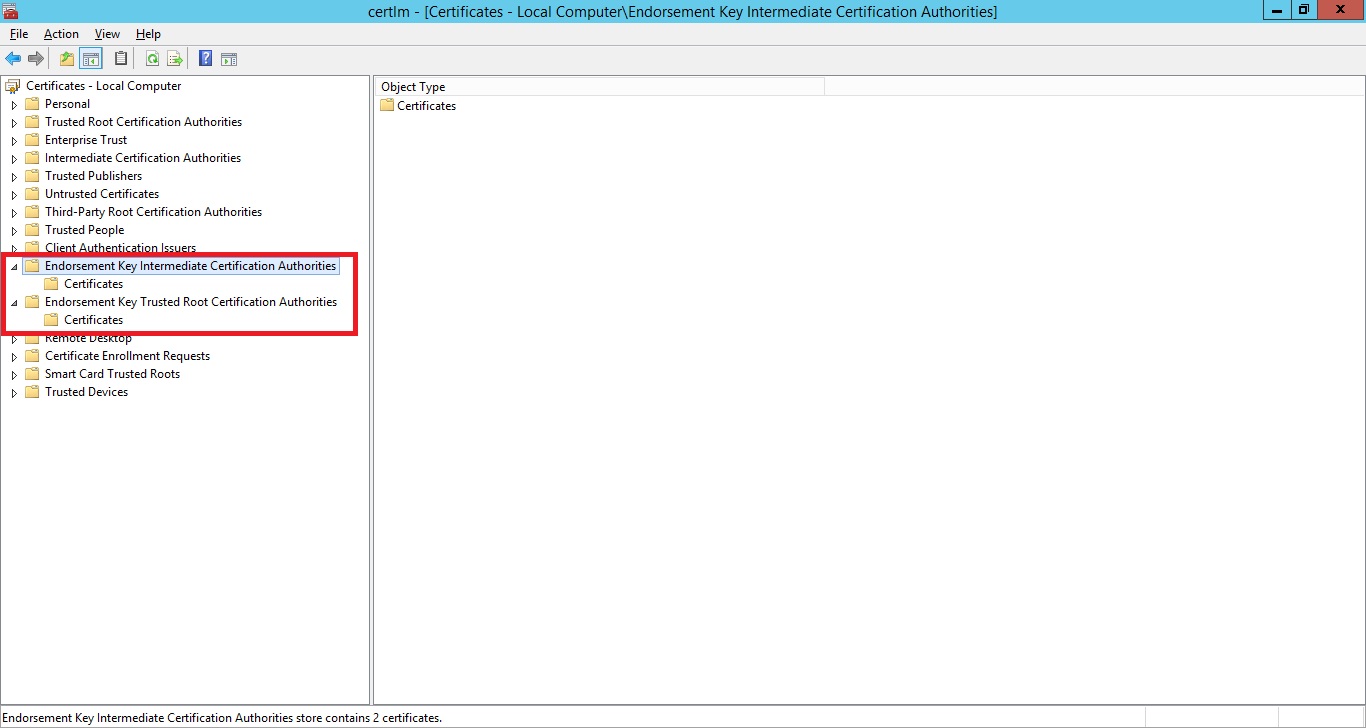
These commands will create the following certificate containers in the local machine store:

After you create the containers you will need to import the manufacturer’s certificates to the proper containers.

Now we can configure your certificate template for Endorsement Certificate attestation.

Step 3: Certificate Template Configuration


  1. Open the Certificate Template Console (certtmpl.msc)

  2. Modify the Workstation Authentication Template you created in Part 1 of this series

  3. Verify the following:

    • Compatibility Tab

      • Certificate Authority: Windows Server 2012 R2

      • Certificate Recipient: Windows 8.1/Windows Server 2012 R2

    • Request Handling

      • Renew with the same key: cleared/unchecked

    • Cryptography Tab

      • Provider Category: Key Storage Provider

      • Requests must be from one of the following providers: Check only Microsoft Platform Crypto Provider

  4. New Settings:

    • Key Attestation Tab

      • Key Attestation: Required

    • Attestation Type

      • Endorsement Certificate

    • Issuance Policies for key attested certificates

      • Include issuance polices for enforced attestation types

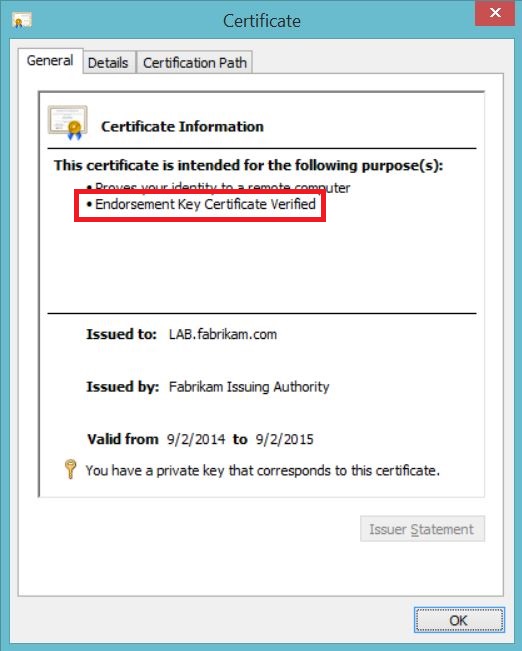
Result: Certificates requested from the template should resemble the following


Configuring and Testing Endorsement Key Attestation:


This process takes the most administrative effort and thus provides the highest level of assurance. With this method our goal is to populate a folder, either locally or network, with empty files. The names of the files are the sha256 hash of the TPM endorsement keys forthe devicesin your organization you want to perform attestation.

Step 1: Identifying the TPM Hash


For this we are going to use a sample PowerShell script that I made using the one in the Technet article for a reference (with a few tweaks of courseJ).


#This line provides us with the TPM Public Endorsement Key info and also provides the hash in sha-256 form


$tpmhash=Get-TpmEndorsementKeyInfo -HashAlgorithm sha256


# We only want the hash value so here we pull just that value


$tpmhashfile=$tpmhash.PublicKeyHash


#Lastly we create an empty file with no extension whose name is the hash of the TPM EK public key. Mine writes to a file share where multiple CA’s can read it. Notice I said READ. So the NTFS and file share permissions will need to be configured to allow the machine accounts of the CA’s to READ.


New-Item -path \\Fab-LAB-DC01\TPMHash\$tpmhashfile -ItemType file


Step 2: Adding the EKPub Hash Folder to the Issuing CA


Now that we have an EKPub hash file in the folder we need to have the CA recognize this folder as a repository. Remember, the CA machine account needs to have read permissions on this folder so if it’s local that’s no big deal. But since mine is on a network share I needed to configure this on the NTFS and share permissions.

  1. We are going to run this command to add the folder as an Endorsement Key List Directory, there is currently no method to do this through the GUI

    certutil.exe -setreg CA\EndorsementKeyListDirectories +\\con-lab-dc01\EKPub$

    Alternatively you can run certutil.exe -setreg CA\EndorsementKeyListDirectories -\\con-lab-dc01\EKPub$ to remove a directory

  2. Now we need to restart the CA services for the change to take effect. You can choose your favorite method I am going to use the command line.

    net stop certsvc & net start certsvc

Step 3: Certificate Template Configuration


  1. Open the Certificate Template Console (certtmpl.msc)

  2. Modify the Workstation Authentication Template you created in Part 1 of this series

  3. Verify the following:

    • Compatibility Tab

      • Certificate Authority: Windows Server 2012 R2

      • Certificate Recipient: Windows 8.1/Windows Server 2012 R2

    • Cryptography Tab

      • Provider Category: Key Storage Provider

      • Requests must be from one of the following providers: Check only Microsoft Platform Crypto Provider

  4. New Settings:

    • Request Handling

      • Renew with the same key: cleared/unchecked

    • Key Attestation Tab

      • Key Attestation: Required

    • Attestation Type

      • Endorsement Key

    • Issuance Policies for key attested certificates

      • Include issuance polices for enforced attestation types

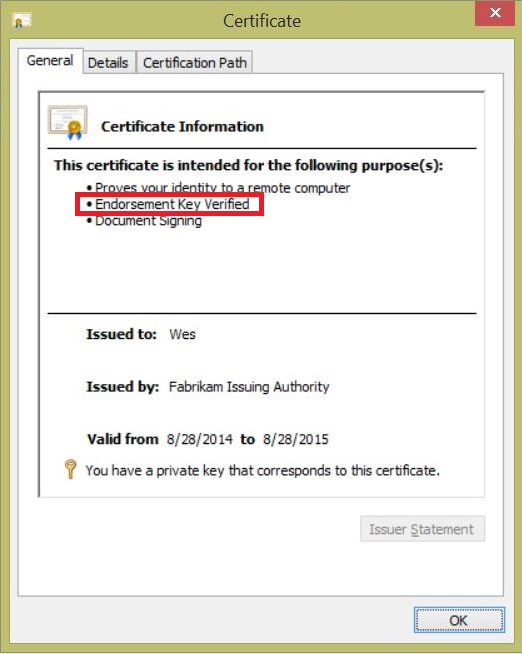
Result: Certificates requested from the template should resemble the following


Technical Resources:


Processing Rules for Key Attestation Based on a Trusted Endorsement Key
http://msdn.microsoft.com/en-us/library/dn410471.aspx

Get-TPMEndorsementKeyInfo
http://technet.microsoft.com/en-us/library/dn449037.aspx

TPM Key Attestation
http://technet.microsoft.com/en-us/library/dn581921.aspx

TPM System Fundamentals Testing Prerequisites
http://msdn.microsoft.com/en-us/library/windows/hardware/dn247549.aspx

TPM Attestation Test
http://msdn.microsoft.com/en-us/library/windows/hardware/hh998296.aspx

Links to part 1 and 2 of this 3 part series are below:

Part 1: Microsoft Platform Crypto Provider
Part 2: Virtual Smart Cards


Original URL: https://blogs.technet.microsoft.com/pki/2014/07/15/setting-up-tpm-protected-certificates-using-a-microsoft-certificate-authority-part-2-virtual-smart-cards/
Post name: Setting up TPM protected certificates using a Microsoft Certificate Authority – Part 2: Virtual Smart Cards
Original author: WesH [MSFT]
Posting date: 2014-07-15T06:54:58+00:00


Hey Everyone, I am back with part 2 of this 3 part series on TPM protected certificates. The topics covered in this are related to Virtual Smart Cards, their benefits, and lastly their limitations. I will also cover how to create a Virtual Smart Cards. Management of certificates contained on the virtual smart card are similar to those of a traditional smart card are not covered in this article.

Virtual Smart Cards function very similarly to conventional Smart Cards. The difference is the private key is protected by the TPM and not the smart card media. The Virtual smart card emulates a smart card and reader so the device presents itself to operating system and applications as a traditional smart card. As for the storage of the private key, this is handled similarly to that of a key protected by the Microsoft Platform Crypto Provider. The private key is encrypted and stored on the file system.

Virtual Smart Cards offer the following similarities with traditional Smart Cards.

Non-Exportability: Since the private key is encrypted by the TPM is cannot be used on any other device.

Anti-Hammering: The TPM will lockout if a pin is entered incorrectly too many times. This behavior is manufacturer specific.

Key Isolation: Private keys protected by the TPM are never exposed to the operating system or malware. All private key operations are handled within the TPM.

For more information see the following related article:

TPM Fundamentals - http://technet.microsoft.com/en-us/library/jj889441.aspx

Lab Configuration

Assumptions

This article assumes the individual has a basic understanding of Microsoft PKI and its components.

Prerequisites

•A domain controller running Windows Server 2003 or later*
•An enterprise certificate authority running Windows Server 2012 R2
•A desktop or laptop with a configured TPM, running Windows 8.1

*In order to process Smart Card logons. Domain Controllers must obtain a certificate based on the Domain Controller Authentication certificate template.

Virtual Smart Card Creation

In this section we will create a virtual smart card on the Windows 8.1 laptop or laptop. Creating a virtual smartcard is not a difficult task however there are a few ways of doing it. The easiest method is using the command line utility TPMVSCMGR.EXE.

To create a virtual smartcard from the command line use the following command. Note: You must have admin rights on the host and the command line must be (run as admin).

Tpmvscmgr.exe create /name “TestVirtualSC” /pin prompt /adminkey default /generate

You should be prompted to enter a pin, enter a pin of your choosing then re-enter it to confirm.

Before we go further let’s take note of what this will actually do.

Create: This is pretty self-explanatory. We are creating a virtual smartcard here.

/name: This is the name that will be given to the device you will see in Device Manager (see below)
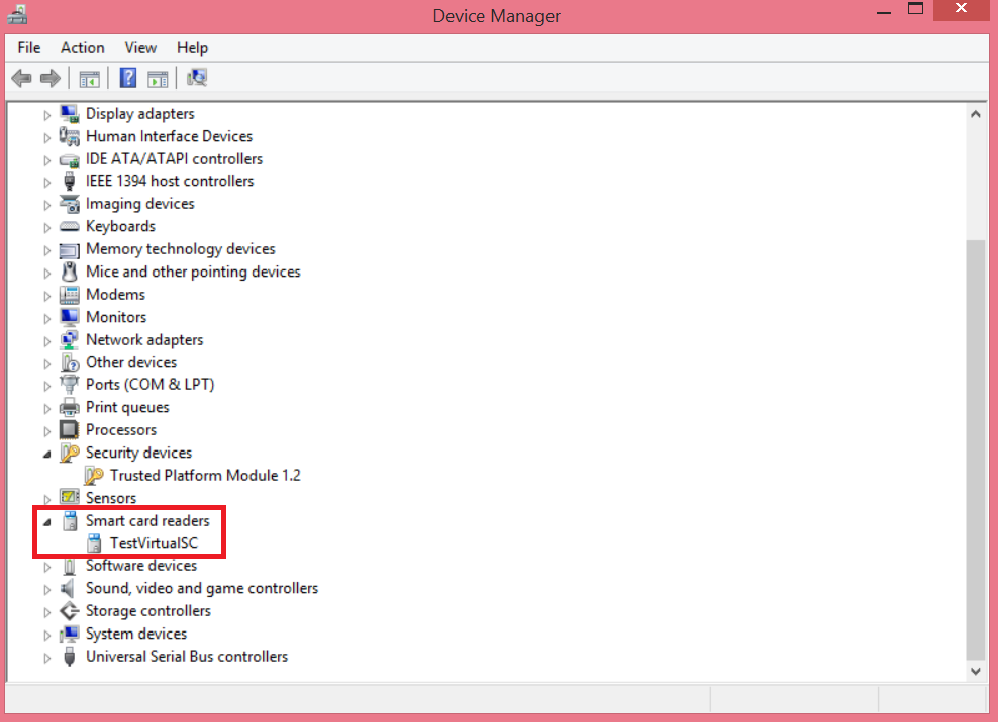
/pin: This is the pin that unlocks the virtual smart card. Similar to physical smartcard but protected by the TPM anti-hammering feature.

/adminkey: the admin key that you are assigning to the virtual smart card. Admin keys are used for management purposes.

After the virtual smartcard creation it can be treated just like a traditional smart card by using the “Microsoft Base Smart Card Crypto Provider” or “Microsoft Smart Card Key Storage Provider”.

Smart Card Logon Certificate Template

In this section we will create the certificate template to be used for smartcard logon. This template will be configured to leverage the “Microsoft Smart Card Key Storage Provider”. So unless a physical or Virtual Smart Card is present the user will not be able to enroll for this type of certificate. Before we get started I want to note a few things.

  1. Creating this template will require Enterprise Admin rights unless you have delegated access to the templates by using one of the steps defined in this article: http://technet.microsoft.com/en-us/library/cc725621(v=WS.10).aspx

  2. The template settings defined here should not be used in a production environment. Obtaining a certificate that can be used for smart card logon should not be easy. Processes should be put into place to ensure these types of certificates are procured in a secure manner (Issuance Policies), especially if they are to be used for non-repudiation. See the last section in this document “Further Considerations” for more info.

Now that this stuff is out of the way…

From the Enterprise Certificate Authority.

  • Open the Certificate Templates Console - certtmpl.msc,

  • Duplicate the Smartcard Logon certificate templates

  • On the Compatibility tab set the Certificate Authority to Windows Server 2012 and Certificate recipient to Windows 8.1/Windows Server 2012 R2

    *Note: Windows 8.1 and Windows Server 2012 R2 are only required for key attestation. We will reuse this template in part 3 for this purpose. If your CA and client are Windows 8 and Windows Server 2012 you can still complete this exercise. If this is the case simply choose Windows 8/Windows Server 2012 in the compatibility settings.

  • Click on the General Tab and give the template a name.
  • Click on the Cryptography tab

    • Change the Provider Category to Key Storage Provider

    • Select Requests must use one of the following providers:

      • Check the box for Microsoft Smart Card Key Storage Provider.

  • Click Apply and OK.

  • Open the Certificate Authority MMC – certsrv.msc

  • Right click on the Certificate Templates container and select new, certificate template to issue.

  • Click on the certificate template you created and click OK.

Enrolling for a Smart Card Logon Certificate

After your Virtual Smart Card and Smart Card Logon Template has been created now we are ready to enroll for a certificate.

  • Open CertMgr.msc

  • Right click on the Personal container -> all tasks -> Request New Certificate

  • Certificate Enrollment Wizard

    • On the “Before You Begin” page click Next

    • On the Select “Certificate Enrollment Policy” page Active Directory Enrollment Policy is the default. Click Next

    • Choose the certificate template you created by filling the checkbox to its left and click Enroll

    • Click Finish

That’s it. We now have a Virtual Smart Card and a certificate for Smart Card Logon. We are ready to use it to log in.


Logging In/User Experience

Before I get started on the next section. Sorry for the low res pictures ??

Now what we have everything we need to log in. What will your users see? Users will see the familiar interface but there will be a new link below: Sign-in options
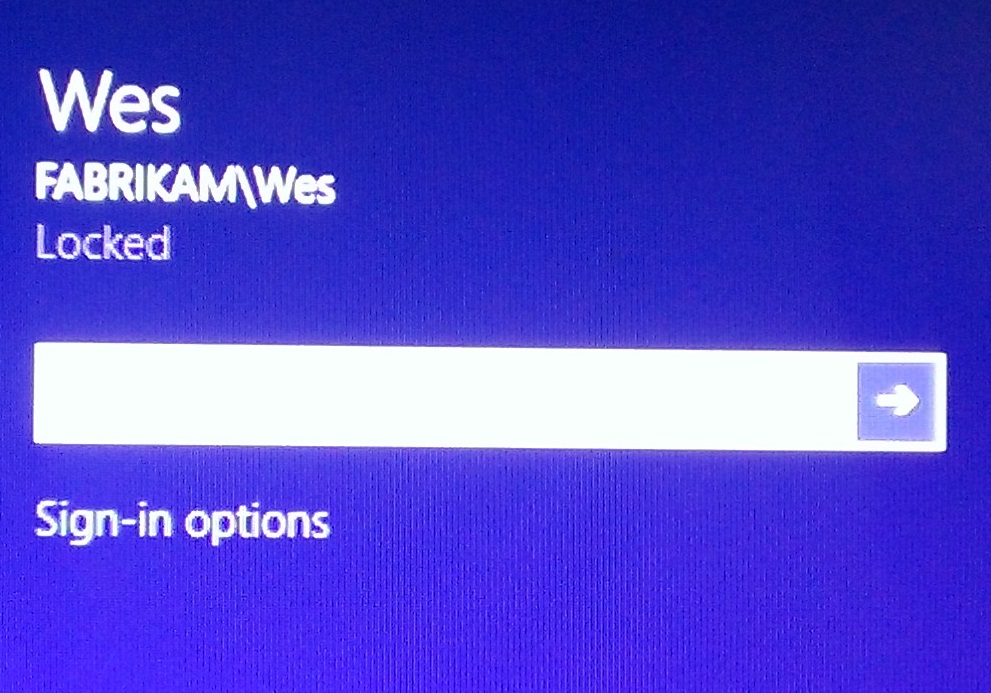
Clicking on Sign-in options reveals the following.
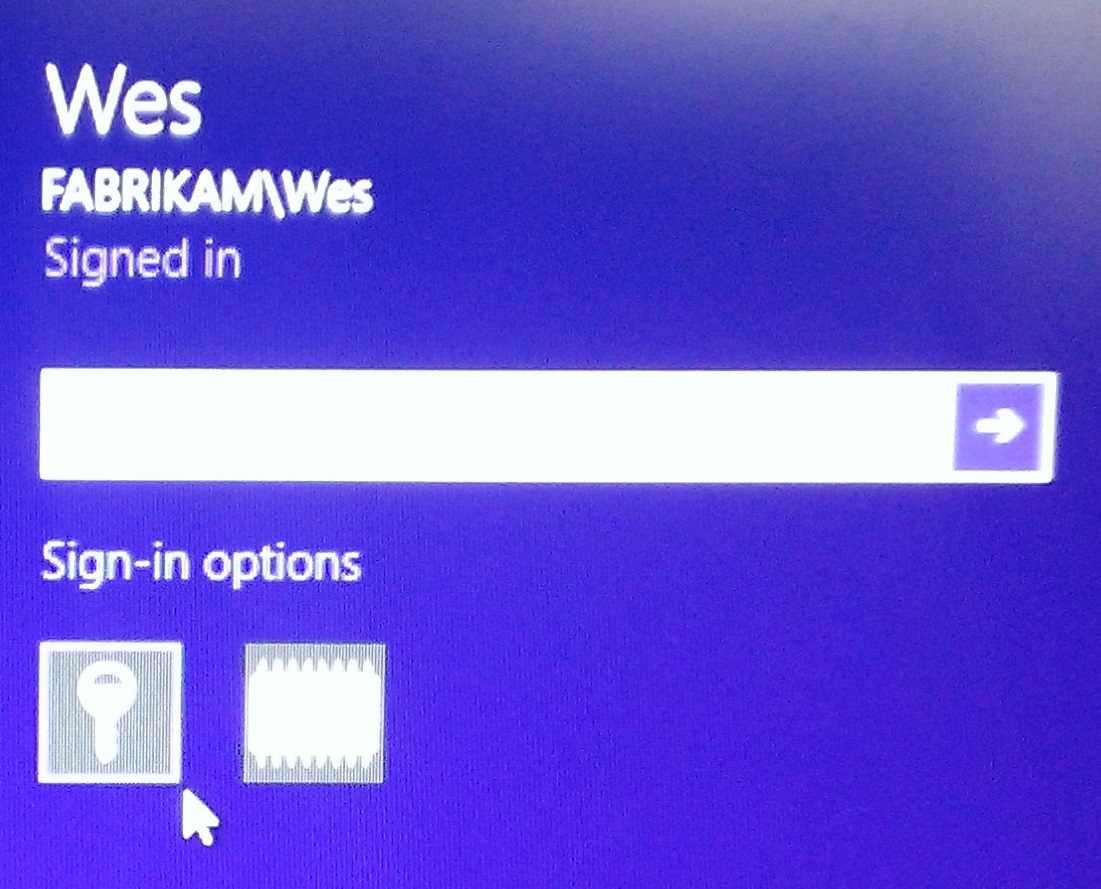
The first is the icon that looks like a key, this is the username/password option. Do I need to explain this any further? I hope not.
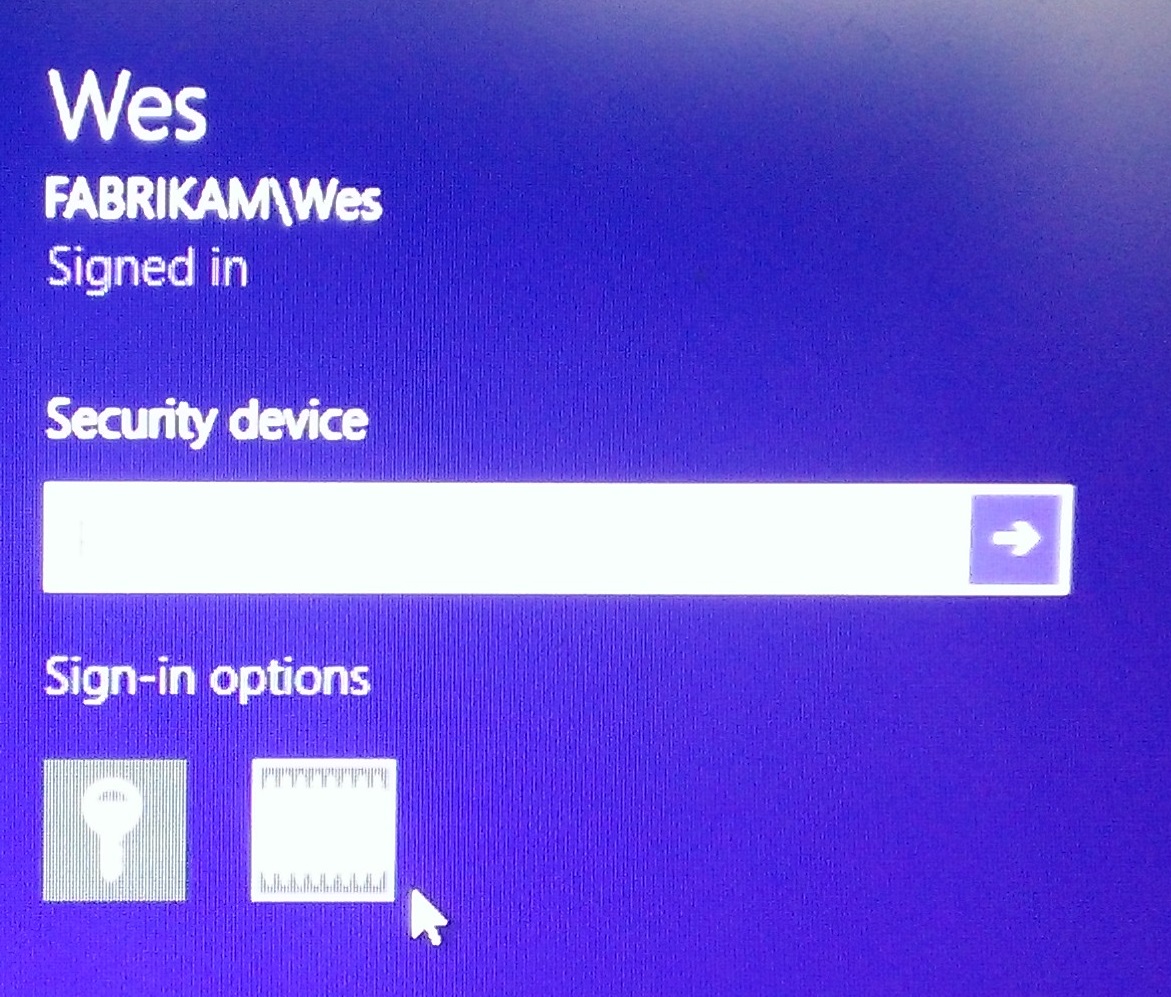

This is the one we are interested in. The icon that looks like an IC or chip. Clicking on this changes the box above to state “Security Device” and the place you would typically put your password says PIN now. Hmmm…… where did I see that PIN before, oh yeah when we created the Virtual Smart Card. I hope you remember what you set it to. Enter the PIN you used when you created the Virtual Smart Card. Viola! Smart Card Logon.

Changing Virtual Smart Card PIN

In this last section I will show you how to change a PIN for a Virtual Smart Card.

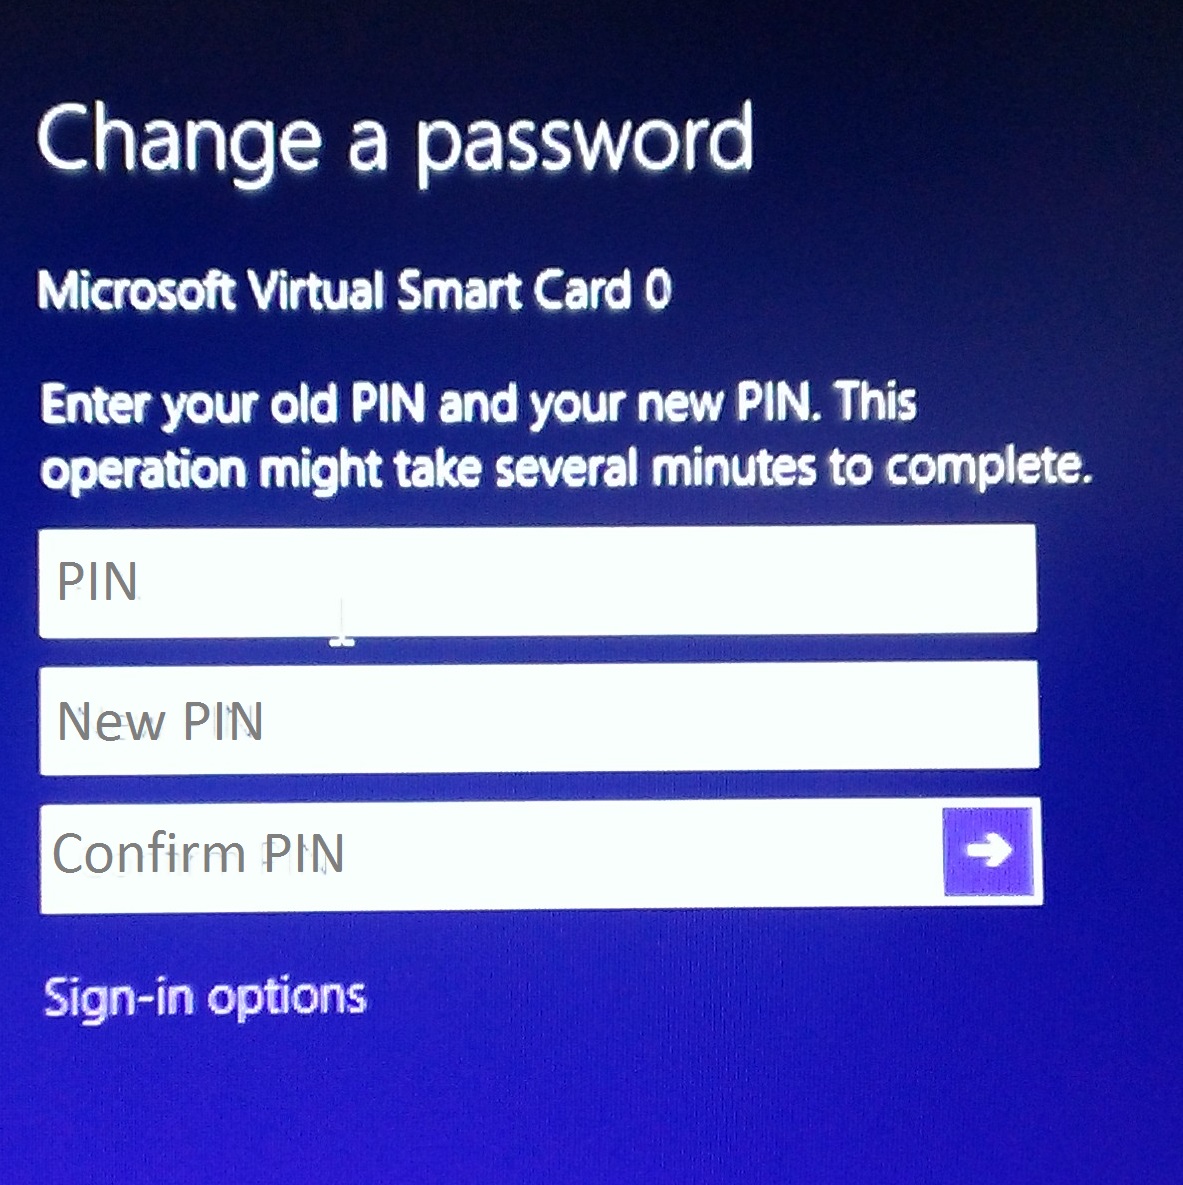
While logged in using the Virtual Smart Card press Ctrl+Alt+Del and select the option to “Change a password”. Enter the old PIN, the new PIN then confirm. That’s it.

Further Considerations

Issuance Policy/Enrollment Requirements

It is important to give consideration as to why you are implementing Virtual Smart Cards. Most organizations choose to issue Smart Cards or Virtual Smart Cards to strengthen security. Smart card logon achieves this by requiring the user to have their physical smart card and the associated PIN in order to logon. Virtual Smart Cards are very similar. The user must have the TPM enabled device, and know the PIN.

Additional considerations should be given for enrollment for a virtual smart card. Much as that of traditional Smart Cards a username and password should not be the only factor to obtain one. Your organization may determine that someone needs to enroll in person and/or provide positive ID, fill out forms or other requirements.

Shared Devices/Computers

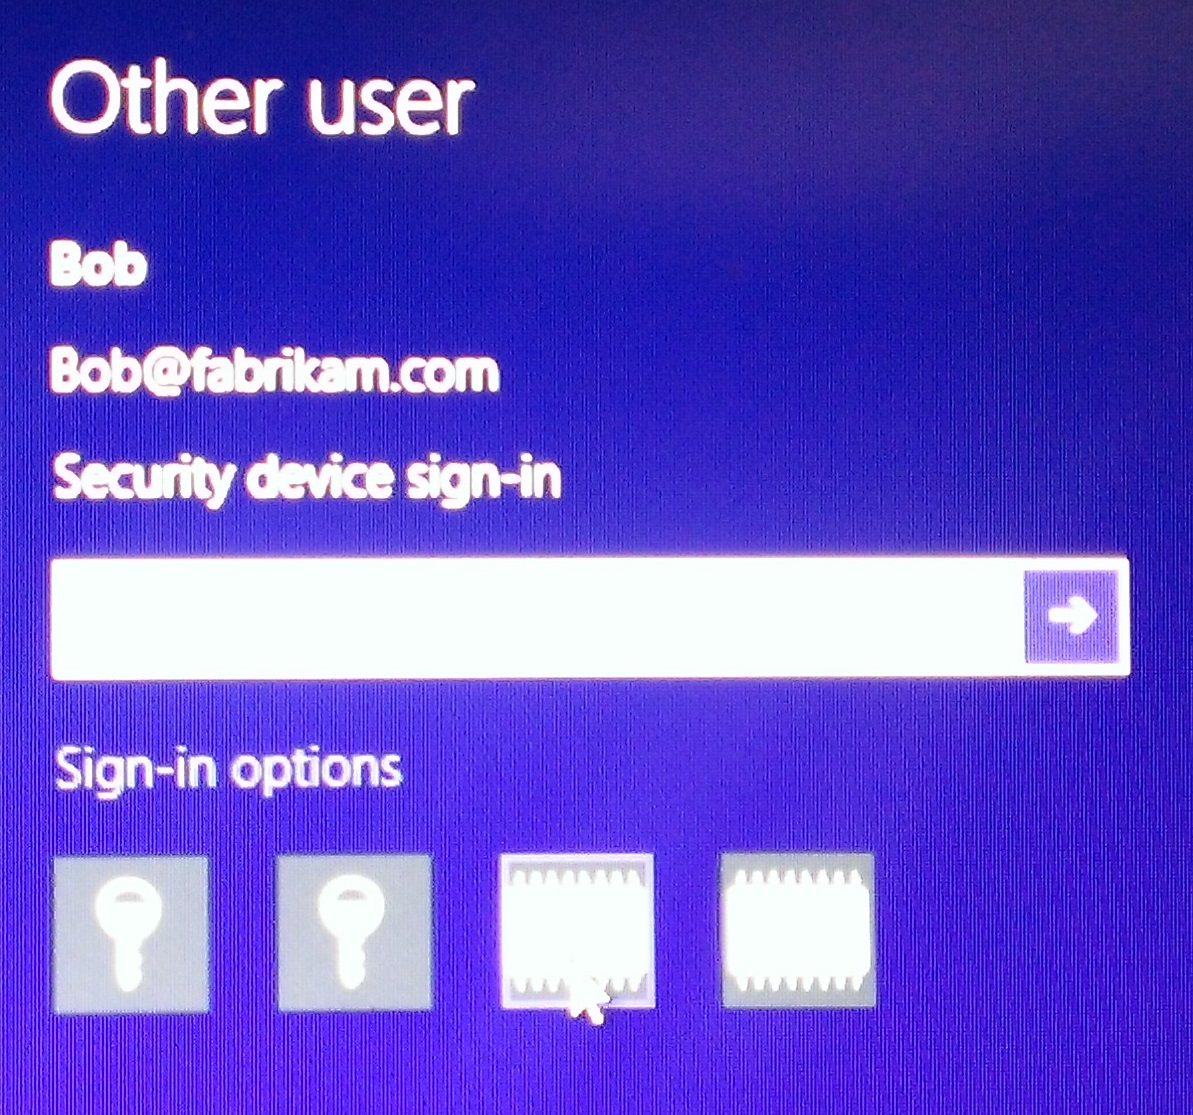
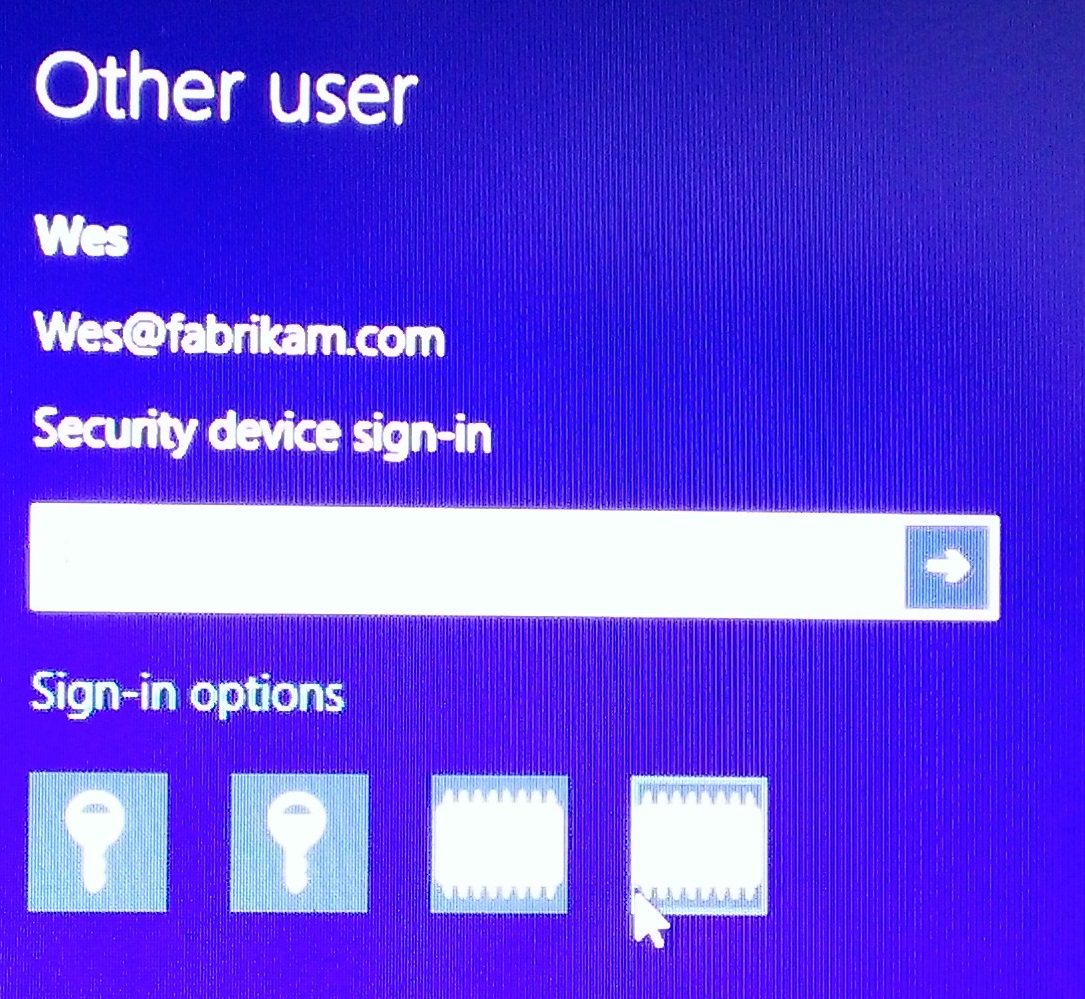
It is possible to have more than one Virtual Smart Card on a device. If you do have a requirement to have more than one the interface presents similar to what you see here:

User 1: Bob
User 2: Wes
I hope you all enjoyed this post on Virtual Smart Cards and I hope it assists you in your evaluation of this security related feature. Again, this is part 2 of a 3 part series regarding protecting certificate private keys using Trusted Platform Modules. I’ll be back really soon with part 3, Key Attestation in Windows Server 2012 R2 and Windows 8.1.

Technical Resources:

Understanding and Evaluating Virtual Smart Cards - http://technet.microsoft.com/en-us/library/dn578507.aspx

TPM Platform Crypto-Provider Toolkit - http://research.microsoft.com/en-us/downloads/74c45746-24ad-4cb7-ba4b-0c6df2f92d5d/default.aspx

Original URL: https://blogs.technet.microsoft.com/pki/2014/06/05/setting-up-tpm-protected-certificates-using-a-microsoft-certificate-authority-part-1-microsoft-platform-crypto-provider/
Post name: Setting up TPM protected certificates using a Microsoft Certificate Authority – Part 1: Microsoft Platform Crypto Provider
Original author: WesH [MSFT]
Posting date: 2014-06-05T13:28:00+00:00


Hey Everyone, This is Wes Hammond with Premier Field Engineering back to share what I have learned about protecting digital certificates using the Trusted Platform module in Windows desktops, laptops and servers. This is part one of a three part series that will include the Microsoft Platform Crypto Provider, Virtual Smart Cards, and lastly the Key Attestation feature included in Windows Server 2012 R2 and Windows 8.1. So getting on to part 1: Microsoft Platform Crypto Provider. Let's start off with, why should I use this? The answer is, using a Trusted Platform Module to protect private keys provides higher security assurances. It accomplishes this with the following:

Non-Exportability: The certificate template will only allow the Microsoft Platform Crypto Provider to be selected if the "Allow private key to be exported" option is not checked in the request handling tab. Thus, private keys protected by the TPM are not exportable.

Anti-Hammering: When used in conjunction with passwords or PINs a TPM will lock out if a pin or password is entered incorrectly too many times.

Key Isolation: Private keys protected by the TPM are never exposed to the operating system or malware. All private key operations are handled within the TPM.

For more information see the following related article:

TPM Fundamentals - http://technet.microsoft.com/en-us/library/jj889441.aspx

Assumptions

This article assumes the individual has a basic understanding of Microsoft PKI and its components.

Microsoft CA configuration:

Requirements:

*Note: The Microsoft Platform Crypto Provider only requires Windows 8 and Windows Server 2012. However Windows 8.1 and Windows Server 2012 R2 are required for key attestation which will be covered in part 3 of this series. So for the sake of this exercise I will be leveraging Windows 8.1 and Windows Server 2012 R2 for the client and CA server operating systems

  • A domain controller running Windows Server 2003 or later
  • An enterprise certificate authority running Windows Server 2012 R2
  • A desktop or laptop with a TPM, running Windows 8.1

Certificate Template Configuration:

  • Open the Certificate Templates Console - certtmpl.msc
  • Duplicate the certificate template of your choice. For this exercise we will use the Workstation Authentication template.
  • On the Compatibility tab set the Certificate Authority to Windows Server 2012 R2 and Certificate recipient to Windows 8.1/Windows Server 2012 R2.

    *Note: Windows 8.1 and Windows Server 2012 R2 are only required for key attestation. We will reuse this template in part 3 for this purpose. If your CA and client are Windows 8 and Windows Server 2012 you can still complete this exercise. If this is the case simply choose Windows 8/Windows Server 2012 in the compatibility settings.

  • Click on the General Tab and give the template a name.
  • Click on the Cryptography tab
  • Change the Provider Category to Key Storage Provider
  • Select Requests must use one of the following providers:
  • Check the box for Microsoft Platform Crypto Provider. *Note: If this provider is not listed check the request handling tab and make sure the" Allow private key to be exported" option is not checked.
  • This step is optional: Click on the Request Handling tab
  • Check the option to Renew with the same key *Note: This option ensures the renewed certificate maintains the same assurance levels as that of the original request.
  • Click Apply and OK.
  • Open the Certificate Authority MMC - cert
  • Right click on the Certificate Templates container and select new, certificate template to issue.
  • Click on the certificate template you created and click OK.

Issue End Entity Certificate

These next steps require a domain account with local administrator rights.

  • Log onto the desktop or laptop Windows 8.1
  • Open the local computer certificate store - certlm.msc
  • Right click the Personal container and select All Tasks, Request New Certificate
  • Click Next on the Before You Begin screen
  • Click Next on the Select Certificate Enrollment Policy screen
  • Check the box for your new certificate template and click Enroll
  • Select Finish

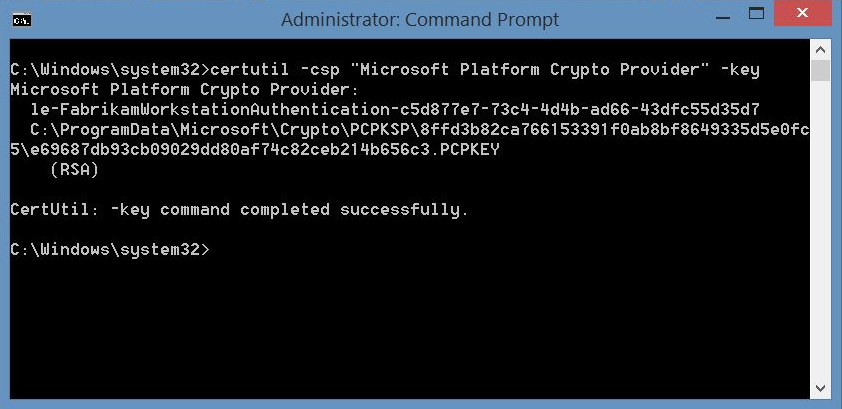
To verify the certificate use the following command

Certutil -csp "Microsoft Platform Crypto Provider" -key

Related Links

TPM Platform Crypto-Provider Toolkit
http://research.microsoft.com/en-us/downloads/74c45746-24ad-4cb7-ba4b-0c6df2f92d5d/default.aspx