Retired Microsoft Blog disclaimer

This directory is a mirror of retired "Windows PKI Team" TechNet blog and is provided as is. All posting authorship and copyrights belong to respective authors.

Posts on this page:

Original URL: https://blogs.technet.microsoft.com/pki/2009/08/07/understanding-key-archival/
Post name: Understanding Key Archival
Original author: MS2065 [MSFT]
Posting date: 2009-08-07T11:24:21+00:00


It came to my attention that there is little understanding regarding the relationship between archived private keys and Key Recovery Agent (KRA) certificates. With this blog post I would like to clarify what you can expect from the recovery mechanism and why.

Relationship between archived private keys and Key Recovery Agent certificates

Microsoft TechNet offers two operations whitepapers called Key Archival and Management in Windows Server 2003 and Active Directory Certificate Services Longhorn Beta3 Key Archival and Recovery which you should be familiar with before turning on key recovery.

Apparently, both papers are not 100 % clear about the effects of adding KRA certificates to the CA configuration. Step 9 of the key archival process explains that a private key is encrypted with the KRA’s public key before it is stored in the CA database. That’s a true statement but think about the effect when you have archived private keys in the CA database and you are adding a new KRA certificate to the list of key recovery agents at the CA.

At the time when the private keys have been archived, the public key of the newly added KRA certificate was not available to the CA. Therefore, you cannot recover private keys from the database with a KRA certificate which was not part of the CA configuration when a private keys were archived. This is a very important piece of information! You have to have a lifecycle strategy for your KRA certificates to ensure private key recovery at any time.

Imagine the scenario illustrated in the drawing below:

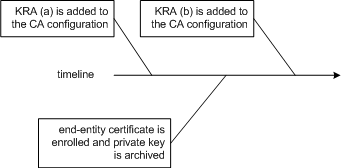
A certificate from KRA (a) is added to the CA configuration. From that point in time on, the CA has access to the KRA's public key. If an archival request comes in, the CA is able to encrypt the random symmetric encryption key (used to encrypt the end-entity private key) with the KRA’s public key. Due to the fact, that the certificate from KRA (b) is added to the CA configuration after the end-entity private key was archived, KRA (b) is not able to recover the end-entity private key. You may assume, that the CA is doing an implicit re-encryption of the already archived private keys when a new KRA certificate is added to the CA configuration but it’s not!

At this point you may ask for a solution for the problem. What should be done after adding a new KRA certificate to the CA configuration? If you are not comfortable with the default behavior, the only way is to export all archived private keys from the CA database and import them again. While importing the private keys, the CA is using the currently configured KRA certificates to encrypt the random symmetric encryption keys used to encrypt the private keys. I described this procedure in the Active Directory Certificate Services Upgrade and Migration Guide in section Exporting Archived Encryption Keys (Optional). The procedure is a bit cumbersome especially because I did not investigate how to automate the getkey operation explained in step #10 for all exported certificates. May be with a Powershell script the entire export/re-import can be automated.

Even if the above approach is not the most comfortable way, you should be aware of the facts. I want to avoid any surprise where you cannot recover end entity certificates because of a misunderstanding of key archival.

KRA certificates and the CA configuration

It is a recommended practice configuring the KRA certificates before enabling key recovery. True statement, but what’s happening when a KRA certificate expires and must be renewed?

As the Active Directory Certificate Services Longhorn Beta3 Key Archival and Recovery whitepaper states in section Renewing Key Recovery Agent Certificates between the lines, a CA will not use an expired KRA certificate to encrypt new incoming private keys for archival. The CA administrator must ensure that the KRA certificates are valid while key recovery is enabled. Therefore it is highly recommended to watch out for event 127 ("Key recovery certificate %1 is about to expire soon and will not be used upon expiration. Contact your administrator to renew this certificate.  %2  %3") which warns about a soon expiry of a KRA certificate. The event was introduced with Windows Server 2008. If you are catching event 127, immediate action is recommended: To keep the number of KRA keys used for private key encryption at a low level, you should renew the expiring KRA certificate with the existing key. You would have two KRA certificates and on KRA key in this scenario. If you are renewing the KRA certificate with a new key instead, you must be aware that all newly arriving private keys are encrypted with this new KRA key. Thus you are maintaining two KRA certificates and two KRA keys for key recovery.

KRA certificate characteristics

Generally, the validity of a KRA certificate is verified whenever it is used to archive a private key while processing a request. The KRA certificate must meet the following requirements:

  • The KRA certificate’s Key Usage extension must have either CERT_KEY_ENCIPHERMENT_KEY_USAGE or CERT_KEY_AGREEMENT_KEY_USAGE set.
  • The KRA certificate must chain to any trusted root, and the chain must be valid for szOID_KP_KEY_RECOVERY_AGENT. Note, while it is the default configuration that a KRA certificate is issued by the CA that is also configured for key archival, there is no technical dependency between the KRA certificate and the archiving CA. A Windows CA can be configured to use any trusted and valid KRA certificate.
  • None of the certificates in the KRA certificate chain is be revoked.

Summary

The following practices are recommended when dealing with KRA certificates and keys:

  • define the number of KRA certificates before enabling key recovery and do not add or remove KRA certificates randomly at a later time
  • use longer certificate validity times for KRA certificates to keep the number of renewals at a low level
  • renew KRA certificates before they expire with an existing key
  • watch out for event 127 in the event log. The event was introduced with Windows Server 2008.
  • think about the key storage for KRA keys. User profiles can be lost. If the only copy of a KRA key is stored in a user profile, you may loose the capability to recover private keys
Original URL: https://blogs.technet.microsoft.com/pki/2009/08/05/how-to-create-a-web-server-ssl-certificate-manually/
Post name: How to create a web server SSL certificate manually
Original author: MS2065 [MSFT]
Posting date: 2009-08-05T09:43:00+00:00


The Internet Information Server (IIS) and Microsoft Internet Security and Acceleration (ISA) provide wizards in the administration user interface to request and install SSL certificates. With this blog post I want to explain how to request a SSL server certificate manually. The manual steps are required if the Certification Authority (CA) is not available in the same forest as the IIS or ISA is a member of.

1. Creating an INF file to set the certificate properties

Use Notepad to modify the following sample INF file according to your needs. Safe the file as ssl.inf for example

[Version]
Signature="$Windows NT$"

[NewRequest]
Subject = "CN=SERVER.CONTOSO.COM"   ; For a wildcard use "CN=*.CONTOSO.COM" for example
; For an empty subject use the following line instead or remove the Subject line entierely
; Subject =

Exportable = FALSE                  ; Private key is not exportable
KeyLength = 2048                    ; Common key sizes: 512, 1024, 2048, 4096, 8192, 16384
KeySpec = 1                         ; AT_KEYEXCHANGE
KeyUsage = 0xA0                     ; Digital Signature, Key Encipherment
MachineKeySet = True                ; The key belongs to the local computer account
ProviderName = "Microsoft RSA SChannel Cryptographic Provider"
ProviderType = 12
SMIME = FALSE
RequestType = CMC

; At least certreq.exe shipping with Windows Vista/Server 2008 is required to interpret the [Strings] and [Extensions] sections below

[Strings]
szOID_SUBJECT_ALT_NAME2 = "2.5.29.17"
szOID_ENHANCED_KEY_USAGE = "2.5.29.37"
szOID_PKIX_KP_SERVER_AUTH = "1.3.6.1.5.5.7.3.1"
szOID_PKIX_KP_CLIENT_AUTH = "1.3.6.1.5.5.7.3.2"

[Extensions]
%szOID_SUBJECT_ALT_NAME2% = "{text}dns=computer1.contoso.com&dns=computer2.contoso.com"
%szOID_ENHANCED_KEY_USAGE% = "{text}%szOID_PKIX_KP_SERVER_AUTH%,%szOID_PKIX_KP_CLIENT_AUTH%"

[RequestAttributes]
CertificateTemplate= WebServer

Notes:

  • leave off the Subject= line if you want the subject to be empty
  • if you don’t need the template to be specified, remove the RequestAttributes section
  • the specification of the enhanced key usage OID is not explicitly required since the EKU is defined in the certificate template. The OID in the INF file above is for explanatory purposes
  • you can click on “OK” for the template not found UI from certreq if the client has no access to templates
  • you can ignore the unreferenced “[Strings]” section dialog when it appears

2. Compiling the INF file into a REQ file

The following command-line command will generate key material and turn the INF file into a certificate request.

certreq –new ssl.inf ssl.req

Once the certificate request was created you can verify the request with the following command:

certutil ssl.req

3. Submitting the REQ file to the CA

If the CA is reachable via RPC over the network, use the following command to submit the certificate request to the CA:

certreq –submit ssl.req

You will get a selection dialog to select the CA from. If the CA is configured to issue certificates based on the template settings, the CA may issue the certificate immediately.

If RPC traffic is not allowed between the computer where the certificate request was created and the CA, transfer the certificate request to the CA and perform the above command locally at the CA.

If the certificate template name was not specified in the certificate request above, you can specify it as part of the submission command:

certreq -attrib "CertificateTemplate:webserver" –submit ssl.req

4. Installing the certificate at the IIS or ISA computer

Once the certificate was issued and is available as a file on the target computer, use the following command to install it.

certreq –accept ssl.cer

The installation actually puts the certificate into the computer’s personal store, links it with the key material created in step #1 and builds the certificate property. The certificate property stores information such as the friendly name which is not part of a certificate.

After performing steps 1 to 4 the certificate will show up in the IIS or ISA management interface and can be bound to a web site or a SSL listener.

Original URL: https://blogs.technet.microsoft.com/pki/2009/07/26/morello-on-pki/
Post name: Morello on PKI
Original author: MS2065 [MSFT]
Posting date: 2009-07-26T14:10:13+00:00


I came across two valuable blog posts from my co-worker Morello. The articles have been posted to the Windows Server Customer engineering blog – check them out!

Original URL: https://blogs.technet.microsoft.com/pki/2009/06/16/what-is-a-strong-key-protection-in-windows/
Post name: What is a strong key protection in Windows?
Original author: Alex Radutskiy [MSFT]
Posting date: 2009-06-16T21:43:20+00:00


Strong key protection is one of the most misunderstood features in Windows security. In this post I will attempt to demystify it. I will also try to address some of the misconceptions about this feature that I’ve come across on the security discussion lists and while assisting our support folks.

It all starts with Crypto… API Framework

Windows has two crypto API frameworks for persisting public/private key pairs. First one called Cryptographic API or CAPI and the second one called Cryptography Next Generation or CNG. Both define a set of flags for their APIs that can set extra levels of protection. Let’s call them Medium and High for the sake of this discussion.

The flags are CRYPT_USER_PROTECTED (Medium) and CRYPT_FORCE_KEY_PROTECTION_HIGH (High) passed to the CryptGenKey function in CAPI. In CNG, the flags are NCRYPT_UI_PROTECT_KEY_FLAG (Medium) and NCRYPT_UI_FORCE_HIGH_PROTECTION_FLAG (High) actually set on the NCRYPT_UI_POLICY structure that is used during a call to the NCryptSetProperty function. The same flags can be used during import of the key with CAPI and CNG.

It all starts with Crypto… Providers

It is important to understand that the API model itself doesn’t define what those flags actually mean or what it means when they are not used. A developer that implements a provider for these APIs makes that decision. For example, a particular provider can require whoever is trying to use a key to solve a Sudoku puzzle where difficulty goes up as the Medium and High protection is used.

Providers are modules that plug-in into the API framework and are actually responsible for key material storage and protection. In CAPI world providers were called Cryptographic Service Providers (CSPs) and in CNG they are called Key Storage Providers (KSPs). A provider could be purely software-based (for example Microsoft Windows in-box providers) or a hybrid of software and hardware (for example Smart Card or Hardware Security Module (HSM) provider).

Microsoft Provider Implementation

From Windows Vista/Windows Server 2008 on, Windows ships with a handful of CAPI and CNG software-based providers while earlier Windows versions are only supporting CAPI. Those providers implement key protection in a very similar way in respect to the strong key protection.

By default all private keys stored by Windows providers are protected by using DPAPI. See this MSDN article Windows Data Protection or this Microsoft Knowledge Base article How to troubleshoot the Data Protection API (DPAPI) on more details about DPAPI. The two higher levels of protection Windows providers use are “consent” and “password”; however, they don’t simply map to the flags we talked about earlier.

First let me describe what these two options mean and then I’ll explain how they map to the flags. A consent option simply prompts a user asking her to allow access to the private key by an application that is running on behalf of that user. This helps to prevent some rogue application quietly using somebody’s key.

The password protection actually asks a user for password that is used as additional entropy passed to the DPAPI. User selects the password when a key is created (by the way password complexity policy on the machine applies to this password) and has to provide it before a key can be used. Not only this setting provides the same protection as the consent setting, it also helps against attacks when a user logon credentials have been compromised.

Now back to the Medium and High… With medium protection a user is presented with a UI choice between consent and password when a key is created. User has to select either one of them before the key is created and will be required to either consent or provide the password, depending on user’s choice at the create step. With high protection a user is presented with UI where the only choice is to create a password for the key.

A picture worth a thousand words so let’s take a look at the UI involved. This is what you see for a CAPI key with Microsoft software providers when CRYPT_USER_PROTECTED flag is passed (this is by the way is part of the DPAPI and is also documented in the MSDN article referenced earlier):

This is the first dialog that user sees. By clicking on the “Set Security Level…” a user can select the desired level from the following dialog.

When an application tries to use the key, the following dialog is presented.

Now let’s take a look at how things change when CRYPT_FORCE_KEY_PROTECTION_HIGH is used.

First noticeable different is that the default level is set to high already. Also, the OK button is disabled because no password has been entered. When a user clicks on the “Set Security Level…” they see the following UI.

This time user gets no option between Medium and High and is taken straight to the password selection page. When an application tries to use a key protected by a password the following UI is presented:

I will not go into the “Remember password” option in this post because it is better to discuss it together with the caching that Microsoft providers support and that is enough for a post on its own.

Now let’s see what CNG UI looks like. When you create a key pair and set its UI policy with the NCRYPT_UI_PROTECT_KEY_FLAG flag, you will see this UI:

Conceptually it is very similar to UI CAPI providers show. It is still allows a user to select between consent and password. One difference I’d like to point out is that default is actually password.

When an application tries to use a key that was created to require consent, they see this dialog.

With the NCRYPT_UI_FORCE_HIGH_PROTECTION_FLAG flag the creation dialog only allows password to be used.

When a key is being used, users will see this dialog (note the text box to enter password):

Security policy for strong key protection

Now that we identified what each flag does with respect to Windows in-box crypto providers, lets break down what affects “System Cryptography: Force strong key protection for user keys stored on the computer” policy has. The policy I’m talking about can be found in Group Policy under Local Policies\Security Options node and it affects different components of windows differently. The policy has these options (I will give them short names to use later in the text):

1. NoImput – User input is not required when new keys are stored and used.

2. Prompt – User is prompted when the key is first used.

3. Password – User must enter a password each time they use a key.

Note none of these simply map to flags discussed above.

Provider Behavior

Windows in-box providers only react to the “Password” setting of this policy by behaving as if High protection was requested when application requests Medium. For example, if an application passed NCRYPT_UI_PROTECT_KEY_FLAG and the policy is configured to “Password”, Windows CNG provider will behave as if NCRYPT_UI_FORCE_HIGH_PROTECTION_FLAG was used instead (same apples to CAPI Windows providers). The “Prompt” setting has no effect.

Certificate Enrollment Behavior

When enrolling for certificates from a Windows Enterprise CA using certificate templates (http://go.microsoft.com/fwlink/?LinkID=92522), administrators can select an option “Prompt the user during enrollment and require user input when the private key is used” on the Request tab. If this option is not selected, the strong key group policy doesn’t affect how keys are created during certificate enrollment. However, if this option is selected, the certificate enrollment wizard (one that can be launched from Certificate Manager snap-in certmgr.msc) will automatically check the “Strong private key protection” option which in turn will result in CRYPT_USER_PROTECTED or NCRYPT_UI_PROTECT_KEY_FLAG flag used during key generation. So if the Group Policy was set to “Password” the user will be presented with a dialog box requiring her to enter the password (remember Provider Behavior), otherwise she will get a choice between consent and password options.

Certificate Import Wizard Behavior

When you import a certificate, the certificate template setting “Prompt the user during enrollment and require user input when the private key is used” is not considered even if that certificate is based on some template. On one of the pages of the wizard, user has an ability to check if strong key protection should be used. If Group Policy was set to “Prompt” option, the wizard will check that option by default. If the Group Policy was set to “Password” option, the wizard will check the option and disable the checkbox control preventing user from unchecking it.

Certutil.exe –importPFX Command Behavior

Until Windows 7 and Windows Server 2008 R2 there was no way to force strong key protection while importing a certificate from a PFX file using Certutil.exe -importPFX command. Now you can supply ‘-protect’ option with the command that in turn will pass CRYPT_USER_PROTECTED or NCRYPT_UI_PROTECT_KEY_FLAG flags to the provider being used to import the key. After that, the Group Policy setting will have the same effect as I described in “Provider Behavior” section above.

More About That Certificate Template Setting

I have briefly mentioned the certificate template setting “Prompt the user during enrollment and require user input when the private key is used”. I want to discuss the level of security of this setting. The fact is that there is none. The CA has no way to enforce that the client did anything in response to this setting on the certificate template. Windows tools that do certificate enrollment such as Certificate Manager snapin, certreq.exe, and our APIs will honor it, but there is no real security protection against some other tool ignoring it. This holds true with all other certificate template settings that have to do with private key properties except the key size which can be verified based on the certificate request and public key that is part of it, but this topic is good for another post. One thing you can take away from this is that if you want high level of security, use hardware key storage (smart card or HSM) and enroll on machine you control with some Enrollment Agent (EA) present during enrollment. Otherwise this setting is just to keep honest people honest.

How can you find out what protection is set on the key

So how can you find out if a key associated with some certificate has strong key protection enabled? One way would be to use certutil.exe -store command that performs a key operation on each certificate it enumerates. If the key has high protection set, the UI will be displayed.

Original URL: https://blogs.technet.microsoft.com/pki/2009/06/11/pki-enhancements-in-windows-7-and-windows-server-2008-r2/
Post name: PKI Enhancements in Windows 7 and Windows Server 2008 R2
Original author: MS2065 [MSFT]
Posting date: 2009-06-11T15:02:10+00:00


The TechNet Magazine released a new article about the PKI Enhancements in Windows 7 and Windows Server 2008 R2 in the May 2009 issue.